The Plastic SCM graphical user interface (GUI) provides easy-to-use, powerful tools covering virtually all of the product's client functionality.
Plastic SCM GUI guide
Chapter 1: Introduction to the Graphical User Interface
Launching the Plastic SCM GUI
- Windows: On the Start menu, go to the Plastic SCM program group and execute the program Plastic SCM.
- Linux: On the main menu of the distribution you are using, select Applications and then Development.
- Mac OS X: Go to the Plastic SCM folder within the Applications folder, and execute the program Plastic SCM client.
You can launch the GUI from a command processor by executing plastic or plastic.exe. This program is located under the Plastic SCM installation directory in the Client subdirectory. (You probably won't need to switch to this directory because the installer typically adds the directory to your program search path.)
How the GUI Window is Organized
The Plastic SCM GUI window is structured around the fact that you can have any number of workspaces, but you work with one workspace at a time. This is called the active workspace - it's like the current working directory in a command processor.

Once you open a workspace (active workspace), all its related information appears just below:

The main portion of the GUI window is a region that displays the active workspace's work context. It can include any number of tabbed windows, called views. When you switch the active workspace, the GUI preserves the current state of the work context. If you switch back to the original workspace - in the same GUI session or in a subsequent one - its work context is restored exactly as you left it. Each time a view is opened using the buttons in the left panel, a new tab is created, or the existing tab is activated if it was previously open.
Getting help
Plastic SCM includes a help system. It's a mix of UX improvements with empty states and a smart help that guides you while you learn how to master Plastic SCM.
It is implemented as a panel in all views that shows up to help you discover new features or respond to things that might be causing frustration.
It is better explained with some examples:
-
Suppose you frantically click the "refresh" button of the Changesets view. Chances are you're
not finding what you're looking for. And,
suppose you have a filter in the view preventing you to see what you are looking for.
The GUIs will detect this and show a panel telling you that you have a filter set, and that's
probably why you can't find what you're looking for:

-
If you've never colored your Branch Explorer based on the authors of the changesets, the help
system will help you set it up:

This help system comes with a good amount of art in the form of a mascot — our wise Owl. This smart and methodic librarian that aligns well with the Plastic philosophy: preserve history to learn from it.
This help system is a starting point to improve onboarding usability and help users become experts on version control in an active way.
You can also click the Information button in each view (which looks
like this ![]() on Windows,
like this
on Windows,
like this ![]() on Linux,
and like this
on Linux,
and like this ![]() on macOS)
to show or hide the help panel as you want.
on macOS)
to show or hide the help panel as you want.
How to manage objects in the Plastic GUI views
Many of the GUI's views are tables or include a table and other elements.
Each table row represents one SCM object, like an item, a revision, a branch...
The table columns contain values of the objects' fields, like Name, Status, Creation Date.
You can manipulate these tables by using some common operations:
- Selecting objects/rows
- Adjusting the width of the columns
- Sorting
- Exporting the contents to a text file
- Filtering the objects in the view
- Running queries
Selecting Objects/Rows
The GUI recognizes the "standard" single-selection and multiple-selection gestures supported by many graphical interfaces.
- Mouse gestures
-
- Left-Click
- Select a single row, which represents a single SCM object.
- Ctrl + Left-Click
- Toggle the membership of the clicked row in the set of selected rows.
- Shift + Left-Click
- Select the block of consecutive rows that extends from the row you clicked most recently (the "anchor" row) to the row you are clicking now (the "free" row). If there is already a block of consecutive rows selected this way, extend (or invert) the selection by keeping the same "anchor" row but changing the "free" row. If the current selection set consists of a non-consecutive set of rows, that selection set is discarded.
- Keyboard gestures
-
- Up-Arrow and Down-Arrow
- Discard the current selection set, if any, and move the selection highlight upward or downward.
- Shift + Up-Arrow and Shift + Down-Arrow
- Similar to Shift + Left-Click: Modify the current block by moving the "free" row upward or downward.
Adjusting the width of the columns
You can drag the right-hand separator line of any column to adjust the column width - all the way down to nothing, if you want!
Double-clicking a right-hand separator line resizes the column to the width of the largest element.

Sorting
Clicking a column header sorts the rows on that column. Clicking it again reverses the sort order. There are exceptions in certain tables. For example, in the Workspace Explorer, sorting on the Item column doesn't disturb the directory hierarchy. It instead sorts the entries in each directory separately.
Exporting the table contents to a text file
The Export view data button, existing in some views, opens a new window that configures how to export the content of the current table view to a text file in CSV (Comma Separated Values) or XML format, as seen on the following figure:

Filtering the objects in the view
Some views contain a Filter field. As you type characters in this field, the table is instantly "filtered down" to the rows that contain the filter character string in any column.

You can also filter by a particular column of the view. To do this, use the pattern column_name:value in the Filter field. Following the example above, you can filter the column GUID to find those changesets whose GUIDs contain the value 50:

To restore the original set of rows, just empty the Filter field.
Running queries
Some of the Platic views feature an Advanced mode in which you can view the query that produce the table. You can customize the query to produce more finely tuned results.

The query input field is also a drop-down box, providing access to standard queries and ones that you've previously used. In addition to Execute, these commands are available:
- Reset query
- Return to using the standard Plastic SCM query for this view.
- Clear history
- Empty all queries from the drop-down box, except for the current one.
- Set as default query
- Make the current query the one that gets executed whenever this kind of view is opened.
Executing Commands
In any table, you can right-click on a selection of one or more objects (that is, rows) to bring up a context menu of commands that operate on the selection.

On many context menus, there is a default command that appears in boldface type. You can invoke an object's default command by double-clicking the object with the left mouse button. (The context menu does not appear at all in this case.) If a context-menu command has a keyboard equivalent ("accelerator"), it is listed in the menu.
Many views also have one or more command buttons in their toolbars. The commands may or may not process the selected object(s).

Chapter 2: The Workspace Explorer
The Workspace Explorer is Plastic SCM's version of the Windows Explorer or a Linux file manager.
The Workspace Explorer shows both items (files and directories under source control) and private objects (not under source control).
Toolbar Commands
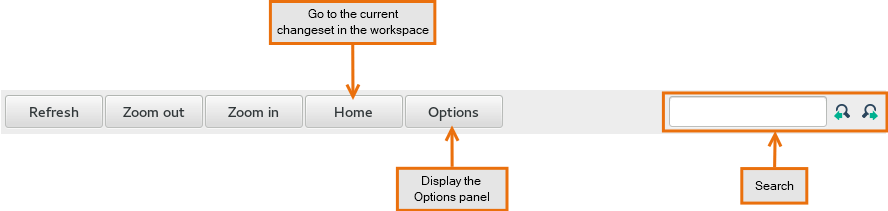
The toolbar includes the following buttons and controls:- Refresh
- Refresh the view's content to show any changes that may have been made.
- Update workspace
- Load and update the workspace contents.
- Search
-
The search function includes the option Include private files:
- If this option is unmarked, the search function locates files in the workspace tree without searching on disk, making it quick to return data. It does NOT find private or ignored items.
- If the option is marked, the function searches on disk, finding private files as well as controlled.

The search function allows for standard matching. The system will return files or directories' names that match the search string and will also allow you to search by extension. For example, you could type in *.cs, and the system will return all files with that extension. The third type of search you can perform is the exact search, where you use quotation marks to surround your search string. For example, "BaseCommands". This will return all directories or files whose name is exactly "basecommands".

You can also call up the search function by pressing Ctrl + F.
- Tree view - List view
-
The Workspace Explorer displays the contents of the active workspace as a table, either one directory at a time (list view), or all at once (tree view) using tree control.
-
When the Workspace Explorer is in tree mode:

- Expand a directory by double-clicking it or by clicking its
 control.
 - Collapse a directory by double-clicking it or by clicking its
 control.
When you exit the Plastic SCM GUI or the Workspace Explorer, any nodes you have expanded are remembered and saved for the next time you call up the view. Focused items are also saved and restored. It's that simple.
- Expand a directory by double-clicking it or by clicking its
-
When the Workspace Explorer is in list mode:

- Drill down into a directory by double-clicking it.
- Pop up to the parent directory by clicking the
 toolbar button.
-
When the Workspace Explorer is in tree mode:
- Jump to directory
-
This field appears in flat mode only. Enter a pathname within the repository's directory hierarchy to jump directly to that directory. (Use the forward-slash (/) character to indicate the repository's root directory and a directory separator.)

- Preview
- Show a preview for the selected item. See the Preview Window section for further information.
- Recent
-
Show a list of the last twenty items that were used, separated into sections of five for easier visualization. Both of these numbers are arbitrary, and can easily be customized by the user.
By using the Recent items button, you'll gain speed when working. You won't have to search through file folders to find what you're looking for. Instead, your most recently used items will be right there in a quick list for you to choose from. Two clicks, and you're gold.
You'll also note that each workspace is independent. For each workspace, you'll have a unique list of recent items.
Columns in the Workspace Explorer
Most columns in the table display SCM-level metadata: revision identifier, changeset membership, status (checked-in/checked-out), and more. There are also a couple of columns that display standard operating system metadata: Size and Date.
- Item
- The leaf name of the object, along with an icon that shows the object's type and its current status. See section Icons and Icon Decorations. Exception: the full pathname is listed for the root directory of the workspace.
- Status
- One or more indicators of the object's SCM status. The first indicator for an item is always Controlled; the first indicator for a private object is always Private. Additional indicators can be:

- For private objects:
- Ignored indicates that the object is specified in the workspace-local or user-global ignore file. Attempts to execute the Add to source control command on the object will be ignored.
- For items:
- Checked-out indicates that the file has been processed by the Checkout command. The object loses its Checked-out status when you execute a Checkin or Undo checkout command on it.
- Changed (files only) indicates that the item has been modified without first being checked-out. (The user preference Compare files contents instead timestamps controls how Plastic SCM determines that a file has been modified.).
- Not on disk indicates that the object has been deleted from the file system by a program other than Plastic SCM. You can use the Update command to restore such a file to the workspace.
- Cloaked indicates that the item is specified in the workspace-local or user-global cloak file. An Update command bypasses the item (unless you explicitly selected it when issuing the update).
- Size
- (files only) The size of the file as it currently exists in the workspace.
- Type
-
(items only) Either Directory, Text, Binary, xlink or
wxlink.
You can change a file item's type between Text and Binary by using the Change revision type command both in the Workspace Explorer or in the Pending changes views.
Plastic SCM uses different algorithms to compare and merge Text and Binary files. See section How Differences are Displayed. - Branch
- The branch of the revision loaded into the workspace.
- Changeset
- The changeset that contains the revision loaded into the workspace.
- Created by
- The user who created the revision loaded into the workspace.
- Date
- A timestamp, indicating either:
- When the revision was created in the repository, or
- When the object was most recently changed in the workspace, either by the Update command or by your modifying it.
- Repository
- The repository in which the item and its revisions are stored. (You can configure a workspace to combine items from multiple repositories.)
Preview Window
The column at the far right (which can optionally be showed/closed) shows a preview for the selected item, along with important identifying information.
The top half of the window shows the image thumbnail. As with Windows thumbnails, this is a small representation of the original image. It's stored under your workspace path .plastic\preview to be reused on future preview requests. This won't cause any storage headaches, since the thumbnails only take up about 3~5KB.
Each revision will have its own thumbnail file. The thumbnails are generated when you click on a new revision file and you have the preview panel opened. If you click again on the same revision file, Plastic SCM will use the previously generated file.
You can configure the maximum file size to generate the preview of a file when that file is not loaded in the workspace (Browse repository on this label, Browse repository on this branch and Browse repository on this changeset modes). To do so, add the following key to your client.conf file:
<MaxPreviewFileSize>1048576</MaxPreviewFileSize>
The default value is 1 MiB (1048576 bytes). It means that, if the selected, non-loaded file size is more than 1 MiB, it won't be downloaded to generate its preview (but you will still be able to see its icon, if any, its size, and its attributes.)

Previews for basic image formats (.jpg, .ico, .png, .bmp, .gif) are available in all operating systems. And there are additional file format support, for example:
- Windows7/Windows vista: show OS thumbnail image, supports .txt and PDF, and video formats (as .avi, .mov, .mpg ... and others).
- WindowsXP, Linux, Mac: show custom icons.
You can easily configure an external tool to get previews of other binary files and generate diffs for more complex gaming files.
To do this, go to the section called Preview tools in your Plastic SCM Preferences window. Click Add. The proposed template is "ImageMagick"; you can select it as the default preview provider. Bonus of using this one? IT'S FREE! ImageMagick supports key gaming image formats like TGA, TIFF, PSD, and RAW. You can view a full list at the Image Magick website.

We use ImageMagick through the "convert.exe" and "identify.exe" programs. Make sure that you write the full path to both ImageMagick binaries since there's another "convert.exe" on "c:\Windows\System32" and this Windows binary is first on your path environment value! You will find programs inside the ImageMagick installation directory.
The first program (convert) is used to generate the thumbnail image for the preview functionality, and also for the full size image used by the differences tool. The second program (identify) is used to get the file properties inside your binaries files. This second one is optional. Click the OK button and you will have the new template configured.
Icons and Icon Decorations
The Items column displays an icon for each file system object, indicating its type. These icons are the same found in the operating system. Examples include:
 |
text file (including program source code) |
 |
executable program |
 |
binary file (including Java class files and C object modules) |
   |
image file (BMP, JPG, PNG shown here) |
 |
directory (folder) |
Unless it's a private object, an object's icon has an icon decoration that indicates its current Plastic SCM status. The following table shows some of the ways a text-file icon can be decorated:
 |
Ignored (private objects only) |  |
Controlled |  |
Checked out |
 |
Changed |  |
Cloaked |  |
Not on disk |
This table is not exhaustive because more than one decoration can appear on the same icon - for example, as with the cloaked file in the table.
Commands for Source-Controlled Items

- Add directory tree to source control
-
(only for directories) For each selected directory, search for all private objects within the directory tree and convert each one into a source-controlled item. An initial revision is created in the repository for each new item - typically, it's revision 0 on the /main branch.
Each selected directory is also converted to an item, if it isn't already under source control. At one or more levels up the directory hierarchy, parent directories are either placed under source control or have new revisions created.
This command does not process private objects that are specified in a workspace-local or user-global ignore file.
- Open
-
- Open
- (only for files) Launch the program that the operating system associates with this object.
- Open with...
- (only for files) Launch a program that you specify interactively.
- Open in Windows Explorer
- (Windows only) Open a Windows Explorer window on the selected directory, or on the parent directory of the selected file.
- [Custom "Open with"]
- Open the application that you customized from the Open with preference.
- [External tools actions]
- It is possible to define external applications to run actions on the selected items. Learn how to configure the External tools menu.
- Diff
-
- Diff with previous revision
- Open a Diff view (Side-by-side Diff tool, Image Diff tool, Directory diff tool), showing the changes you've made to the selected file or directory in your workspace. For an item that you have not modified or checked-out, compares the workspace's revision with its immediate predecessor in the revision tree.
- Diff revisions
- Display a dialog in which you choose two revisions of the selected item, then open a Diff view (Side-by-side Diff tool, Image Diff tool, Directory diff tool) to compare those revisions. By default, one of revisions is the item as it exists in your workspace.

- Diff selected items
- Diff two selected files or directories. This diff only opens for controlled files or directories, and doesn't apply to directories inside xlinks pointing to different repositories.
- Repository
-
Open the Branch Explorer, Branches, Changesets or Labels views for the repository of the selected item. These are the same options available in the Repository browser view context menu of a repository.
This is useful when there are xlinked repositories, since the buttons on the left panel open those views for the main repository (the one where the root directory is in).
- Create Xlink
-
Create a new Xlink inside the selected directory.
A Xlink is a directory that links to a changeset on a different repository. It's the way to load several repositories on a workspace. Learn more about Xlinks .
A dialog box pops up and lets the user configure the Xlink. In this dialog, it's also possible to set the Writable and Relative Server options for the Xlink. And the expansion rules for the writable Xlink.
- Edit Xlink
- Edit an existing Xlink inside the selected directory.
- Checkout
-
Item are checked out to signal Plastic SCM that they are being edited. No change occurs to the contents of the item in your workspace. The checked-out revision's properties include:
- The revision you checked it out from.
- The branch on which a subsequent Checkin will create a permanent new revision. The item's status changes to Checked-out. You can see the checked-out items in the Pending changes view.
- Lock and Checkout
-
If you select a single controlled file, this option forces the lock and checkout of the file. This option ensures
that an appropriate lock rule for the selected item exists in the server. And if it doesn't, you'll be prompted
to confirm that you want to add a new one:

- Checkin
-
Create a new changeset containing the changes of each selected checked-out or changed item. You are not required to Checkout an item before modifying it in order to check it in. Items that have been modified without having been checked-out have Changed status and can be checked in the same as checked-out items.
The set of item revisions created by an invocation of the Checkin command are grouped into a new changeset. Typically, a Pending Changes view dialog box appears, in which you can specify a comment string to be associated with the changeset and all its individual revisions.
This option is provided here for convenience. However, the preferred way to check in items to the repository is to use the Pending changes view, instead of right clicking on each of them in the Workspace Explorer and creating separate changesets every time you checkin. That view is explicitly designed to check in changes to the repository and is better suited for the job, displaying all the pending changes and letting the user review them with ease before checking in.
If an item has been checked out but has no changes, its state is set back to Controlled (not checked-out), but no new revision for that item is created in the repository.
If a user checked in some items in the repository after you started your changes, a dialog will appear asking whether you want to merge the new changes before checking in, or to create branch and checkin your changes there, thus letting you continue working and merge later.

- Undo checkout
-
(checked-out items only) For each selected item, discard the checked-out revision in the workspace and download the content it had before the changes from the repository. Since this operation can overwrite changes that are not preserved anywhere else, a confirmation box appears.
To undo your changes to an item with Changed status go to the Pending changes view where you can use the Undo changes button.
- Add to cloaked list / Remove from cloaked list
-
Through a submenu, these options offer to modify a cloaked list, by adding or removing an entry for each selected item.
Cloaked items are items that the update operation won't download by default from the repository to the workspace. This is convenient in some scenarios, for instance when there are big files in the repository that are updated often, but you don't really work with them, so you prefer to skip downloading those cloaked files every time you switch the workspace to a different branch or do an update of the workspace.
Cloaked items are defined as entries in file named
cloaked.conf. The submenu adds or removes those entries to thecloaked.conffile based on the item that right clicked on.The entry can be:
- The item's leaf name (inside any directory).
- The item's suffix (inside any directory).
- The item's pathname relative to the workspace's root directory.
By default, this command modifies the workspace-specific configuration
cloaked.conffile located in the active workspace's root directory. This file affects the active workspace only.If you check Apply rules to all workspaces in the confirmation dialog that appears, this command modifies the
cloaked.conffile in theplasticsubdirectory within your operating system home directory instead. This one affects all your workspaces.Thecloaked.conffile can be located:- In the root directory of the workspace.
- In the plastic-global-config repository. It is possible to create a global cloaked configuration for each configured repository.
Read in the Platic book the details of how to setupcloaked.conf. - Add to hidden changes list / Remove from hidden changes list
-
Through a submenu, these options offer to modify the hidden changes list, by adding or removing an entry for each selected item.
Items in this list are controlled items that can be changed but the user doesn't want them to appear by default on the Pending changes view (this is customized in a setting). It can be the case for libraries that are under source control but overwritten every time they are compiled and the user doesn't usually want to check them in.
The entry can be:
- The item's leaf name (inside any directory).
- The item's suffix (inside any directory).
- The item's pathname relative to the workspace's root directory.
By default, this command modifies the workspace-specific configuration
hidden_changes.conffile located in the active workspace's root directory. This file affects the active workspace only.If you check Apply rules to all workspaces in the confirmation dialog that appears, this command modifies the
hidden_changes.conffile in theplasticsubdirectory within your operating system home directory instead. This one affects all your workspaces.Thehidden_changes.conffile can be located:- In the
plastic4directory (under$HOME/.plastic4on Linux/Mac systems orC:\Users\user\AppData\Local\plastic4on Windows). - In the root directory of the workspace.
- In the plastic-global-config repository. It is possible to create a global hidden changes configuration for each configured repository.
Read in the Platic book the details of how to setuphidden_changes.conf. - Rename
-
Change the leaf name of the selected object, without changing its directory location. This is change to the parent directory, not to the renamed item itself. Accordingly, when you rename an item, a Checkout command is automatically performed on the parent directory (if necessary). However, if you go to The Pending changes view, the renamed item will appear in the Moved section.
No checkout occurs when you rename a private object.
Performing an Undo checkout command on the parent directory from the Workspace Explorer has the effect of undoing Renames and Moves within it. In The Pending changes view you can just mark the moved item and then click on the Undo changes button.
- Cut
- Cut a controlled item in order to move it. It is also possible to use the Ctrl + X keyboard shortcut to obtain the same outcome.
- Paste
- Paste a controlled item that has been cut in order to move it. It is also possible to use the Ctrl + V keyboard shortcut to obtain the same outcome.
- Delete
-
Delete the selected objects, which can be private objects and/or source-controlled items.
For a private object: delete the selected objects from the disk.
For an item: perform a Checkout of the parent directory, if necessary, and remove the item's name from the directory. In the confirmation popup dialog, you also have the option to remove the file or directory from your workspace -- that is, delete it from disk storage.
In the Pending changes view you will see the item itself listed as deleted, rather than its parent directory.
The item is not removed from the repository. Rather, its name no longer appears in the checked-out revision of its parent directory. The deletion is "solidified" on your workspace's branch when you Checkin the parent directory (if using the Workspace Explorer) or select the deleted item in the Pending changes view and click Check in.
At that point, you can still access the item in the previous changesets where it existed. You can propagate the deletion of an item to other branches, just like other changes you make, using the various forms of the Merge command.
You cannot Delete a directory if there is a checked-out item anywhere in its subtree.
To undo a Delete of an item, just perform an Undo checkout command on the parent directory.
- Change revision type... Binary / Text
- Change the revision type of each selected item, to binary or text. The type of an item controls how it is handled by the Diff and Merge tools.
- New... File / Directory
- (only for directories) Create a new, empty file or subdirectory in the selected directory. The new object has Private status.
- Annotate
- Open an Annotate view for the selected item.
- View history
- Open a History view for the selected item, showing its revisions in a table as described in The History View.
- View history as 2D revision tree
- Open a Branch Explorer for the selected item showing the revisions and their types as described in the 2D revision tree view.
- Path permissions
- Open a Permissions window for the selected object.
Commands for Private Objects
- Add to source control / Add directory tree to source control
- Convert each selected file, and the entire subtree of each selected directory, into source-controlled items. An initial revision is created in the repository for each new item - typically, it's revision 0 on the /main branch.
At one or more levels up the directory hierarchy, parent directories are either placed under source control or have new revisions created.
- Open
-
- Open
- (only for files) Launch the program that the operating system associates with this object.
- Open with...
- (only for files) Launch a program that you specify interactively.
- Open in Windows Explorer
- (Windows only) Open a Windows Explorer window on the selected directory, or on the parent directory of the selected file.
- [Custom "Open with"]
- Open the application that you customized from the Open with preference.
- [External tools actions]
- It is possible to define external applications to run actions on the selected items. Learn how to configure the External tools menu.
- Add to ignored list / Remove from ignored list
-
Through a submenu, offers to modify an ignored list, by adding or removing an entry for each selected item. The entry can be:
- The item's leaf name (inside any directory).
- The item's suffix (inside any directory).
- The item's pathname relative to the workspace's root directory.
By default, this command modifies the workspace-specific configuration
ignore.conffile located in the workspace's root directory. This file affects this particular workspace only.If you check Apply rules to all workspaces in the confirmation dialog, this command modifies the
ignore.conffile in theplasticsubdirectory within your operating system home directory instead. This file affects all your workspaces.It is possible to create a global ignored configuration for each configured repository.Read in the Platic book the details of how to setupignore.conf. - Rename
- Change the name of the selected file or directory. Since the object is Private, this has no effect on the repository.
- Delete
- Remove the selected file, or the selected directory and its subtree, from disk storage. Since the object(s) are Private, this has no effect on the repository.
- New... File / Directory
- (only for directories) Create a new, empty file or subdirectory in the selected directory. The new object has Private status.
Chapter 3: 2D Revision Tree View
The 2D Revision tree view is helpful when you want to view a particular file's history. Let's say you and your co-workers have made tons of changes to a certain file and you'd like to get a better overall picture of what's happened to the file. The 2D Revision tree view allows you to see, at a glance, every change that file has been through.
The 2D Revision tree shows two global types of changesets:
- A changeset with changes in the selected file.
- A changeset without changes in the selected file.
If a changeset has changes, the 2D Revision Tree view shows you below the diagram the differences between the selected changeset and the previous one with changes too:

How to Launch
To launch the 2D Revision tree view, go to the Workspace Explorer and select the file for which you'd like to see the revision tree. Right-click and select View history as 2D revision tree.

Display Options
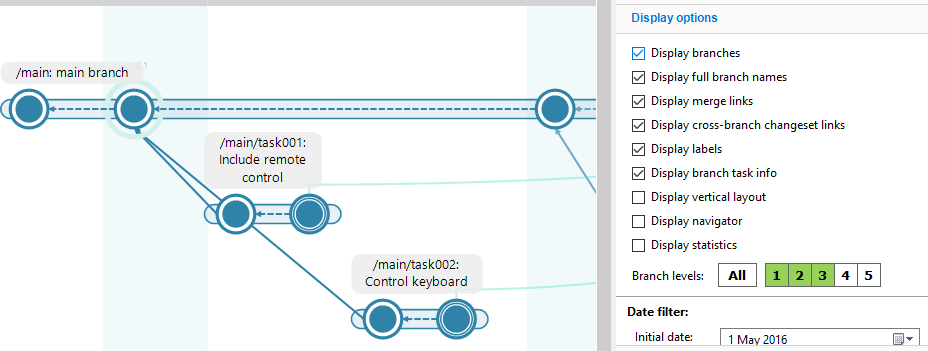
The Display options tab, which appears in the right panel by clicking the Options button, controls the appearance of the 2D Revision tree.
In the 2D Revision tree view, you have several display options to customize the display to best suit your needs. These options are the same as those in the The Display Options Tab in the Branch Explorer view.
Just a remark related to the following option: The Only relevant option toggles the display of changesets that don't have merge or branch base links on them. You can choose to view the pure file history (only relevant changesets) or the full changeset history with the history changesets highlighted. The following picture shows only the relevant changesets. When changesets are hidden by this mode, the changeset parent link becomes dashed:

The Changeset History Context Menu
If you right-click a changeset in the revision tree, you can run some actions on the selected changeset. Those operations are the same as the ones described in the Changesets chapter plus the following actions:
- Go to parent changeset
- Shows the parent changeset of the selected changeset.
- Show related branches in a new diagram
- Open a new filtered Branch Explorer view that only contains the branches connected to the selected changeset through parent links or merge links.
Chapter 4: The Pending changes View
The Pending changes view shows what changes you have made to the files and directories in the active workspace and lets you review and check them in efficiently.
This view is essentially a "diff" between the workspace and the repository. This view makes it easy to follow through on the changes, either by creating new revisions (Checkin) or by discarding your work (Undo checkout). You can also use this view to convert private objects into source-controlled items.
This view is the central hub where all the changes happening in the workspace are listed together and is the recommended tool to check in changes to the repository. It lists items that have been changed explicitly in Plastic SCM (for instance, an item has been renamed in the Plastic SCM GUI client) and items that have been changed outside (for instance, an items that has been renamed in the Windows Explorer). The later changes are normally considered "local", since they have not been "applied" yet and Plastic SCM has to detect them.
The Main Screen

The Changes Section
You can see in the figure above that in the lower half of the screen, your changes are grouped in four categories:
- Changed files: this is the list of files that have been modified. It includes checkouts and changed files. By default these files will be selected, proposed to be checkedin.
- During the checkin of the changed files they will be checkedout first. That's why if something fails during the checkin (a trigger, a new concurrent change, etc) the files will be checkedout.
- Undoing the changes for these items means that the checkouts and changed files will be removed and the previous versions of the files restored.
- Added and private: this is the list of files that have been added explicitly to the repository but have not been checked in yet and any private files that have not been added to ignored list.
- By default, the items in this category are not selected. Any item that you select in this group will be added to the repository.
- Out of the box, the GUI checks the items in when they are added (in the Workspace Explorer), but this behavior can be changed in the Other options tab in the Preferences window by unmarking the option Checkin files and directories when adding them to source control.
- Undoing the changes on private items has no effect.
- Undoing the changes on added items makes them private again.
- Deleted items: this is the list of deleted items, either explicitly deleted in Plastic SCM (using the delete command on the Workspace Explorer) or deleted in the workspace (moved locally).
- When checking in the items in this category, they are removed from the current branch. They are still available in the older changesets.
- Undoing the changes in this category means that the items are downloaded back from the repository.
- Moved items: this is the list of items that have been moved or renamed on the workspace.
Client changelists
The user can group the changes (checkouts) in the Pending changes view on different groups called Changelists. Using changelists is just a way to help the users dealing with their own changes on their workspace.
You can enable the client changelists selecting the option Show changes grouped by changelists in the Pending changes view Options, described in the Changing the Set of Displayed Revisions section.
The figure above now looks like this one with the changelists option enabled:

The Default changelist groups the changes that are not into any other group.
It's possible to create new changelist by selecting the items you want to move to a new group:

User defined changelists can be of two types:
- persistent, meaning they will stay even if they do not content any more;
- and non-persistent which means they are automatically removed as soon as they get empty.
You can move any item to any changelist at any time:

The Comments Section
Also in the Pending changes view, you'll notice that there is a comments section. Here you enter a description that will help identify the changes in the future, both to you and other developers. Think how this comment can help you to figure out what the change was about when you need to review it next year.
Click on the Checkin comments button to drop down the list of recent comments that you used on previous checkins.
You can configure the maximum number of comments to store in the Comments tab in the Preferences window.
You can also enabled/disabled the spell checking and the language used by launching the context menu as you can see in the following picture:

Changing the Set of Displayed Revisions
The Options dialog in the Pending changes view lets you configure the following:
- What to find—How to find changes in the workspace. You can finely tune how Plastic finds changes on disk and what to skip.
- What to show—The types of changes to display. From auto-refresh to deciding if you want to see private files, ignored and more.
- Move detection—How Plastic finds moved files and directories in your workspace. Plastic can detect files and directories that you moved or renamed on disk.
Click the Options button to configure the settings above:
Use the Previous (<) and Next (>) arrows to see the Options dialog in Windows, Linux and macOS.
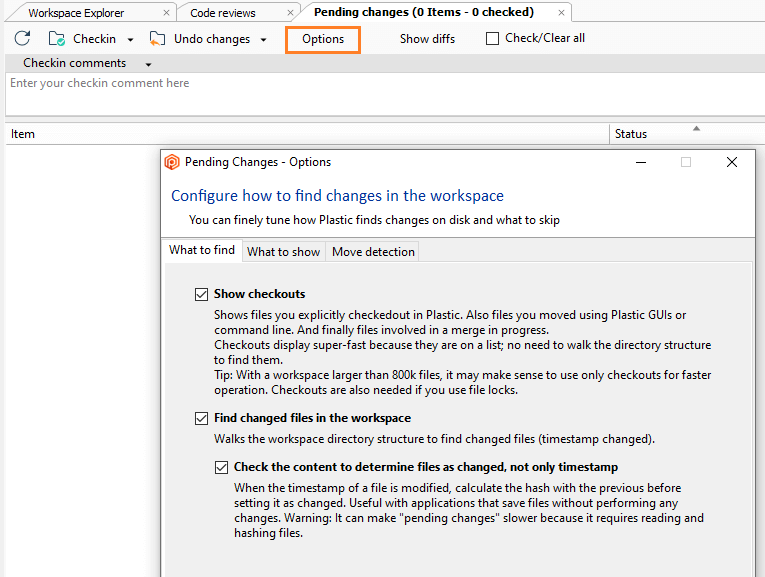
Plastic SCM GUI - Windows - Pending changes options
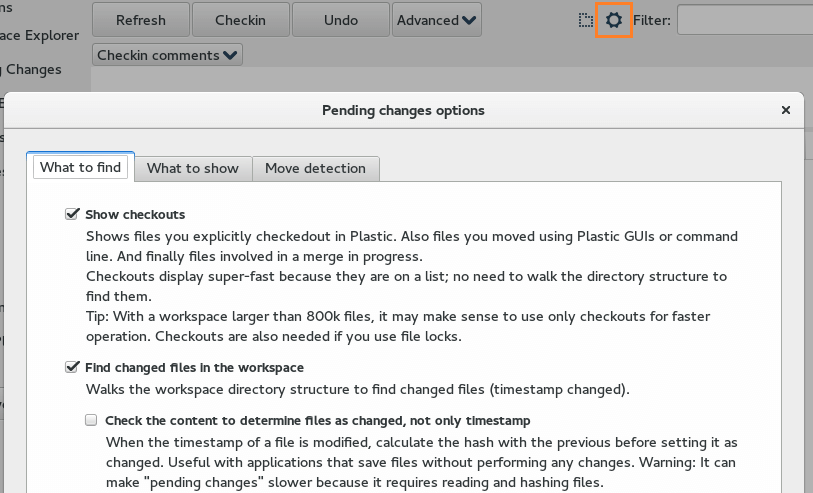
Plastic SCM GUI - Linux - Pending changes options
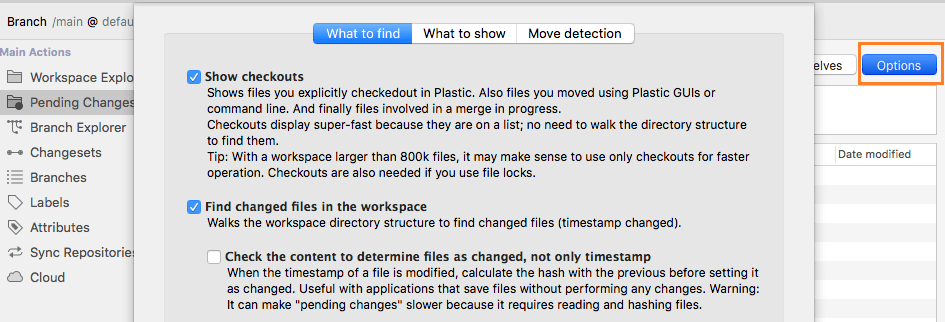
Plastic SCM GUI - macOS - Pending changes options
What to find
- Show checkouts
-
Shows the files that were modified. Plastic detects changed files just by comparing
timestamps. If the file timestamp is newer than the one it had when Plastic wrote it to
disk, then it is modified. It is a super quick check that works most of the times.
Plastic can also check the content of the file to see if it is changed, not only the timestamp. Some applications save files and change the timestamp even if the content didn't change. This check calculates the new hash of the file contents to see if it was really changed.
What to show
- Auto-refresh
- If this option is marked, then Plastic automatically refreshes the Pending changes when needed.
- Group changes in "change lists"
-
Shows all the changes grouped by user created lists.
Read how to manage the changelists. - Show private files
-
Shows the files that are not under source control. For example, recently added files or even tool-generated files.
You can also enable always select private files so they are always checked in Pending changes. This is good to avoid forgetting to add new files. But you need to configure a goodignore.confto avoid adding temporary files to version control. - Show ignored files
-
Shows the files that you previously ignored by adding them to the
ignore.conf.
Read how to ignore files. - Show hidden files
-
Shows the files that you previously hid by adding them to the
hidden_changes.conf.
Read how to hide files. - Show deleted files and directories
- Shows the files that you manually deleted in the workspace outside of Plastic control. (Not using the GUI or a command, but simply deleting them from disk.)
Move detection
- These options let you tune move detection. This is one of the key features in Plastic. Plastic can easily detect when you moved a file, renamed a directory, etc. But at the end of the day, it uses a heuristic and it can make mistakes. While it achieves very good results by default, these settings let you customize the heuristic to your needs.
- Find moved and renamed files and directories
-
Walks the workspace finding possible moves. If you rename foo.c to bar.c, Plastic will
find bar.c as added, foo.c as deleted, and then it will try to match them. It can be
slow if you have lots of private files because it will spend a long time trying to match deletes and added to
find moves. Normally, you'll have this setting enabled. But if you are sure that you don't have any moves and you
need to speed up your Pending changes, then it is a good reason to uncheck it.
You can also fine tune how "find moves" works:- Match binary files only when they have the same extension
- Doesn't try to match a .png with a .jpg, which makes a lot of sense. The caveat is that it won't find a .doc to .docx rename. Binary file move detection is tricky because it is not based on how similar the file contents are, but on how similar the names and sizes are. Plastic doesn't calculate diffs on binaries because it could be super slow.
- Match text files only when they have the same extension
- Doesn't try to match a .cs with a .c. It can be useful in some circumstances. Plastic diffs the text files to figure out how similar they are. Plastic does it only for text files, not binaries. This setting simply helps you tuning the algorithm, so that the matches are not tried between every possible pair of files but only the ones with the same extension. You'll only use this setting if the Pending changes view is not showing what you expect.
- Similarity percentage
-
Defines "how similar" two files need to be to detect them as moved or renamed. If you move foo.c
to bar.c and modify it later, the percentage defines how similar the files need to be so that
Plastic considers them the same file. If you changed a file a lot and you renamed it, and the file shows
as added/deleted, chances are you need to tweak this setting so that Pending changes detect it as moved.
The similarity percentage applies to directories too. It defines how similar the directory structure needs to be—how many moved children relative to the total of directory entries.
Finally, it also applies to binaries. The percentage means the allowed difference in size.
Columns in the Pending changes View
This view contains a subset of the Workspace Explorer columns: Item, Type, Branch and Repository. It also includes an Extension column, which lists the suffix (if any) of the item's leaf name.
The Status column has different values from those seen in the Workspace Explorer. Here is a detailed description of the possible values in the Pending changes view:
- Changed files:
- Checked-out: when a controlled item has been changed in the workspace (edited) and Plastic SCM has been told about it (i.e. the item has been checked out in the Workspace Explorer or any of the third party integrations).
- Changed: the controlled item has been changed in the workspace, but Plastic SCM has not been told about it.
- Added and private:
- Added: the item has been added explicitly to Plastic SCM, but is checked in yet.
- Note that out the box, the Plastic SCM GUI will automatically check in items when they are added using from the Workspace Explorer, so they don't appear here.
- Items appear here if they have been added with a cm add command in the command line interface or if adding them through the Workspace Explorer when the preference Checkin files and directories when adding them to source control has been deselected in the Preferences - Other options window.
- Private: the item is not added to the source control and not fitting any of the ignored patterns (unless the Show ignored items option has been set in the Pending changes view Options as described in the Changing the Set of Displayed Revisions section).
- Deleted items:
- Removed: the controlled item has been deleted from the workspace using the delete command in the Workspace Explorer (or any of the third party integrations).
- Removed locally: the controlled item has been deleted in the workspace outside Plastic SCM (for instance, in the Windows Explorer).
- Moved items:
- Moved: the controlled item has been moved or renamed in the workspace using the Move or Rename commands in the Workspace Explorer (or any of the third party integrations).
- Moved locally: a controlled item has been moved or renamed outside Plastic SCM. The Pending changes view checks the items that are no longer available and tries to match them with the private items to determine if it's the same item. A similarity algorithm is used for matching, so that items that have been moved and changed are still detected as the same item.
- The similarity value is displayed on the Similarity column. Only locally moved items have a value in this column.
Commands in the Pending changes View
Toolbar Commands
The toolbar in this view contains command buttons that act on the set of items with checks in the Item-column checkboxes (independent of the standard row-selection mechanisms):

- Refresh
- Refresh the content of the view filtering according to the options as described in the Changing the Set of Displayed Revisions section.
- Checkin
-
Perform a Checkin command on all checked items, including changed, added, moved, and deleted. Behavior has been described at the beginning of this chapter.
This button has expanded options letting the user use a check-in variant:

- Checkin changes to a different branch
-
If you choose this option, a new window appears to select the branch where the changeset will go, as shown in the next figure.

When Create a new branch is selected, several things happen:
- The new branch is created.
- The workspace is switched to the new branch.
- The check-in changeset is created in the new branch.
When Select an existing branch is selected, keep in mind that it has to be an empty branch and its base (starting changeset) will be changed to be the current changeset of the workspace.
- Shelve pending changes
- If you choose this option, a new window appears to start the process of shelving the selected pending changes. Here you can learn how to do that.
- Undo changes
-
This button undoes the changes of the selected items. A dialog is displayed asking for confirmation since undone changes cannot be recovered.
This button has an additional option as shown in the figure below: Undo unchanged. This option will remove from the list any checked out items or items detected as changed when they have no real changes in their content.

- Options
- Open the pending changes view filter Options as described in the Changing the Set of Displayed Revisions section.
- Show / Hide diffs
- Display (or hide) the differences panel (an integrated Diff Window) at the bottom. The differences panel shows the differences of content of the selected item with its previous version.
- Clear / Check all
- Select or deselect all the items in the Pending changes view.
- Filter
- You can use this field to reduce the Pending changes table to a subset of its rows. You can filter on one or all the columns in the view..
Context Menu Commands
The commands available right-clicking on an item in the Pending changes view vary slightly depending on the category of the item (changed, checked-out, added...).
- Open
-
- Open
- (only for files) Launch the program that the operating system associates with this object.
- Open with...
- (only for files) Launch a program that you specify interactively.
- Open in Windows Explorer
- (Windows only) Open a Windows Explorer window on the selected directory, or on the parent directory of the selected file.
- [Custom "Open with"]
- Open the application that you customized from the Open with preference.
- [External tools actions]
- It is possible to define external applications to run actions on the selected items. Learn how to configure the External tools menu.
- Diff workspace contents
- Show the differences between the current workspace contents with the previously loaded contents on the workspace with the configured diff tool.
- Diff revisions...
- Show differences between revisions stored in the repository, or differences between workspace contents and a revision in the repository.
- Undo changes
- Undo the changes of the selected items. A dialog is displayed asking for confirmation, since undone changes cannot be recovered.
- Search matches
-
When a file under Plastic SCM is moved or renamed locally and then heavily changed, Plastic SCM may fail to recognize the item as moved and detects it as one added item and another deleted item. This is the case when the similarity percentage is below the threshold set for moved items detection (default 90%).
The search matches option lets the user match the added item with the deleted item to tell Plastic SCM that they are actually the same item and the history of the original item is preserved. It's the way to tell Plastic SCM that the items it is detecting as added + deleted are actually one single moved or renamed item.

The similarity threshold can be adjusted for this specific item using the Min similarity accepted slider. As you move the slider to the left, the deleted items that match are shown in the list. Once the item is manually selected and the Accept the selected match button is clicked, the item appears in the "Moved items" category.
- Checkout
- For local operations, make Plastic SCM aware of the change, or apply the change to the workspace. See the Pending changes view at the beginning of this chapter for more details on local operations.
- Delete
- Delete the item from the workspace, same as the Delete command in the Workspace Explorer.
- Add to hidden changes list
- You can add the selected item to this list in which there are controlled items that can be changed but the user doesn't want them to appear by default on the Pending changes view (this is customized in a setting). It can be the case for libraries that are under source control but overwritten every time they are compiled and the user doesn't usually want to check them in.
- Add to ignored list
- Add the selected item to the ignored filter. See Commands for Private Objects in the Workspace Explorer for more details.
- Change revision type
- Change the type of the selected item to either text or binary. See Commands for Source-Controlled Items in the Workspace Explorer for more details.
- Annotate
- Launch a new view of the selected item with line by line annotations about the author, changeset and branch that last modified it.
- View history
- Display the reversion history of the selected item as described in the History view.
- View history as 2D revision tree
- Display the history of the selected item showing the revisions and their types in the 2D Revision tree view.
Merge in the Pending changes View
When a branch or changeset is merged, the items are left in checked state. The Pending changes view will display these items and also provide information about the merge operations that have been performed and are pending to be checked in. This is depicted in the figure below.

How to improve Pending Changes performance
Plastic will warn you when it detects that calculating changes in the workspace is slow. For example:

To disable this monitoring, you must add to your client.conf configuration file the following key:
<ShowPerformanceWarnings>no</ShowPerformanceWarnings>
Use the following hints to improve performance:
Calculating moved files took too long
When the move calculation is slow, chances are that you have lots of private and locally deleted files in your workspace. By locally deleted we mean a file under version control that was deleted from the workspace but not using Plastic, simply deleting it from the directory.
Plastic detects moved files by comparing each deleted and added file (private) and finding how similar they are. If you have lots of privates and deletes, calculating how similar they are will take long.
Solutions:
- Ignore the privates so they won't be considered by the move detection. Example: your bin and obj directories will be typically ignored to avoid intermediate build objects to be considered as private. Check how to add to ignored.
- Do you really need all these privates? Maybe you should clean the workspace deleting them. This is true for temporary log files.
-
If the previous two are not doable for you, you can consider deactivating Find moved and renamed files and directories (moved file detection) under Options in the Pending changes view:

Keep Pending changes clean: only modified files and files that need to be added should be listed for maximum performance.
Finding changed files took too long
There are several reasons that can probably affect to that operation:
- The hard drive performance is not good as expected. Do you have a mechanical hard drive? Is there any other process causing a high disk usage?
- An antivirus software is running. Disable your antivirus to reduce the disk usage. Very often antivirus software running on developer machines slow down all version control operations and turn a powerful computer into a nearly unusable state. Double check if the antivirus is eating CPU or disk IO while pending changes is working.
- Windows superfetch service. The superfetch service has been identified as a potential cause of disk performance issues. Stopping this service may have a good effect on your computer's performance.
Too many privates files
If you have thousands of private files in your workspace, chances are pending changes will be slower than it should.
You have several options to fix this:
- Turn them into ignored files. If you have thousands of private files under obj or bin directories, adding them to the list of ignored (files that will never have to be under version control) will solve the issue.
-
Alternatively, you can disable Show private files under Options in the Pending changes view, so that you only work with checked out files. This is an option in really big workspaces (+500 thousand files) but it means you have to actively checkout files first (no need to lock, just tell Plastic you modified the file by doing checkout):

Chapter 5: The Shelve View
Shelving is a way of locally saving your progress in a pinch. The changes are temporarily "shelved" in the workspace, not in the repository. This is meant to let you quickly experiment with an idea you just had, but don't want to checkin those unfinished changes you had in the workspace to the repository yet.
The shelve view allows you to:
- Create a shelve.
- Delete a shelve.
- View shelve changes.
- Apply a shelve.
You access the Shelve pending changes option from the Checkin button in the Pending changes view.
You have to select those items in the Pending changes view which are going to be part of the new shelve and write a comment (optional) for the new shelve.

This takes you through a series of dialog boxes to create your shelve.
Once the shelve is created the changes in the workspace can be undone only if this option is checked.

You can then make the Shelve view tab active and survey all the shelves you've created.

Working with Shelves
Once in the Shelve view you can do the following operations:

- View shelve: shows a Diff window with all the items saved in the selected shelve.
- Apply shelve in my workspace: all the changes in the shelve will be applied as if you make a checkin command.
- Delete: remove the selected shelve.
Chapter 6: The Branch Explorer View
The Branch Explorer view provides an interactive diagram of a repository's development activity. It shows:
- The repository's branch hierarchy, showing the branches' inheritance relationships.
- The development that has taken place on branches, as recorded in the individual changesets created by checkin commands.
- The merge operations that have been performed to integrate different branches' development work.
- The labels that are applied on changesets.

The Branch Explorer makes it easy to "drill down" from the highest level (the repository and its branches) to the lowest level (changes to individual code statements in revisions).
In addition to viewing past activity, you can use the Branch Explorer to perform new development operations: switching the active workspace to another branch, creating branches, merging from one branch (or changeset) to another, diff the changes made in branches and changesets and more.
The Branch Explorer lets you perform a multi-selection action for changesets and branches. For example, it is possible to select a changeset, find another one using the search, Ctrl + Click it and run a Diff selected changesets operation. It is very useful to diff distant changesets.
Components of the Branch Explorer Diagram
The Branch Explorer diagram is 2-dimensional:
- The vertical dimension is structural - the /main branch appears at the very top; higher-level branches appear toward the top of the diagram; lower-level branches toward the bottom. The hierarchical connections among the branches are indicated by branch base links: each branch is connected to its parent branch by such a link.
- The horizontal dimension is temporary - whenever a Checkin creates a new changeset on a branch, it is represented in the diagram as a new rounded-corners rectangle (almost a circle, actually) within the branch. Thus, a branch grows rightward over time as development takes place on it. To help you map development changes to the calendar, shading bands divide the horizontal dimension into separate days.
By default, the Branch Explorer displays development activity for the previous three months only. See the Display options Tab section.
The Branch Explorer displays these Plastic SCM objects: branch, changeset, label, branch base link, and merge link. Figure at the beginning of this chapter shows these elements in the diagram. Here are the details:
- Branch - A branch is represented as a rounded rectangle that grows rightward as changesets are checked-in into it.
-
Changeset - Each changeset is created on a particular branch. It records the creation of new revisions in the repository (Add to source control or Checkin).
Changesets are joined together with a link arrow that always goes from a changeset to its parent. This is true even for changesets in different branches: the first changeset on a new branch will be linked to its parent changeset on the other branch.
-
Pending changes changeset - Plastic SCM draws a changeset in the Branch Explorer that represents pending changes in the workspace
 . It shows up as a "fake" changeset when there are checkouts in the workspace. When you right-click this changeset, you are allowed to execute workspace actions (show Pending changes view, check pending changes, undo pending changes).
-
Label - The Branch Explorer indicates that a label has been applied to a changeset with a green circle around it. If more than one label has been applied to a given changeset, the circle is split in up to four sectors to give a visual clue of how many labels are applied.
Commands for all the labels are available with right clicking on the green circle.
-
Branch base link - The branch base link is just a changeset parent link. The only difference is that it goes to a parent changeset in a different branch.
When a branch has been just created, no changesets are inside it. The empty branch has a branch base line pointing to the changeset or label that has been used as base.
-
Merge link - When you merge two branches using the Merge from this branch command, the Branch Explorer indicates the merge by drawing a green arrow; it connects a changeset on the source branch (typically, the latest of the branch) to the changeset on the destination branch that records the Checkin of the merge results.
There are more merge links for special types of merge like cherry picks or subtractive merges.
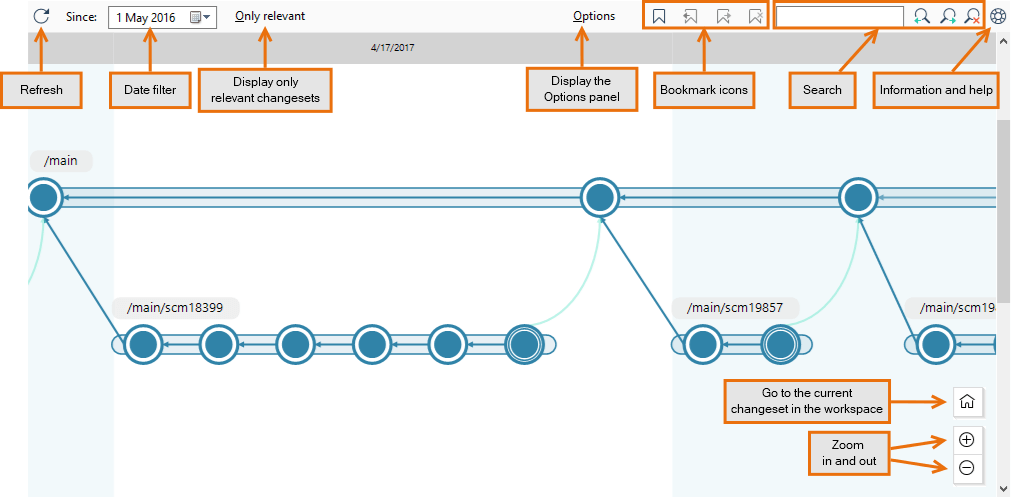
Navigating the Diagram
Plastic SCM makes using branches easy, so it's likely that a given repository has a large number of them. Accordingly, the Branch Explorer provides numerous facilities for navigating the branch hierarchy, so that you can concentrate on the ones you care about right now (and ignore the ones you don't):
- Scroll bars - Scroll bars are located at the bottom and right edges of the Branch Explorer diagram. The size of the draggable bar indicates how much of the horizontal or vertical dimension is currently visible.
- Dragging the diagram - Using the left mouse button, you can click-and-drag anywhere in the diagram to move it in any direction.
-
Navigator panel - To open a navigator panel below the Branch Explorer, you must first open the "Display options" tab by clicking the Options button above. Then, check the Display navigator box. The navigator panel uses a tinted "viewport" highlight to indicate which portion of the entire branch-hierarchy diagram is currently visible. You can drag this highlight to scroll the display, or click anywhere in the navigator panel to center the viewport there:

-
Search for objects - The Branch Explorer toolbar includes a search box that highlights the results and lets you navigate through all the objects that contain the entered string. The search includes branch and label names as well as changeset numbers and GUID alphanumeric string:

- Once you enter the string to search for, hit Enter to highlight the matching objects in the Branch Explorer and use the Next and Previous buttons to navigate through the results. The Branch Explorer will scroll to make the highlighted search result visible.
- Use the Clear highlights button to remove the temporary highlighting applied to search results.
Commands in the Branch Explorer View
Commands
Use the Previous (<) and Next (>) arrows to see the Branch Explorer toolbar in Windows, Linux and Mac OS.
Plastic SCM GUI - Windows - Branch Explorer toolbar
Plastic SCM GUI - Linux - Branch Explorer toolbar

Plastic SCM GUI - Mac OS - Branch Explorer toolbar
- Only relevant
- Toggle the display of changesets that don't have merge or branch base links. When changesets are hidden by this mode, the changeset parent link becomes dashed:

- Options
- Toggle the display of The Extended Options Panel.
- Bookmark icons
-
Bookmarks allow you to mark some changesets, review other changes, and then go back to the first area where you were working. This is particularly useful for integrators, who switch back and forth between changesets frequently.

- Search options
- Search in the Branch Explorer. See the section Navigating the Diagram.
- Information and help
-
Show help about the Branch Explorer view. This help lets you open this Branch Explorer documentation, display the legend diagram


- Statistics
- Toggle the display of the Stats panel. (Note that the Navigator and Stats panels cannot both be visible at the same time.) This panel displays a bar graph, showing the number of changesets created each day during the interval that the Branch Explorer is currently displaying. You can configure this interval in the Display options Tab.
Context Menu Commands
The Branch Explorer is a fully interactive diagram in which most of the objects can be operated. The user can right-click all the objects to get the context menu and launch any command. This means that the context menu for each of those objects is the same found in the specific views:
- Branches - The commands available when a branch is right-clicked are the same described in the Commands in the Branches view section (except the Show in Branch Explorer one). But besides those commands, you can also find these ones:
- Branch Explorer
- The Branch Explorer submenu is only available in the Branch Explorer view and offers filtering and navigation commands specific to this view.
-
- Go to branch base
- Scroll the diagram to the branch base changeset of the selected branch.
- Show selected branches in a new diagram
- Open a new filtered Branch Explorer view that only contains the selected branches.
- Show selected and related branches in a new diagram
- Open a new filtered Branch Explorer view that only contains the selected branches plus those connected to them through changeset parent links or merge links.
- Show pending merges for selected branches in a new diagram
- Open a new filtered Branch Explorer view that contains the branches whose base changesets are on the selected branches and have changes that have not been merged yet.
- Show custom diagram of the selected branches
-
Open a new filtered Branch Explorer view that contains the branches matching the criteria selected in the dialog that pops up.

- Show remote changesets in current branch from...
- Open a new filtered Branch Explorer view with the changesets that contains the selected branch and the remote changesets that contains the selected branch in a remote server.
- Changesets - The commands available when a changeset is right-clicked are the same described in the Commands in the Changesets View section (except the Show in Branch Explorer one). But besides those commands, you can also find these ones:
- Go to parent changeset
- Shows the parent changeset of the selected changeset.
- Show related branches in a new diagram
- Open a new filtered Branch Explorer view that only contains the branches connected to the selected changeset through parent links or merge links.
- Labels - The commands available when a label is right-clicked are the same described in the Commands in the Labels view section (except the Show in Branch Explorer one).
Labels are represented in the Branch Explorer as circles around the changeset they are applied to and, of course, several labels can be applied to the same changeset. When it happens, a right clicking on the labels circle shows a top level menu with all the labels. And the commands for each of them are defined as submenus. This situation is depicted in the figure below.

- Merge links - As we've seen previously, a merge link is a link that show a merge operation between two branches. The commands available when a merge link is right-clicked are:
- Go to source changeset / Go to destination changeset
-
Show the merge source/destination changeset, scrolling to it if necessary. This command is enabled when the source/destination changeset is not visible in the Branch Explorer as the picture below shows:

The Extended Options Panel
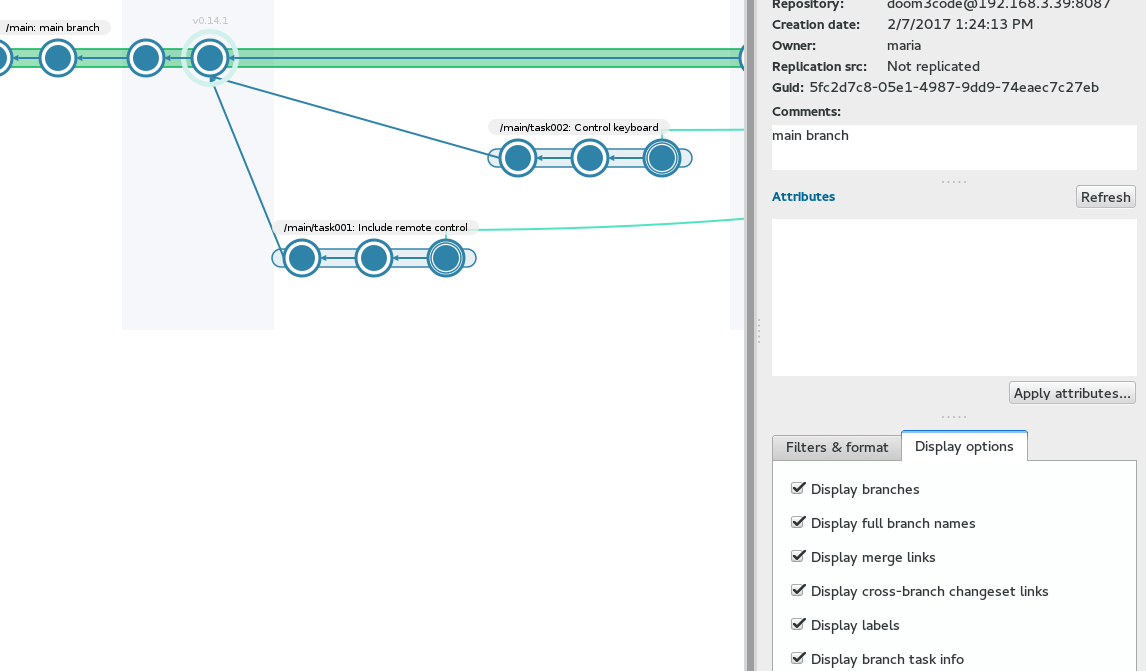
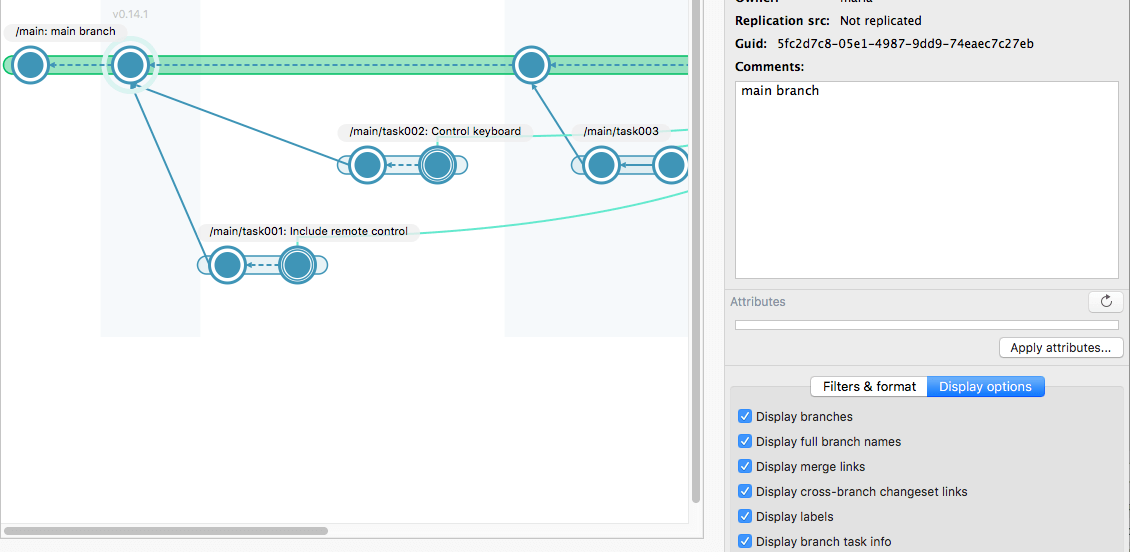
The Properties Tab
This tab displays information on the selected object - the same information that is displayed in the Branches, Changesets or Labels view, along with information on replication.
The Display options Tab
Use the Previous (<) and Next (>) arrows to see the Branch Explorer toolbar in Windows, Linux and Mac OS.
The Display options tab controls the appearance of the Branch Explorer diagram.

The options in the panel are detailed below:
- Display branches - Toggles the display of branches in the Branch Explorer.
- Display full branch names - The full branch name is the name resulting of the concatenation of the branch itself and all its parents.
- Display merge links - Toggles the display of merge links in the diagram.
- Display cross-branch changeset links - Toggles the display of branch base links between changesets in the diagram.
- Display labels - Toggles the display of labels in the diagram.
-
Display branch task info - If an issue tracker is configured using the "Task on Branch" mode and the associated task is found in the issue tracker, then this option toggles the display of the branch task info.
Learn how to integrate TASK AND ISSUE TRACKING SYSTEMS.
Plastic SCM GUI - Windows - Branch Explorer - Branch task info
Plastic SCM GUI - Linux - Branch Explorer - Branch task info
Plastic SCM GUI - Mac OS - Branch Explorer - Branch task info


-
Display vertical layout - A simple checkbox which enables you to view the Branch Explorer as a tree. (This one is for you, ClearCase lovers!)

-
Display navigator - Toggles the display of the Navigator panel. See how the navigator panel works.
Note that the Navigator and Statistics panels cannot both be visible at the same time.
-
Display statistics - Toggles the display of the Statistics panel. This panel displays a bar graph showing the number of changesets created each day during the interval that the Branch Explorer is currently displaying. You can configure this interval using the date filter.
Note that the Navigator and Statistics panels cannot both be visible at the same time.
-
Display branch levels - This setting controls how many branch levels are displayed in the diagram. The level of a branch is determined by how many parent branches it has. The figure below depicts this:

-
Date filter - The data filter lets you set the data range that is displayed in the Branch Explorer:

-
Enter visibility mode - The visibility mode lets the user hide or show branches in the diagram. The hidden branches are not displayed across sessions of the Plastic SCM GUI. The hidden branches list is local to the client machine. This means that if a user hides some branches, they won't be visible for them, but are visible for the rest of the users.
- To hide a branch and its children, double click that branch.
- To hide a branch and don't hide its children, use Shift + double click on that branch.
- Once the visibility is set, click the Exit visibility mode button to confirm the visibility changes.
- Click clear visibility config to display all the branches in the Branch Explorer.

-
Enter relayout mode - The relayout mode lets the user set the vertical order of branches. This is useful to show the most relevant branches at the top, for example.
- Click a branch to select it.
- Then, use the cursor keys up and down to move it to the desired location. Only the vertical position can be changed; since the horizontal scale is time and changesets have a specific date, it doesn't make sense to move them.
- When a branch has been explicitly relocated, its color changes to yellow.
- Once the relayout is set, click the Exit relayout mode button to confirm the relayout changes.
- Click clear selected branch to reset the selected branch to its default layout.
- Click clear all the relayout data to reset the Branch Explorer to the default layout.

The Filters and conditional format Tab
Learn how the Branch Explorer can be globally configured for all users.
Add inclusion and Add exclusion
With these options, you can show (Add inclusion) or hide (Add exclusion) branches from the Branch Explorer based on queries. Both inclusion and exclusion rules have additional options:
- Add child branches adds (to inclusion or exclusion) the child branches of the branches selected by the query.
- Add parent branches adds the parent branches of the selected ones.
- Add branches that are source of a merge adds the branches that are source of a merge to the selected branches.
- Add branches that are destination of a merge adds to the list the branches that receive merges from the selected ones in the rule.
It is possible to configure quite flexible and powerful inclusion and exclusion rules by combining those rules and its options. For example, if we combine the following inclusion and exclusion rules...
- Inclusion rule: owner = 'coder'.
- Exclusion rule: date > '01/01/2013'.
...we will get a Branch Explorer like the following: the branches owned by coder will be visible added and the branches created after 2013 will be hidden from the list of visible branches.
Check out more examples:
-
Example 1 - Show only the main branch:
- Click the Add inclusion button.
- Type the right query, in this case name = 'main'.
- Select the options if needed.
- Optionally, type a description. For example, Only main.
- Click Save and then Apply.
And you will get something like this:

-
Example 2 - Display only the branches containing changesets created after a certain date.
- Click the Add inclusion button.
- Type the right query, in this case changesets > '3/6/2018'.
- Select the options if needed.
- Optionally, type a description. For example, Branches with recent changesets.
- Click Save and then Apply.
And you will get something like this:

In this case, the comparison takes into account the date and the hours, so internally the filter uses '> 3/6/2018 00:00:00'. Therefore, you can specify a specific time as the following example shows:

-
Example 3 - Hide a particular branch.
- Click the Add exclusion button.
- Type the right query, in this case name = 'task1001'.
- Select the options if needed.
- Optionally, type a description. For example, Hide branch task1001.
- Click Save and then Apply.
And you will get something like this:

If we can also hide its child branches, then check the Add child branches and you will get something like this:

Add format
This format option lets you change the background color of the branches, changesets, and labels that match the format rules that you configured. If an object (branch, changeset, or label) matches multiple rules, then the first one wins.
Follow these steps to add format rules:
- Click the Add format button.
- Then, select the rule to add:
- Branches with pending merges - A predefined rule that selects all branches that contain one or more changesets that are not yet merged to any other branch.
- Active branch in this workspace - A predefined rule that selects the branch which you are working on.
- Custom branch query rule - A custom rule to specify any query to apply a background color to a set of branches. For example: owner = 'mary' or parent = '/main'.
- Custom changeset query rule - A custom rule to specify any query to apply a background color to a set of changesets. For example: branch = 'main/scm0245'.
- Custom label query rule - A custom rule to specify any query to apply a background color to a set of labels. For example: date < '1 months ago'.
- If you prefer, you can change the predefined color for each format rule. Just click the rule's color box to open a color-selection dialog.
- Click the Apply button to apply the format rules to the Branch Explorer.
Use the Previous (<) and Next (>) arrows to see an example of custom format rules for branches,
changesets and labels in Windows, Linux and Mac OS.
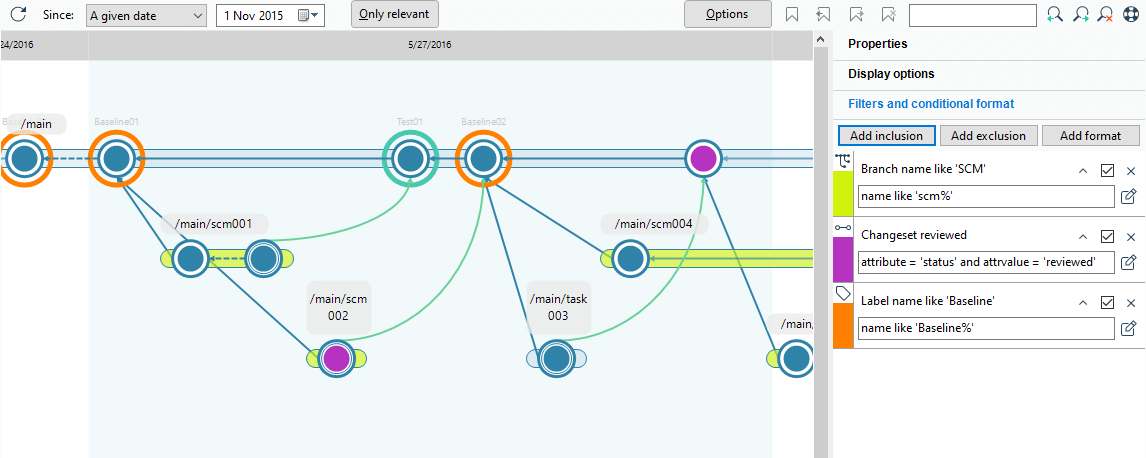
Plastic SCM GUI - Windows - Branch Explorer - Add custom format rules
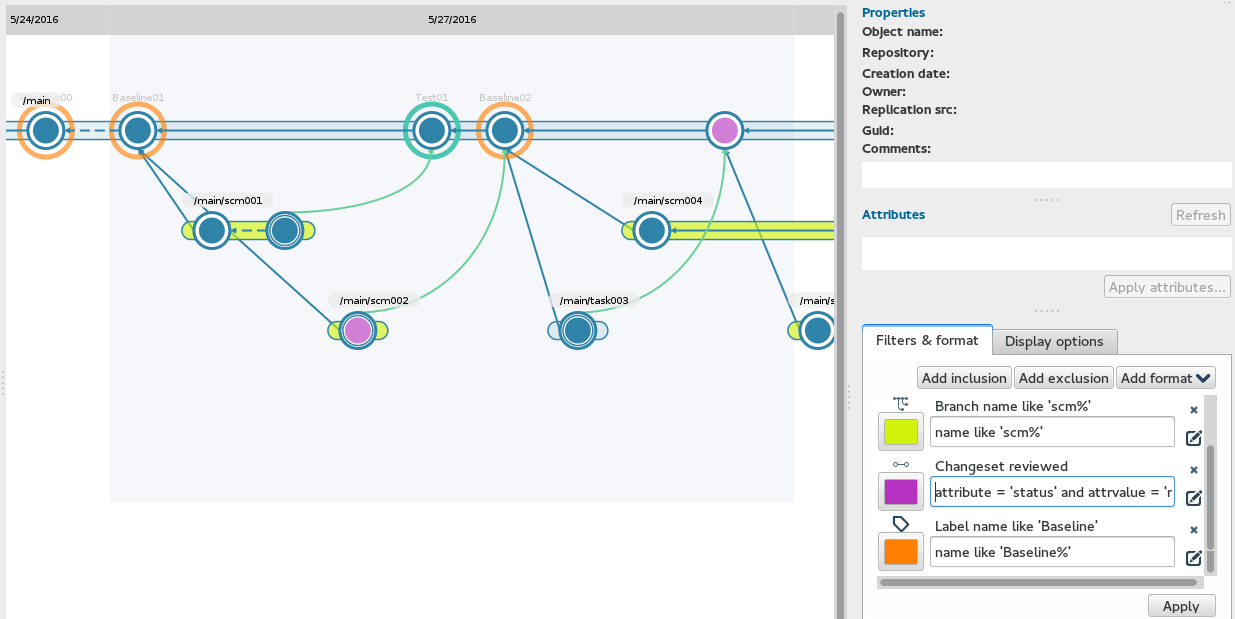
Plastic SCM GUI - Linux - Branch Explorer - Add custom format rules
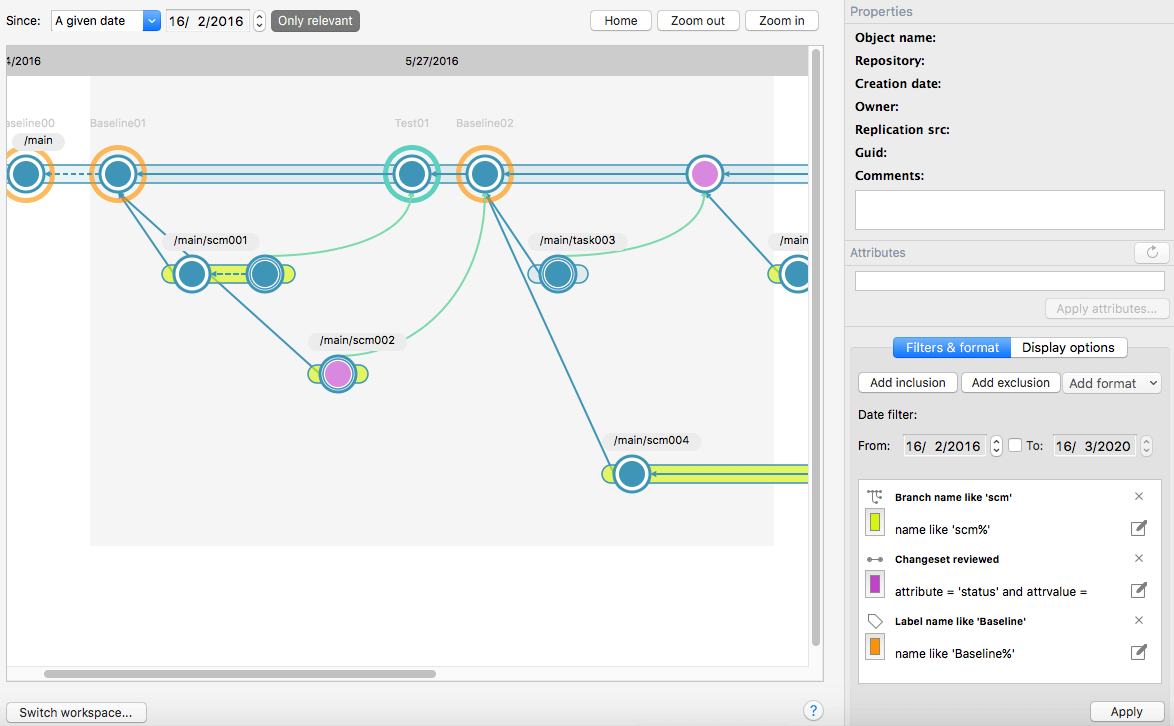
Plastic SCM GUI - macOS - Branch Explorer - Add custom format rules
The format rule is useful to highlight branches, changesets, or labels with specific attributes.
Lets see the following example where we are going to highlight branches with some particular attributes:
- A user creates the attribute status.
- Then, apply the status values pending, in progress and completed to different branches.
Learn how to create and apply attributes.
- The user now defines the conditional format rules by following these steps:
- Click the Add format button and select the Custom query rule option.
- Type the right query, in this case: attribute = 'status' and attrvalue = 'completed'.
- Click the color to change to a green color background.
- Optionally, type a description. For example, branch completed.
- Click Save and then Apply.
And this is how the Branch Explorer looks now:

The Attributes tab
Use the Previous (<) and Next (>) arrows to see the Branch Explorer toolbar in Windows, Linux and Mac OS.
This tab lets you assign attributes to the selected branches. To apply an attribute you have to follow these steps:.
- Select one or more branches.
- Click the Apply attributes button.
-
Select the attribute you want to apply. If you need to create the attribute:
- In Windows: Go to the Attributes view.
- In Linux or macOS: Click the New button to open a dialog to enter the name of the new attribute.
- Enter or select a value for the attribute to apply to the selected branches.
- Apply the changes.
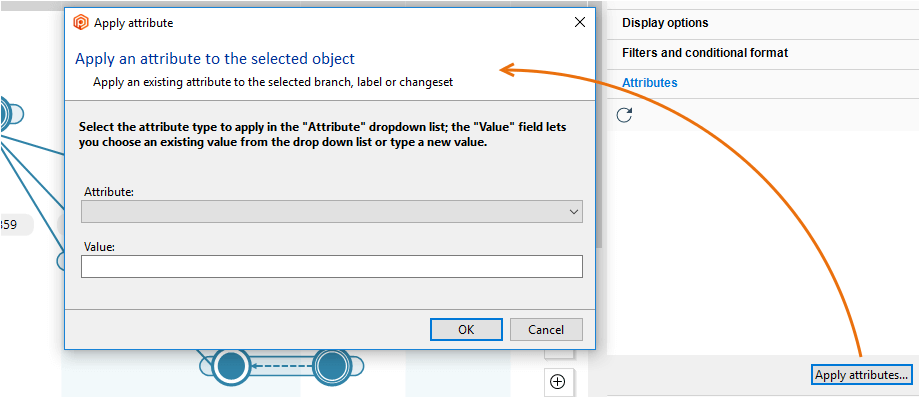
Plastic SCM GUI - Windows - Branch Explorer - Apply attribute
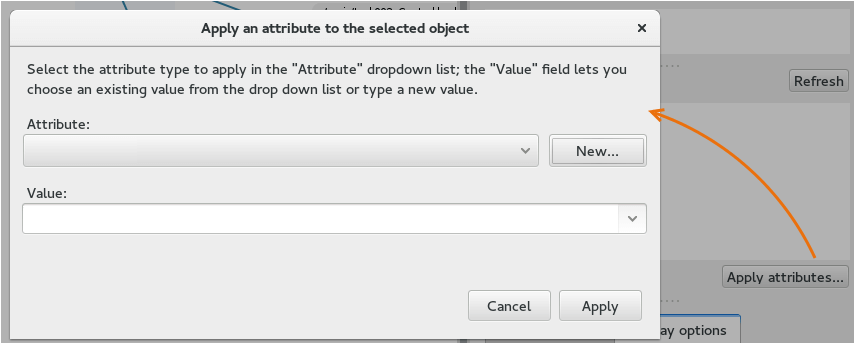
Plastic SCM GUI - Linux - Branch Explorer - Apply attribute
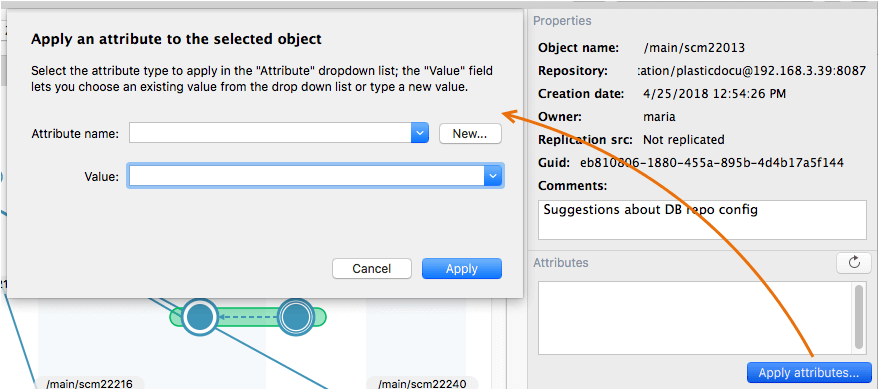
Plastic SCM GUI - Mac OS - Branch Explorer - Apply attribute
In the example below, we applied two attributes to a branch. You can delete any of them by doing click in the X button:
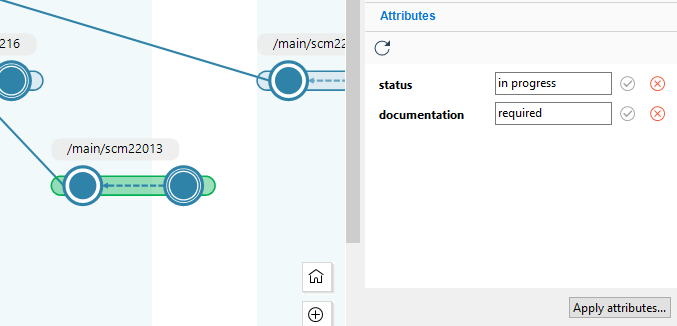
Plastic SCM GUI - Windows - Branch Explorer - Attributes applied
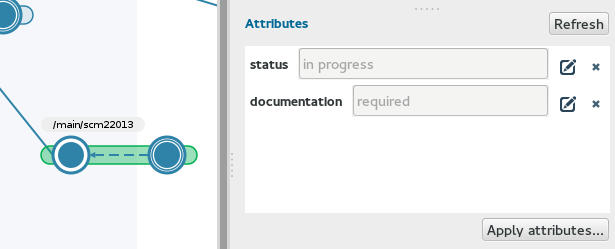
Plastic SCM GUI - Linux - Branch Explorer - Attributes applied
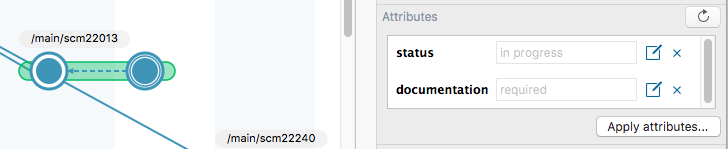
Plastic SCM GUI - Mac OS - Branch Explorer - Attributes applied
Attributes are a way to associate custom metadata to objects like branches, labels and so on.
Following the example in the Add format section above, suppose you create a branch for each task in your issue tracking system. Maybe, you need to track if a branch (and its associated task) is open, resolved, tested, reviewed or integrated. You can create a status attribute and then assign it one value depending on the status of the task (open, solved, tested, reviewed, integrated). Then you can use the query language to find, for example, the tested branches:
cm find branch where attribute = 'status' and attrvalue = 'tested'And, of course, you can use this query to filter branches in the Branch Explorer.
The Changeset colors - Replication sources tab
A replication source is a remote repository from which branches have been replicated to the current repository at some point.
By default, changesets that have been replicated from remote repositories are drawn with a different color in the diagram. This tab controls that color coding and it also lets the user connect to those remote repositories to explore their contents.
Note: The color coding only indicates that the changesets came from a replication operation, but they are actually in the current repository. They are replicated from the other repository, so they exist in both places.

Customizing the replication sources
The replication sources tab can customize the appearance of changesets. The figure below summarizes what can be customized for each source:

Exploring remote repositories
When a replication source is online after activating the Show remote data checkbox, the branches and changesets in that remote repository are displayed with dashed lines (see the next figure). Right clicking on these changesets, it is possible to diff the changes, browse the repository as is it on those changesets or compare them with any other local changeset.

The Changeset colors - Users tab
You can also control the color coding related to the user that own a changeset:

And it is possible to customize the appearance of the changesets. The figure below summarizes what can be customized for each user:

The Issue Tracking System Extension Tab
This tab appears only if you've configured an integration between Plastic SCM and an issue tracking system (ITS). (See The Issue Tracking Tab section). The tab displays certain fields from the record that corresponds to the currently selected branch
For more information, see the TASK AND ISSUE TRACKING SYSTEMS guide.
The Replication Dialog
The pop-up dialog that appears for each replication command (when right clicking on a branch) enables you to enter the specifications for transferring data from one site to another. Depending on the operation, this can include the identifier of a remote repository server, the name of a local repository and a branch within it, and a pathname for storing a replication package file.
When you've entered all the specifications, click the Replicate button to perform the operation.
Note: Read the Plastic SCM book to learn how replication works.
You can also check the Distributed version control guide to learn more about the replication operations.
You can also check the Distributed version control guide to learn more about the replication operations.

The Advanced options button opens another dialog, in which you can specify options related to user identities:

- Remote server configuration profile
-
By default, the replication operation will be performed at the remote site under the same user identity that you're currently using at the local site. However, it is possible to define connection profiles for different servers.
If a different identity must be used at the remote site, or if a different user-authentication scheme is employed at that site, specify a replication profile here. You can create such a profile in the Preferences window, in The Connection Profiles Tab section.
- User translation mode
-
This option specifies how the user identities recorded in repository database records at the sending site are to be interpreted at the receiving site. This is useful when the source and destination Plastic SCM servers are configured to use different authentication methods, or the credentials used to connect to the remote server are not the same as those used in the local one. These are the possible values:
- Copy - User identities are simply copied into the new database records at the receiving site. This method is valid only if both sites employ the same user-authentication scheme and have the same user database.
- By name - The user identity in a database record is sent to the receiving site as a name; it is converted there to a local user identity - either by the repository server itself or by another process (for example, an LDAP server). This is correct when the same user name is available to both source and destination Plastic SCM servers.
- Use translation table - Similar to By name, but an incoming user name at the receiving site is first translated to another name before it is converted into a local user identity. You specify a file containing a simple table to drive the name-translation process. Each line of the table is in this form:
sending-site-name ; receiving-site-name
Here's an example, in which short names at the sending site are converted into corresponding long names at the receiving site:
rafa;rafael.nadal
rog;roger.federer
arod;andy.roddick
Persistence of Branch Explorer Settings
When an instance of the Branch Explorer closes, Plastic SCM saves the current state of its Navigator, Stats, and Extended Information panels in file branchexplorer.cfg, located in the plastic subdirectory within your operating system home directory. Both the panel's current visibility and their various options settings are preserved. Likewise, the zoom level of the branch-hierarchy diagram is saved in the configuration file.
All these settings are restored the next time you open a Branch Explorer for the same workspace.
Chapter 7: The Branches View
The Branches view lists all the branches that have been created for the workspace's repository(s). (The Branch Explorer view provides an alternative, showing the branches in a diagram instead of a table.)
Columns in the Branches View
- Name
- The branch's name.
- Repository
- The repository in which the branch was created.
- Owner
- The user who created the branch.
- Creation date
- A timestamp indicating when the branch was created.
- Comment
- The comment string associated with the branch.
The Extended Information Panel
The Show extended information toolbar button opens the Branches view's extended information panel, which has two panes:
- The Properties pane repeats the main table's information on the selected branch, and also adds information on replication and more room to display the comment. It's interesting to note that the object comment can be edited here by clicking on the Comments text box. As soon as a key is pressed to edit, a Save button appears to persist the changes.
- The Attributes pane lists the attributes that are currently applied to the selected branch. You can use this pane to revise an attribute's value or unapply the attribute from this branch. You can also click the Add attributes button to apply additional attributes to the branch.
Commands in the Branches View
Toolbar Commands
The toolbar includes the following buttons and controls:
- Refresh
- Refresh the content of the view.
- Show extended information
- Display the view's extended information panel. To close the panel, use its x button.
- List view
- Show branches as a list.
- Tree view
- Show branches as a tree. Child branches are now under the parent branches in a tree view.
- Export view data
- This button is used to export the current content of the table in the view to a text file, either CSV or XML. See Exporting the table contents to a text file section for more details.
- Filter
- You can use this field to reduce the Branches table to a subset of its rows. You can filter on one or all the columns in the view..
Advanced
Toggles the toolbar's Advanced mode, in which you can view and customize the query that produced this view's table. See section Advanced Mode: Revising the Query that Produces a Table.
Context Menu Commands
- Create child branch
- Create a child branch of the selected branch (which becomes the "parent" of the new branch). A New branch dialog appears, in which you enter specifications for the new child branch.
If Plastic is not configured to use an integrated issue tracking system then the user must create a branch using the Manual mode that looks like this:

- Branch name - Enter a simple ("leaf") name only. The new branch complete name includes the "path" of parent branches. For example, specifying task123 as the branch name might create a branch whose complete name is /main/integration/task123.
-
Comments - Optional comment string, which will be displayed in a Branches view column. Click on the History button to drop down the list of recent comments that you used on previous branches creation.
You can configure the maximum number of these recent comments in the Preferences window - see section The Comments Tab.
You can also enabled/disabled the spell checking and the language used by launching the context menu as you can see in the picture above.
If Plastic use an integrated issue tracker, by default, the New branch dialog will be launched using the From task mode:
Use the Previous (<) and Next (>) arrows to see the dialog in Windows, Linux and Mac OS.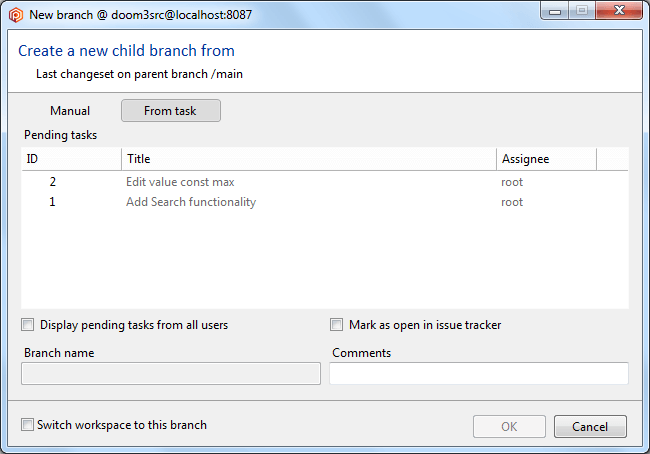
Plastic SCM GUI - Windows - New branch from task
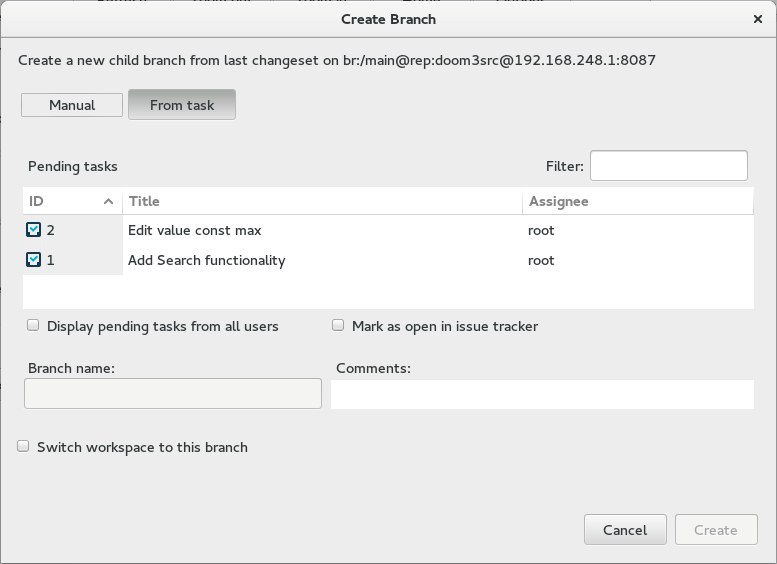
Plastic SCM GUI - Linux - New branch from task
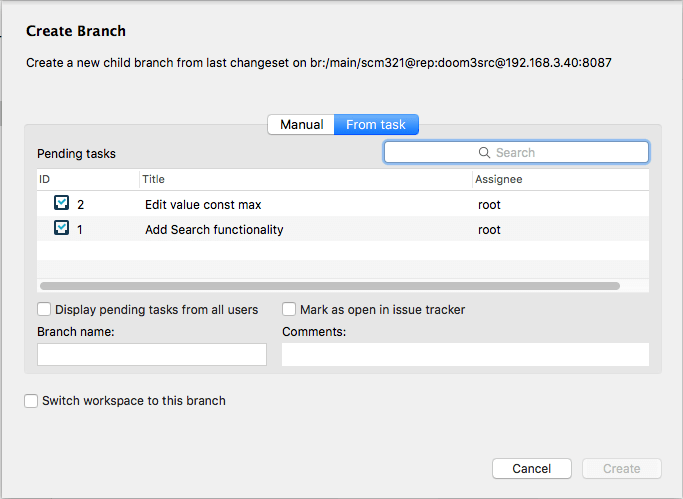
Plastic SCM GUI - Mac OS - New branch from task
- Pending tasks - This dialog offers the user the possibility to select a pending task from the configured issue tracker to automatically fill in the Branch name and Comment text fields. By default this list shows the pending tasks assigned to the authenticated issue tracker user.
- Display pending tasks from all users - It is possible to show in the list all the pending tasks from all the users in the issue tracking system.
- Mark as open in issue tracker - A request can be sent to the issue tracker to mark the selected task as open if it wasn't before.
Creating branches from issue tracker information is available for all supported extensions. The Mark as open in issue tracker option won't be available for VersionOne.In both Manual and From task modes the user can mark this option:
- Switch workspace to this branch - As a convenience, the dialog offers the possibility of directly switching the workspace to the new branch created.
Read more about how to integrate Plastic SCM with a control tracking tool. - Switch workspace to this branch
-
Change the workspace configuration to use the selected branch. This modifies the workspace's configuration to point to the selected branch and then performs an Update to make the workspace actual contents match the contents of the branch.
Plastic SCM first checks whether there are any pending changes and if so, prevents the user from continuing the switch operation by displaying an error window.

In this case, the user should go to the Pending changes view and either check in or undo any pending changes before switching to the branch. If needed, it is possible to checkin any pending changes in a new branch from the Pending changes view. This operation will also switch the workspace to that new branch automatically.
- Merge from this branch
- Merge the changes in the selected branch into the branch currently loaded in the workspace.
- Merge from this branch to
-
Merge the changes in the selected branch into the branch the user choose from a new dialog. This merge also
works when there are conflicts that need to be resolved.
Learn more about the merge-to command with conflict resolution .
- Advanced merge
-
- Cherry pick from this branch
-
Open a Merge organizer window with an entry for each item that has revisions on the selected branch. Using the Merge organizer window you can perform a standard merge or a cherry pick merge for some or all the items. For each item, the contributors to the merge are:
- source: the last revision on the selected branch
- destination: the item as it exists in your workspace
- Diff branch
- Open a Diff Window to compare the items changed in the branch. This command will compare the latest versions of the items in the branch with the revisions in the branch base changeset.
- Diff... Diff with other branch / Diff with label
- Open a Diff Window to compare the latest revisions in the selected branch with the revisions in a label or another branch.
- View
-
- View changesets on this branch
-
Open a Changesets view listing all the changesets created on the selected branch. The listing is created by a query in this form:
find changeset where branch='branch-spec' on repository 'repository-spec'
Using the Advanced mode in this view you can modify the query and re-execute it any number of times.
- Explore changesets on branch
- Open a Branch changes window enabling you to browse through all of the selected branch's changesets (the same collection of changesets displayed by View changesets in branch), drilling down to individual items and individual changes in those items.
- Browse repository on this branch
- Open a Repository browser view configured with the selected branch. This is a virtual view into the repository; no data is transferred to the workspace. This command is useful when you are working on one branch and you wish to see how the source base would look if you were working on another branch.
- Push/Pull
-
Note: The replication commands described below can use your day-to-day user profile (see The General Preferences Wizard section) or an alternative profile (see The Connection Profiles Tab section). With all these commands, you enter replication specifications in a pop-up dialog box. See section The Replication Dialog.
Read the Plastic SCM book to learn how replication works.
You can also check the Distributed version control guide to learn more about the replication operations.- Push this branch
- Send all revisions on the selected branch along with associated metadata, to a repository at another Plastic SCM site. You choose the remote Plastic SCM server and repository in a popup dialog.
- Pull this branch
- Bring all revisions on the selected branch in a repository at another Plastic SCM site along with associated metadata into the workspace's repository. You choose the remote Plastic SCM server and repository in a popup dialog.
- Pull remote branch
- Same as above except that you choose the remote repository's branch in a popup dialog.
- Sync with Git...
- Synchronize both Plastic and Git repositories by pushing and pulling changes directly from Plastic SCM to any remote Git server. Read more about GitSync.
- Create replication package from this branch
- "Offline" version of Push this branch: instead of sending the data to a specified remote site immediately via the network, store the data in a replication package file. This file can subsequently be imported at any Plastic SCM site(s).
- Create replication package
- Same as above except that you specify the source (Plastic SCM server, repository, branch) in the dialog box along with the replication package file.
- Import replication package
- Complete a replication data transfer by incorporating the data in a specified replication package file into a repository at your site.
- Show in Branch Explorer
- Show the selected branch in the Branch Explorer, scrolling to it if necessary. If the branch is not selected in the Branch Explorer, then check the current Display options configuration.
- Rename
- Change the name of the selected branch. This does not automatically modify the selector of the active workspace or any other workspace.
- Delete
- Permanently remove the selected branch from the repository. This is allowed only if no item has a revision on the branch.
- New code review for this branch
- Create a code review for the selected branch, and optionally open it in a Code review window (you must check the Show diffs after creation option). You specify the code review's title, initial status, and initial assignee in a popup dialog.
- Create top-level branch
- Create a branch that is not a child (or grandchild, etc.) of any other branch. This only affects the name assigned to the branch. To all effects, a top level branch behaves exactly as a child branch.
- Properties
-
Open a Branch Properties view in which you can view and/or modify the branch's name, its comment string, and the branch history.

- Permissions
- Open a Permissions window for the selected branch.
- [External tools]
- It is possible to define external applications to run actions on the selected branches. Learn how to configure the External tools menu.
Chapter 8: The Changesets View
The Changesets view lists some or all of the changesets created by Add to source control and Checkin commands in a particular repository.
- When you open a Changesets view using the Changesets menu, by default, only changesets created in the past 30 days are listed.
- Similarly, when you open a Changesets view using the View changesets command in the Repositories view, by default, only changesets created in the past 30 days are initially listed.
- When you open a Changesets view using a branch's View changesets in branch command, all of the branch's changesets are listed.
Subsequently, you can use the toolbar's Advanced mode to modify a time constraint or otherwise revise the query that produced the changeset listing.
Columns in the Changesets View
- Name
- The integer sequence number that uniquely identifies the changeset within its repository, at a particular site. (In a distributed development environment, the collection of changesets in a repository varies from site to site.)
- Comment
- The comment string entered during the Add to source control or Checkin command that created the changeset.
- Creation date
- A timestamp indicating when the changeset was created.
- Branch
- The branch on which the changeset's revision(s) were created.
- Created by
- The user who invoked the command that created the changeset.
- Repository
- The repository (including a repository server identifier, indicating a particular Plastic SCM site) that contains the changeset, its branch, and its revision(s).
- Guid
- The Globally Unique Identifier of the changeset. This alphanumeric string identifies a changeset uniquely among different repositories. Since replicated changesets may have a different number than they had in the repository they were replicated from, this GUID helps to unequivocally identify the changes in different repositories. A GUID is a 128 bits value represented in hexadecimal notation.
The Extended Information Panel
The Show extended information toolbar button opens the Changesets view's extended information panel, which has two panes.
- The Properties pane repeats the main table's information on the selected changeset, and also adds information on replication. It's interesting to note that the object comment can be edited here by clicking on the Comments text box. As soon as a key is pressed to edit, a Save button appears to persist the changes.
- The Attributes pane lists the attributes that are currently applied to the selected changeset. You can use this pane to revise an attribute's value or unapply the attribute from this changeset. You can also click the Add attributes button to apply additional attributes to the changeset.
Commands in the Changesets View
Toolbar Commands
The toolbar includes the following buttons and controls:
- Refresh
- Refresh the content of the view.
- Show extended information
- Display the view's extended information panel. To close the panel, use its x button.
- Export view data
- This button is used to export the current content of the table in the view to a text file, either CSV or XML. See Exporting the table contents to a text file section for more details.
- Filter
- You can use this field to reduce the Changesets table to a subset of its rows. You can filter on one or all the columns in the view..
Advanced
Toggles the toolbar's Advanced mode, in which you can view and customize the query that produced this view's table. See section Advanced Mode: Revising the Query that Produces a Table.
Context Menu Commands
- Diff changeset
-
Open a Diff window, loaded with all the items in the selected changeset and comparing these revisions:
- the revision in the changeset
- the immediate predecessor of that revision in the item's revision tree
- Create branch from this changeset
- Perform a Create child branch command, with the selected changeset as the new branch's branch base.
- Label this changeset
- Create a new label and apply it to the selected changeset. See Commands in the Labels View for more details on the new label dialog window.
- Switch workspace to this changeset
-
Change the workspace's configuration to use the selected changeset. This modifies the workspace's configuration to point to the selected changeset and then performs an Update to make the workspace's actual contents match the contents of the changeset.
Plastic SCM first checks whether there are any pending changes and if so, prevents the user from continuing the switch operation by displaying an error window.

In this case, the user should go to the Pending changes view and either check in or undo any pending changes before switching to the changeset.
- Merge from this changeset
- Open a Merge organizer window. This option is the same as merging the branch where the changeset is located, except that instead of merging the full content of the branch, the merge operation considers changes in the branch up to the selected changeset. For each item, the contributors to the merge are:
- source: the revision in the selected changeset
- destination: the item as it exists in your workspace
- Cherry pick from this changeset
- Open a Merge organizer window, with an entry for each item in the selected changeset. These items are the same listed using the Diff changeset command above. For each item, the contributors to the merge are:
- source: the revision in the selected changeset
- destination: the item as it exists in your workspace
- Merge from this changeset to
-
Merge the changes in the selected changeset into the branch the user choose from a new dialog. This merge also
works when there are conflicts that need to be resolved.
Learn more about the merge-to command with conflict resolution .
- Advanced merge
-
- Subtractive merge from this changeset
- Open a Merge organizer window, with an entry for each item in the selected changeset. Using the Merge organizer window, you can perform a subtractive merge for some or all the items. This will effectively remove the changes that were introduced by this particular changeset from the current revisions loaded in the workspace.
- Subtractive merge from this changeset interval
- Open a Merge organizer window after selecting the first and the last changesets of the interval.
- Cherry pick from this changeset interval
- Open a Merge organizer window after selecting the first and the last changesets of the interval.
- Diff selected changesets
- If you select two changesets, a Diff window will open comparing the revisions between the selected changesets.
- Diff with other changeset
- Open a Diff window, comparing the revisions in the selected changeset with the revisions in another changeset. You choose the other changeset in a popup dialog.
- Browse repository on this changeset
- Open a Repository browser view, configured with the selected changeset. This is a virtual view into the repository; no data is transferred to the workspace. For example, you might use this command to "turn back the clock" to a point earlier in the evolution of the branch you're working on as see how the revisions as they were back at that point.
- Mount this changeset in Plastic Drive
-
Plastic Drive is a tool to mount a changeset as a Windows drive that lets you quickly browse the code using your favorite tools (Visual Studio, Eclipse, IntelliJ...). Files are downloaded from the server on demand, then cached. So the mount happens immediately, no need to wait for a big update to finish.

The cache path used by Plastic Drive to store temporary files can be specified on a configuration file called
plasticdrive.confin your Plastic configuration directory. Use this file to assign a value to the keycachepath. For example:cachepath=C:\plasticdrivedata
If this option doesn't show in the changeset context menu, then theguiclient.conffile must be edited. The file can be found atC:\Users\<yourname>\AppData\Local\plastic4\. Then set this line as follows:<ShowMountPlasticDrive>true</ShowMountPlasticDrive>
And restart the GUI.
The first time the user run the Mount this changeset in Plastic Drive command the following message will show up:

The message gives you all the instructions. You can Ctrl + C to copy the instructions and the URL of the installer to download. Download it and install it.
Maybe, a compatibility error message will be shown. In this case, run the setup with an appropriated compatibility mode in order to work in your OS and try again.
- Show in Branch Explorer
- Show the selected changeset in the Branch Explorer, scrolling to it if necessary. If the changeset is not selected in the Branch Explorer, then check the current Display options configuration.
- New code review for this changeset
- Create a code review for the selected changeset, and optionally open it in a Code Review window. You specify the code review's title, initial status, and initial assignee in a popup dialog.
- Advanced
-
- Move changeset to a different branch...
-
You can move a selected changeset and its descendants in the same branch to a different branch. The destination branch should be a new child branch or a new empty branch:
Use the Previous (<) and Next (>) arrows to see the Move changeset option in Windows, Linux and Mac OS.
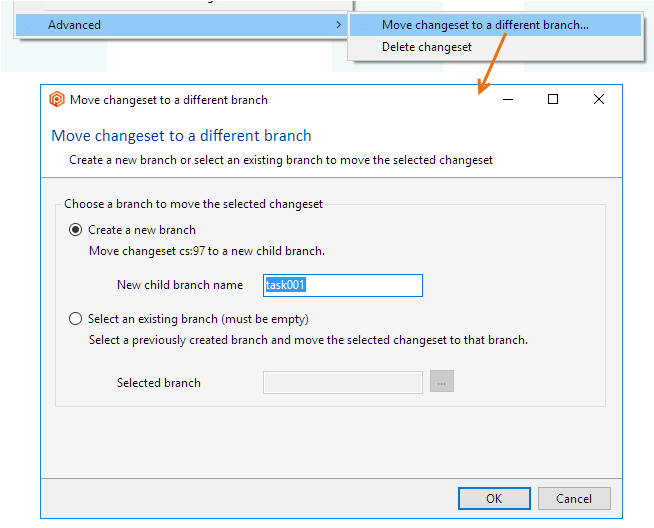
Plastic SCM GUI - Windows - Move changeset
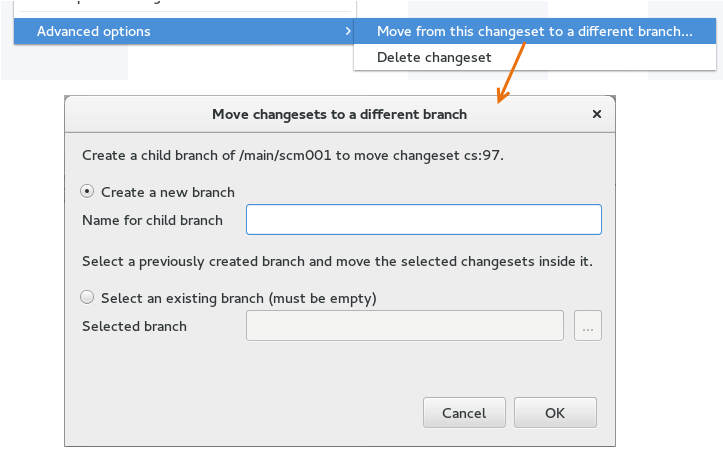
Plastic SCM GUI - Linux - Move changeset
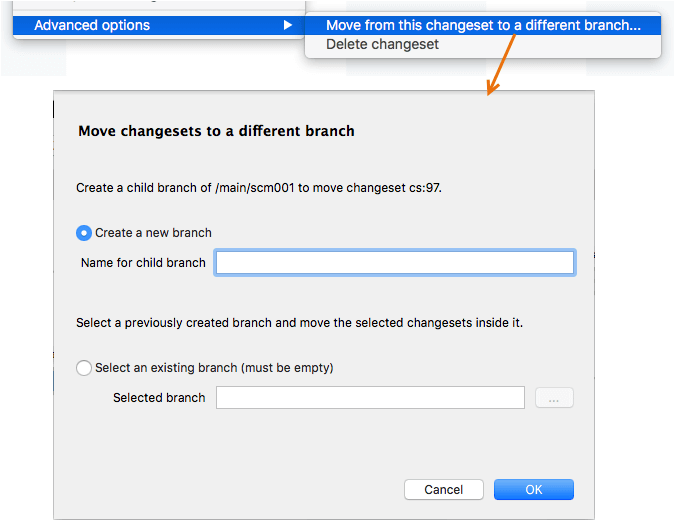
Plastic SCM GUI - Mac OS - Move changeset
- Delete changeset
-
To remove a changeset it must be the last changeset of the branch, cannot be labelled, cannot be the source of a merge of any type, and cannot be the parent of other changeset:
Use the Previous (<) and Next (>) arrows to see the Delete changeset option in Windows, Linux and Mac OS.
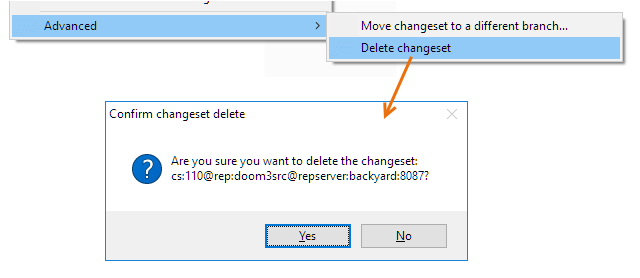
Plastic SCM GUI - Windows - Delete changeset
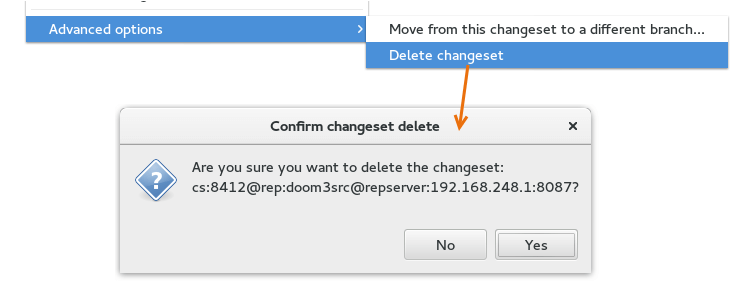
Plastic SCM GUI - Linux - Delete changeset
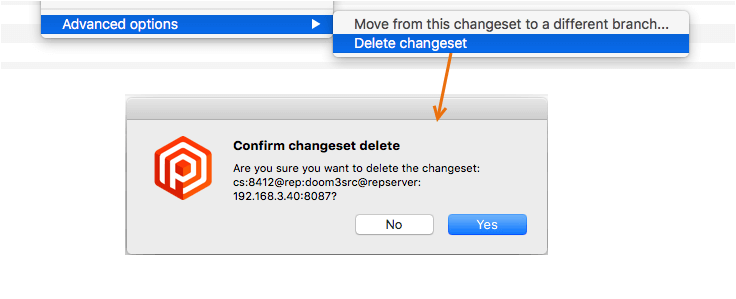
Plastic SCM GUI - Mac OS - Delete changeset
- [External tools]
- It is possible to define external applications to run actions on the selected changesets. Learn how to configure the External tools menu.
Chapter 9: The History View
The History view displays all the revisions of an item - the initial revision created by Add to source control, and all the subsequent revisions created by Checkin.
This view also contains an entry for each namespace change involving the item (even though such a change is recorded as a new revision of the parent directory, not of the item itself).
These changes are:
- Delete - Delete a controlled item.
- Rename - Change the leaf name of the selected controlled item.
- Cut - Cut a controlled item in order to move it.
- Paste - Paste a controlled item that has been cut in order to move it.
Columns in the History View
- Changeset
-
The changeset the revision is part of. Since the history view can display namespace changes, the changeset number listed can have these values:
- Content change - The changeset number is the changeset identifier of this revision of the item.
- Namespace change - The changeset number is the changeset identifier of the parent directory's revision that records the removal, renaming, or moving to another directory of the item.

- Branch
- The branch of the changeset.
- Comment
- The comment string of the changeset.
- Owner
- The user who created the changeset.
- Creation date
- The timestamp of the changeset.
Commands in the History View
Toolbar Commands
The toolbar includes the following buttons and controls:
- Refresh
- Refresh the content of the view.
- Export view data
- This button is used to export the current content of the table in the view to a text file, either CSV or XML. See Exporting the table contents to a text file section for more details.
- Filter
- You can use this field to reduce the History table to a subset of its rows. You can filter on one or all the columns in the view..
Context Menu Commands
A selected revision's context menu contains these commands:
- Open
- (only for files) Launch the program that the operating system associates with this object.
- Open with
-
- Open with
- (only for files) Launch a program that you specify interactively. Learn how to customize the Open with menu.
- [Custom "Open with"]
- Open the application that you customized from the Open with preference.
- [External tools actions]
-
It is possible to define external applications to run actions on the selected items.
In Linux and Mac OS systems, these actions appear under a new menu item called External tools.
Learn how to configure the External tools menu.
- Save this revision as
- (only for files) Save the selected revision as a file on disk. A standard operating system choose-pathname window appears.
- Diff with previous
- Open a Diff view (Side-by-side Diff tool, Image Diff tool, Directory diff tool), comparing the selected revision with its immediate predecessor in the revision tree.
- Diff with other revision
- Display a dialog in which you choose two revisions - by default, the selected revision and the item as it exists in your workspace. Then open a Diff view (Side-by-side Diff tool, Image Diff tool, Directory diff tool) to compare those revisions.
- View history as 2D revision tree
- Open a Branch Explorer for the selected item showing the revisions and their types as described in the 2D revision tree view.
- Revert to this revision
- Create a new revision of the item, using the contents of the selected revision. You are prompted to specify a Checkin comment for the new revision.
- Annotate
- Open an Annotate view for the selected item.
- Diff revision's branch contents
- Open a Diff Window that compares the changes in the branch on which the revision is contained.
- Diff revision's changeset contents
- Open a Diff Window that compares the changes in the changeset on which the revision is contained.
Chapter 10: The Labels View
The Labels view lists all the labels defined for the workspace's repository(s). You can use this view to create new labels and to rename or delete existing ones. You can also execute a number of commands, such as applying a selected label to all the revisions currently in the workspace.
Columns in the Labels View
- Name
- The label's name.
- Changeset
- The changeset on which the label was applied to.
- Branch
- The branch in which the changeset exists.
- Repository
- The repository in which the label was created.
- Owner
- The user who created the label.
- Creation date
- A timestamp indicating when the label was created.
- Comment
- The comment string associated with the label.
The Extended Information Panel
The Show extended information toolbar button opens the Labels view's extended information panel, which has two panes:
- The Properties pane repeats the main table's information on the selected label, and also adds information on replication. It's interesting to note that the object comment can be edited here by clicking on the Comments text box. As soon as a key is pressed to edit, a Save button appears to persist the changes.
- The Attributes pane lists the attributes that are currently applied to the selected label. You can use this pane to revise an attribute's value or unapply the attribute from this label. You can also click the Add attributes button to apply additional attributes to the label.
Commands in the Labels View
Toolbar Commands
The toolbar includes the following buttons and controls:
- Refresh
- Refresh the content of the view.
- Show extended information
- Display the view's extended information panel. To close the panel, use its x button.
- Create new label
- Open a New Label dialog, in which you can define the name and comment of the new label, as well as the changeset to apply it on. By default, the changeset field is filled in with the value of the current changeset loaded in the workspace.
The user can choose to label all writable Xlinked repositories when creating a new label. Plastic SCM will retrieve the Xlink changesets stored in the selected changeset tree and will label them accordingly. Warning messages will be displayed if the selected label name is already existing in any of the xlinked target repositories.

- Export view data
- This button is used to export the current content of the table in the view to a text file, either CSV or XML. See Exporting the table contents to a text file section for more details.
- Filter
- You can use this field to reduce the Labels table to a subset of its rows. You can filter on one or all the columns in the view..
Advanced
Toggles the toolbar's Advanced mode, in which you can view and customize the query that produced this view's table. See section Advanced Mode: Revising the Query that Produces a Table.
Context Menu Commands
The context menu of a selected label includes the following commands:
- Apply label to workspace contents
- Apply the selected label to the changeset currently in the workspace. The command will display an error if there are any pending changes in the workspace.
- Switch workspace to this label
- Change the configuration of the workspace to load the revisions as they were when the label was applied. A message noting that this is a read-only configuration is displayed.
- Browse repository on this label
- Open a Repository browser view, configured to view all the revisions that the selected label is applied to. This is a virtual view into the repository; no data is transferred to the workspace. If you wish to actually load the labeled revisions into the workspace, use the Switch workspace to this label command.
- Merge from this label
- Open a Merge organizer window to merge the changeset to which the label is pointing to with the current content of the workspace. This operation has the same effect as Merge from this changeset.
- Merge from this label to
- A dialog appears to choose a branch in which the selected changes will be applied. This only works if there are no conflicts that need resolved. This command works as the Merge from this branch to and Merge from this changeset to commands.
- Create branch from this label
- Create a new branch using this label as the branch base. See Create a child branch command for more details on the New branch window.
- Show in Branch Explorer
- Show the selected label in the Branch Explorer, scrolling to it if necessary. If the label is not selected in the Branch Explorer, then check the current Display options configuration.
- Rename
- Change the name of the selected label.
- Delete
- Permanently remove the selected label(s) from the repository. This also removes all the applications of the label(s) to item revisions.
- Diff with other label
- Open a Diff window, comparing each item's revision that has the selected label with its revision that has another label. You choose the other label in a popup dialog.
- Permissions
- Open a Permissions window for the selected object.
- [External tools]
- It is possible to define external applications to run actions on the selected labels. Learn how to configure the External tools menu.
Chapter 11: The Attributes View
Attributes are user-defined properties that can be applied to Labels, Branches and Changesets. Attributes are created in the Attributes view and then they can be applied to objects with a specific value, different in each case.
For instance, the user can define an attribute called "Task Status" and apply values like "New", "In progress" or "Completed" to the branches used to implement each task. Combined with the Branch Explorer conditional format and the filtering capabilities available through the Advanced button in several views, attributes let the user build custom intelligence into the Plastic SCM repository.
The Attributes view lists all the attributes defined for the workspace's repository(s). You can use this view to create new attributes and to rename or delete existing ones.
To apply an attribute/value pair to a label, branch, or changeset, use the Extended Information panel in the Labels, Branches, or Changesets view.
Columns in the Attributes View
- Name
- The attribute's name.
- Repository
- The repository in which the attribute was created.
- Owner
- The user who created the attribute.
- Creation date
- A timestamp indicating when the attribute was created.
- Comment
- The comment string associated with the attribute.
Commands in the Attributes View
Toolbar Commands
The toolbar includes the following buttons and controls:
- Refresh
- Refresh the content of the view.
- Create new attribute
-
Open a dialog where you can define the "Name" and "Comment" of the new attribute. You can specify a default list
of values for attributes. You just need to include a line like the following in the attribute comment:
default: value_one, "value two", value3, "Final value"
Use the Previous (<) and Next (>) arrows to see the Create new attribute dialog in Windows, Linux and macOS.
Plastic SCM GUI - Windows - Create new attribute
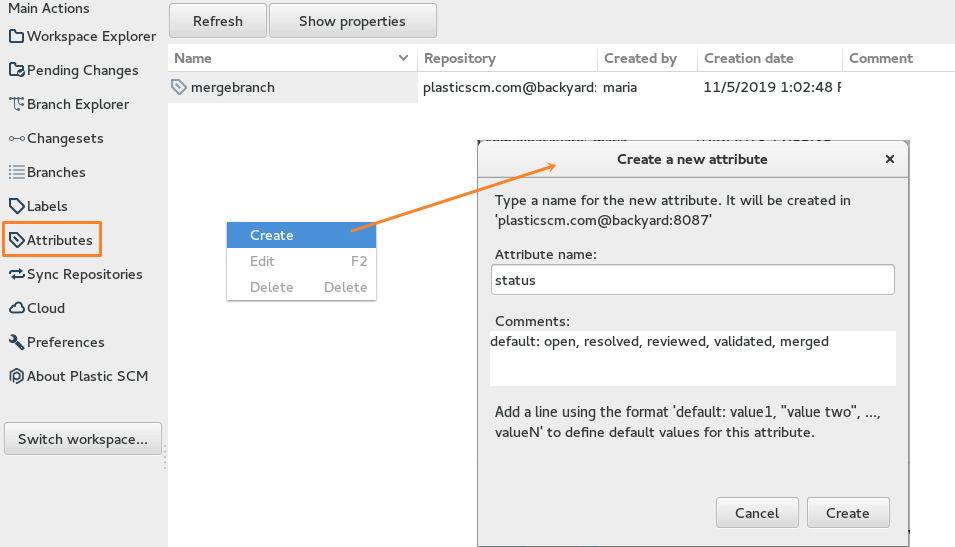
Plastic SCM GUI - Linux - Create new attribute
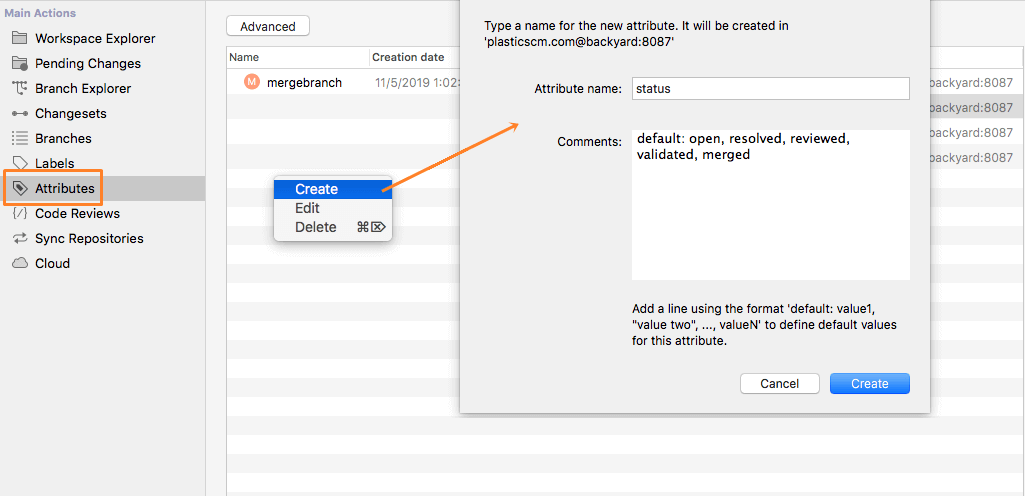
Plastic SCM GUI - macOS - Create new attribute
Then, Plastic scans the attribute comment to find this line and parses that list of comma-separated values to populate the drop-down list of suggested values whenever you want to apply the attribute to an object:
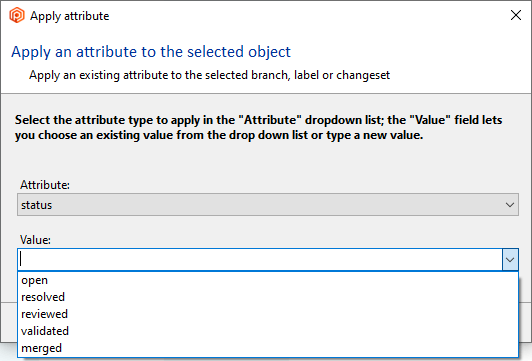
Plastic SCM GUI - Windows - Apply attribute
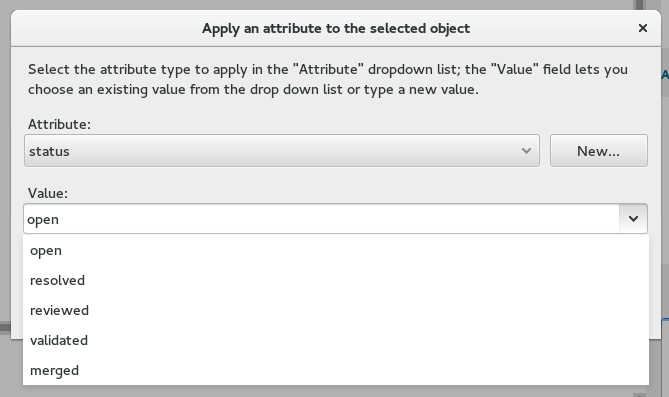
Plastic SCM GUI - Linux - Apply attribute
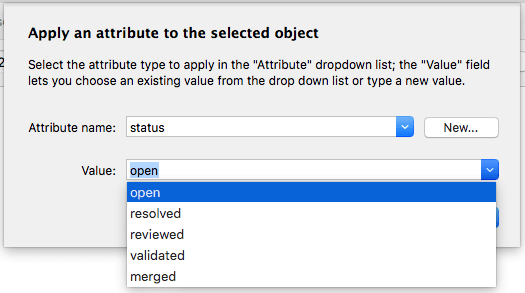
Plastic SCM GUI - macOS - Apply attribute
This is particularly useful when you use our Mergebots, to let all users know what are the expected values they are monitoring.
- Export view data
- This button is used to export the current content of the table in the view to a text file, either CSV or XML. See Exporting the table contents to a text file section for more details.
- Filter
- You can use this field to reduce the Attributes table to a subset of its rows. You can filter on one or all the columns in the view..
Advanced
Toggles the toolbar's Advanced mode, in which you can view and customize the query that produced this view's table. See section Advanced Mode: Revising the Query that Produces a Table.
Context menu Commands
The context menu of a selected attribute includes the following commands:
- Edit
- Change the name or the comment of the selected attribute. Remember that you can specify a default list of values for the attribute as you do it when creating an attribute.
- Delete
- Permanently remove the selected attribute(s) from the repository. This also removes all the applications of the attribute(s) to repository objects.
- Permissions
- Open a Permissions window for the selected object.
Chapter 12: The Repository Browser View
The Repository Browser view shows all the revisions in a particular configuration of the repository, as specified by one of these commands:
- Browse repository on this label
- Browse repository on this branch
- Browse repository on this changeset
This is a "virtual" view into the repository itself, independent of all workspaces. Opening the view does not transfer any data to your workspace. Accordingly, a Repository browser view:
- Does not include any private objects.
- Is not affected by changes that you make to a cloak list. Such changes only affect the downloading of revisions to workspace directories.
Columns in the Repository Browser View
The column setup for this view is almost the same as that for the Workspace Explorer.
The only difference is the lack of a Status column, which applies only to objects in a workspace.
Commands in the Repository Browser View
Toolbar Commands
The Repository browser toolbar includes the controls Refresh, Search, Tree view, and List view.
There is also one more control:
- View/Edit selector
- Open a dialog in which you can view and modify the rules that determine what set of revisions is loaded in the browser. This means that you can view or edit the selector that is being used to browse the repository.

Context Menu Commands
The context menu for a selection of one or more items is the same as in the Workspace Explorer. But many of the commands (for example, Checkout or Rename) are disabled, because they apply only to revisions in a workspace.
Chapter 13: The Side-by-side Diff Tool
The Side-by-side Diff tool compares two text files, side by side. It is used by numerous commands to compare two revisions of an item.
The Side-by-side Diff Tool is also embedded in the Diff window, which compares revisions of multiple items, and in the Branch changes window, which you can use to browse through all the changes made on a branch.
You can configure Diff to appear as a standard view in the GUI window's work context or as a separate top-level window on the desktop (see section The Diff tools Tab in the Preferences dialog). Whether it's an embedded view or a standalone window, we call it the "Side-by-side Diff tool" in this manual.
The main components of the Side-by-side Diff tool are:
- Two file panes - Labeled "left file" and "right file", which display the contents of the two files/revisions.
- A separator bar between the panes - This bar is wide, enabling it to display "tubes" that indicate the various kinds of differences: insertions, deletions, changes, and moves. The separator bar is adjustable. You can also remove it temporarily, so that only the "left file" or "right file" is displayed.
- A control panel at the top - Providing navigation controls and text-comparison options.
- A "find" panel at the bottom - It appears by clicking the Find... button, and supports simple text searches within either file pane.
- The options Text diff and Semantic diff - They shows the differences in text or semantic mode. Each time the user diffs a branch, a changeset or a file from the Pending changes view, he'll have the option to switch to semantic mode.

A new outline pane is displayed when the Semantic diff option is selected. The new pane includes the following information:
- The related semantic information (objects - methods, classes... - that have been moved, added, changed...)

- The Visual diff option, which shows you the semantic differences in a graphical way. The Visual diff can be customized to hide, show or group the unchanged methods, and zoom in or out the differences visual graphic:

- The Skip format changes option that allows you to ignore indentation and EOL changes when the semantic differences are calculated.
- The Reformat option that reformats the source code.
The Diff Revisions Dialog
Sometimes, the two revisions of an item to be compared are not set when you invoke the Diff command (for example, Diff revisions in the Workspace Explorer). Instead, a dialog appears in which you specify the revisions.
For both the "left file" and "right file", the specifications are:
- Name
-
The item's (or private object's) full pathname in the active workspace. The "diff" command fills in this field with the selected item's pathname, but you can change it - either by typing a pathname or by clicking the
 control and selecting a file in the pop-up dialog that appears.
If you specify a private file, the Revision radio buttons become irrelevant, and so are disabled.
- Revision
-
One of these choices:
- Workspace revision - The item's current contents in your workspace. If the item's status is Checked out or Changed, the contents don't correspond to any "official" revision in the repository.
- Latest revision on branch - The most recent revision on a particular branch. You can enter a branch identifier manually (for example, br:/main/task476) or click the control to select a branch in a pop-up dialog.
- Other - A revision that you specify by entering a revision identifier manually (for example, /main/task476#12) or by click the control and selecting a revision in a pop-up dialog.
In many cases, the "right file" is set to Workspace revision when the Diff revisions dialog first appears.
How Differences are Displayed
The Side-by-side Diff tool analyzes the two files/revisions on a line-by-line basis, seeing how they differ. (The definition of "differ" is configurable. See section File-Comparison Options.) It identifies and displays several kinds of difference blocks:
- Insertion - One or more lines exist in the right file, but not in the left file.
- Deletion - One or more lines exist in the left file, but not in the right file.
- Change - A series of lines in the left file differs from a series (not necessarily the same number of lines) in the right file.
- Move - A series of lines exists in both files, but at different locations. The moved block does not need to be identical at both locations - see the Moved detection option in the File-Comparison Options section.
(The names "insertion" and "deletion" are based on the assumption that the left and right files represent the "before" and "after" states of editing a file.)
The left and right sides of a difference block are displayed with tinted backgrounds, and are connected by "tubes" in the wide separator bar. The figure below shows an insertion, a deletion, and a change (the moved blocks are special, and so deserve their own section):

The deleted regions are represented with a line:

The tinted background colors are configurable -- see the option Configure colors.
The XDiff Capability
There are many SCM systems available, and even more standalone "diff" programs. But very few even try to detect when a block of text has been moved from one part of a file to another - and possibly edited, too. But that happens all the time - it's what refactoring is all about!
Plastic SCM has a robust capability for detecting, displaying, and comparing such moved blocks. We call it Xdiff ("cross-difference"). The Side-by-side Diff tool indicates a moved block as follows:

- In one pane, the block is marked as an insertion; in the other pane, as a deletion. This counts as two blocks in the tally of difference blocks (see this figure).
- A purple "ribbon" in the wide separator bar connects the two sides of the block.
- Control buttons float over each side of the block:
 Click this button in one side to scroll the display and go to the moved fragment, making the other side visible. This does not change the Side-by-side Diff tool's current difference block - see section Navigating the Difference Blocks.
-
 Click this button to open a subdiff window, comparing the two sides of the moved block side-by-side. This is especially useful when a block has been moved "far away", making it difficult or impossible to bring both sides into view by simple scrolling. The sub-diff window provides its own difference count (within the moved block) and its own navigation controls.
The subdiff window is modal: you must close it before returning to work in the original Side-by-side Diff tool.
Because Xdiff's job is to detect blocks that have been both moved and modified, its work is not an exact science. ("Is Block B a modified version of Block A, or are they unrelated?") Accordingly, you can tune the Xdiff algorithm - see the Moved detection option.
Comparing Binary Files
The Image Diff tool for binary files can compare image files and revisions in a wide variety of formats, including, but not limited to: JPEG, PNG, GIF, and BMP. Other image formats are supported by using the preview generators. The binmergetool (Binary Merge Tool) uses it to generate managed images from other formats.
There are several ways you can compare revisions of an image (right-click on the image in the Workspace Explorer, and select Diff with previous revision or you can manually select a different revision):
-
Side by Side
This view allows you to view the image differences by placing the current revision of an item next to a previous revision:

-
Onion Skin
This view allows you to compare two revisions of a binary file using a slider bar atop the image. The picture below has the slider bar near the left-middle position, so you can see the complete first revision and how the second revision is showing up as a top layer:

-
Differences
The differences view is useful when the changes made to an image are more subtle, as contrast or color. This view will show you only the changes made to the image:

-
Swipe
The swipe option allows you to move a slider from side to side in order to view bit by bit the changes made to the image. As you can see below, David Hasselhoff is being turned into a Storm Trooper. Most excellent ;)

-
Show Properties
This button shows/hides the image properties for each revision. You can see examples of these properties views in the examples above: Image Diff - Side by Side and Image Diff - Swipe.
-
Zoom Controls
The last four buttons at the top of the binary Side-by-side Diff tool are the zoom control buttons. In order, they are:
- Zoom in
- Zoom out
- Zoom to original size
- Zoom to best fit
And you can also use Ctrl + Wheel to zoom.
Diffing and Merging with Microsoft Products
Plastic SCM is capable of diffing Word documents, Excel spreadsheets, and even PowerPoint presentations. The user is also able to merge Word documents.
Supported versions go from Office 2007 (except Powerpoint 2007) to Office 2016.
-
Diffing with Word
Plastic SCM is capable of diffing Word documents. Simply right-click on the item in the Workspace Explorer, and select Diff with previous revision (or you can manually select a different revision).
Diffing with Word documents looks different than diffing other text files, since it utilizes the Word program itself. You can see some of the differences below.

-
Merging with Word
Processing a merge of two Word files opens up a new Word file with the Plastic SCM extension that shows the two versions of the document on the right-hand side. These have been intelligently merged in the middle pane, with possible conflicts highlighted for you to resolve manually.

-
Diffing with Excel
Plastic SCM is capable of diffing Microsoft Excel documents. To perform the diff operation, right-click on the file in the Workspace Explorer and select Diff with previous revision (or you can select a different revision).
Since version 9.0.16.4345, when you diff Excel files (.xls or .xlsx) Plastic launches Microsoft's Spreadsheet Compare tool by default.

Read more about diffing Excel in Plastic with Spreadsheet Compare .
-
Diffing with PowerPoint
Plastic SCM is able to diff with only Microsoft PowerPoint 2003. Microsoft dropped support for diffing after the 2003 release.
Diffing with OpenOffice Writer
Plastic SCM is capable of diffing OpenOffice Writer documents.
Just right-click the OpenOffice item in the Workspace Explorer and select Diff with previous revision (or you can select a different revision).
The OpenOffice Writer application opens to show you the differences between the selected revisions:

Comparing Revisions of a Directory
The Directory Diff tool's comparison of directory revisions appears similar to its comparison of simple text files. To perform the diff operation, right-click on the directory in the Workspace Explorer and select Diff with previous revision (or you can select a different revision).
The left-side directory revision's contents are displayed an alphabetized list of file and subdirectory names. An item's name in the other directory revision appears directly across, on the right side. Thus:
- A simple renaming of a file or subdirectory appears like a one-line change to a text file:
- If an item has been deleted or moved to another directory, the change appears like deleted text. (Multiple such changes that are alphabetically consecutive appear as a single deletion block.)
- If a new item has been created or an existing item moved from another directory, the change appears like inserted text. (Multiple such changes that are alphabetically consecutive appear as a single insertion block.)

The Side-by-side Diff Tool Toolbar
The toolbar includes the following indicators and controls:
- Difference block navigation controls
- First, Previous, Next, and Last buttons support browsing through all the difference blocks. The Current: NN/TT indicator identifies the current difference block and the total number of difference blocks.
- Options
- A menu of options that control file comparison. See File-Comparison Options.
- Find
-
Open a search panel at the bottom of the view you've selected.

The text box provides a way to search text through the entire text (not just the difference blocks). The Match case checkbox lets you set up a case-sensitive/insensitive searching.
You can also call up the search function by pressing Ctrl + F over the target file.
- Left File / Right File
- Descriptions and revision identifiers of both revisions that are being compared.
Navigating the Difference Blocks
The current difference block is marked with a gray short line as indicated by dull-red tinting of both side's line numbers:

Notes:
- This figure shows that for insertion and deletion blocks, the tinting on one side spans zero text lines, and so appears as a line instead of a rectangle.
- For a moved block, dull-red tinting appears on one side only - and that side is considered to have the current difference block.
To keep yourself oriented, use the indicator in the Side-by-side Diff tool toolbar:

Use these facilities to navigate among the difference blocks - and more generally, within the files/revisions being compared:
- Scroll bar - The scroll bar at the right side of the Side-by-side Diff tool works in the standard manner. The left and right panes scroll somewhat independently, in order to keep both sides of each difference block visible. (This can cause the "tubes" to change shape a bit. Hours of fun to be had there...)
Clicking anywhere in the empty region of the scroll bar centers the draggable "elevator" control at that spot (to the extent possible). The scroll bar's background shows the locations of the difference blocks with tinting. Thus, you can click a difference block's tint in this "scroll bar map" to bring the block into view. But this does not affect the current-difference-block setting. - Mouse - Click anywhere within the tinted area of a difference block to make it the current difference block.
- Navigation buttons in the toolbar - Buttons in the Side-by-side Diff tool toolbar (see the previous figure) support browsing through all the difference blocks. Clicking a button sets the current difference block and scrolls the display to bring it into view.
Built-in semantic diff
Plastic SCM "understands" the code. This means that Plastic is able to identify and show if a method was moved, deleted, added, changed...
The semantic diff capability is able to:
- Match methods (declarations of any type in fact) to calculate the diffs. You moved a method down? No problem!
- Decorate the side by side text diff with symbols (A - added, D - deleted, C - changed, M - moved, R - renamed) to better understand the changes.
- Ignore code format changes such as indentation and EOL changes. Suppose you just split a method call in several lines without other changes - the diff will be ignored by default.
The built-in semantic diffing is available for C#, VB.net, C and Java languages.
Plastic includes C# 7 support. So .NET framework 4.6 is required.
Plastic includes C# 7 support. So .NET framework 4.6 is required.
A regular Plastic "text based diff" displays the file differences between two revisions in this way:

Because Plastic "knows" what happens with the code, then the Plastic built-in semantic diff marks those differences as moved (M), deleted (D), added (A), changed (C)...

Once you enter in the semantic mode, an outline of the changes is displayed highlighting the changes on methods, classes, attributes and so on. Clicking on an element on the outline, highlights the corresponding declaration on the right side of the diff view:

You can go further by getting more information about a specific difference, such a changed or moved difference. In the example below, by clicking on the C mark and then selecting the Diff changed code option (or by doing Ctrl + Click) a new window will show up displaying the differences related to the selected change:

Text Operations
The Side-by-side Diff tool is not a text editor - you cannot change the contents of either pane. But right-clicking in either pane opens a context menu, providing for limited text operations:
- Copy
- Copy the selected text to the operating system clipboard.
- Select All
- Select the entire contents of the current pane.
- Go to line
- Open a dialog where you can enter a number line to go to.
- Find
- Same as clicking the Find toolbar button.
- Find next
- If the search panel is already open, perform a search forward. If the search panel is not already open, simply open it.
- Outlining
- Also known as folding, lets the user collapse or expand outlining nodes. Learn more about this feature here.
File-Comparison Options
The following options control how the contents of files/revisions are compared in the Side-by-side Diff tool:
- Comparison method
-
- Ignore EOL - Ignore line-endings. This is helpful, for example, if one revision being compared was created on a Linux system (text lines end with NL) and the other was created on a Windows system (text lines end with CR-LF).
- Ignore whitespaces - Within a single line, treat any consecutive string of SPACE and/or TAB characters as equivalent to a single SPACE.
- Ignore EOL and whitespaces - both of the above.
- Recognize all - neither of the above.
Learn how to configure the EOL conversion mechanism. - Syntax highlight
-
- Plain text - don't perform any syntax highlighting.
- The language is automatically selected based on the file extension or the user can select one of the supported languages listed in the menu.
- The user can customize the language extensions to syntax highlight the code by creating a
languages.confconfiguration file in thesyntaxhighlightdirectory, in theplastic4directory (under$HOME/.plastic4on Linux/Mac systems orC:\Users\user\AppData\Local\plastic4on Windows):
C:\Users\user\AppData\Local\plastic4\syntaxhighlight\languages.confThis is an example of a
languages.conffile:#syntax language definition by file extension .js:JavaScript .custom:XML .txt:Plain text
These are the supported languages that can be syntax highlighted: C#, Visual Basic, Java, JavaScript, XAML, Python v2.x, Python v3.x, JSON, XML, Batch file, C, C++, CSS, HTML, INI file, Assembly, Lua, Markdown, MSIL, Pascal, Perl, PHP, PowerShell, RTF, Ruby, SQL, VBScript.
- Encoding (Left and Right encoding)
-
The way in which each file/revision's contents are to be interpreted as text characters:
- None - interpret the contents using the operating system or development framework default.
- ASCII - interpret the contents as ASCII characters.
- Unicode - interpret the contents as UTF-16LE characters.
- Unicode Big-Endian - interpret the contents as UTF-16BE characters.
- UTF7 - interpret the contents as UTF-7 characters.
- UTF8 - interpret the contents as UTF-8 characters.
- Other - you can select another character enconding.
- Editor options
-
- Convert tabs to spaces while editing
- When this option is selected, if the user is editing a revision into the Diff tool in the Pending changes view and he enters a new line, then the tabs will be converted to white spaces.

- View white spaces
- Make the whitespaces visible.
- Tabs
-
- 4 spaces - Establish tab stops every 4 columns.
- 8 spaces - Establish tab stops every 8 columns.
- Column guides
- Let the user display a column guide at 60, 80, 100, 120 or 140 columns.
- Outlining
- Or folding to let the user expand or collapse the text (code) in the Diff panes. The outlining feature is supported by these languages: C#, Visual Basic, Python (2 and 3), JavaScript, JSON and XML.
- Collapse regions without diffs
- Collapse only that parts of the text that don't have any difference.
- Collapse to definitions
- Collapse all the text by creating outlining nodes based on code definitions.
- Expand all
- Expand all the outlining nodes showing all the text.
- Preferences
- Let the user configure how to always show the text in the Diff panes by selecting one of the three options defined above.
- Moved detection
-
Open a dialog in which you can adjust two parameters used by both the Xdiff ("cross-difference") and Xmerge ("cross-merge") capabilities, which detect moved text sections - see The XDiff Capability and The Xmerge Capability.
- Enable move detection - Enable/disable move detection behaviour.
- Move detection ratio - The threshold at which two text sections are determined to be "the same section, but edited". Choose a higher value if you are getting "false positives"; at 100%, two sections must be truly identical to be judged the same section. Choose a lower value if Xdiff/Xmerge is failing to recognize an insertion/deletion pair as being the same section.
- Minimum lines in difference - The minimum number of lines that each section must contain to trigger Xdiff/Xmerge processing. Below this threshold, the two sections are always treated as a separate insertion and deletion.
- Configure fonts and colors
- Open a dialog in which you choose the font and the background color for differences blocks (Diff) and changes blocks (Merge).
EOL conversion mechanism
The Plastic client implements a EOL conversion mechanism capable of transforming the different end of lines of text into the right one for the local system.
This feature is useful for teams working on different operating systems with editors and IDEs that can't handle correctly (or complain) files with different EOL types.
The EOL conversion only works for text files.
There are two ways to enable EOL conversion (it is disabled by default):
-
Edit the
client.conffile:-
You must add the
AutoEolConversionkey. For example:<AutoEolConversion>Auto</AutoEolConversion>
-
The valid values are:
None(the default),Auto(converts based on the OS),CR,LF,CRLF.
-
You must add the
-
Create a file named
eolconversion.conf:- In your Plastic SCM client installation directory.
- In the
plastic4directory (under$HOME/.plastic4on Linux/Mac systems orC:\Users\user\AppData\Local\plastic4on Windows). -
This
eolconversion.conffile lets you define the EOL conversion based on the file extension. -
This is an example of a
eolconversion.conffile:
Theeolconversion.conffile must be located:cr .cpp, .pas lf .c crlf .h
-
The valid "conversion types" are
None,Auto,CR,LFandCRLF. -
If an extension is not defined in the
eolconversion.conf, it will use the general conversion type configured in theclient.conffile.
How does the EOL conversion work?
- The EOL conversion will be used not only during an update, but also each time a file is retrieved from the workspace (diff, cat, annotate).
- The EOL conversion only works while downloading files. Checkin always preserve the content created by the user.
Remarks: It is recommended to start with a clean workspace to start using EOL conversion.
Updating an existing workspace, won't rewrite unchanged files even if they need EOL conversion. Only new files being downloaded will be converted.
If you have a file checked out and then you change the EOL configuration, then diff with previous can display differences in EOLs.
Remember to restart the GUI after changing the EOL conversion settings (the client.conf file won't be reloaded otherwise).
Chapter 14: The Diff Window
The Side-by-side Diff tool compares two revisions of an individual item. The Diff window "bumps it up" a level, comparing two sets of item revisions. A set of revisions can be a complete configuration of the repository - for example, the set of revisions to which a given label is applied. Or it can be more limited - for example, the set of revisions in a given changeset or the set of latest revisions on a given branch.

The Diff window above includes these panes:
- Changeset information - The pane above shows you the information about the given changeset. So, you can see who and when the changeset was created, the changeset number and GUID, and the comment entered when the user run the checkin to save the changes. You can edit this comment by clicking the Edit comment button.
- Items list - It's the top left pane with a table of items and a control panel that provides browsing and filtering tools.
- Statistics - The top right pane, which shows statistics about the change type distribution.
- Side-by-side Diff tool - The pane with a complete and fully-functional Side-by-side Diff tool, with its own control panel.
- Find in files results - You can enter what to find, filter by extensions file, specify where to find (source file, destination file or both of them), and also narrow down the search results (selecting where to find - in all files, in the current file (the one visible in the Side-by-side diff pane), or in the visible files in the diff view (the filtered files)).
The toolbar across the top has the following controls and buttons:
- Items navigation controls
- Page back and forth between the items in the list.
- Statistics
- Hide or show the Statistics panel which shows the change type distribution.
- Analyze differences
- Show a new column in the items list with information about code lines.
- Code moved between files detected! Show
-
When the Diff finds code moved between files, the related notification appears:

If you click the Show button, you will see the information about the move:

- Analyze refactors
-
This button is only visible when there are more than 50 files in the items list. Note that the Diff only finds
refactors automatically for less than 50 files.
If the Analyze refactors detects refactors, then it launches the multi-file semantic diff to help you diff refactored code that has been moved between different files.
- Skip merge tracking
-
This button is only visible when several merge sources have been detected. When you click the button, diffs are not grouped by merge.
See below how the items view in the Diff Window looks like when the Skip merge tracking button is disabled or enabled:

- Viewed navigation controls
- Page back and forth between the viewed items: these are the items that you've explored (viewed) at the bottom pane when they've been selected.
- Find in files
- Let the user find any text in the left/right files, or in both.
- Filter
- You can use this field to reduce the items list to a subset of its rows. You can filter on one or all the columns in the view..
As you browse through items in the top pane, the Side-by-side Diff tool automatically compares the revisions of that item in the two specified sets. If the item has a revision in only one set, the Side-by-side Diff tool is replaced by a simple display of that revision.
The Plastic SCM GUI also includes tools that embed an entire Diff window inside a window with additional functionality:
Text diff is editable
The Diff Window lets the user edit the currently loaded revision in his workspace. This is when the revision on the right side (destination) is on disk.
To edit the loaded revision, the right side must be in text mode (not semantic mode). Once the user selects the text mode, then the loaded revision is "editable".
This way, the user is able to make changes to the code and apply them as a new revision.
When you change the revision, then the title of the revision is in red instead of black color. And two new options appears: Save (or Ctrl + S) and Discard .
Use the Previous (<) and Next (>) arrows to see the Text diff is editable feature in
Windows, Linux and macOS.
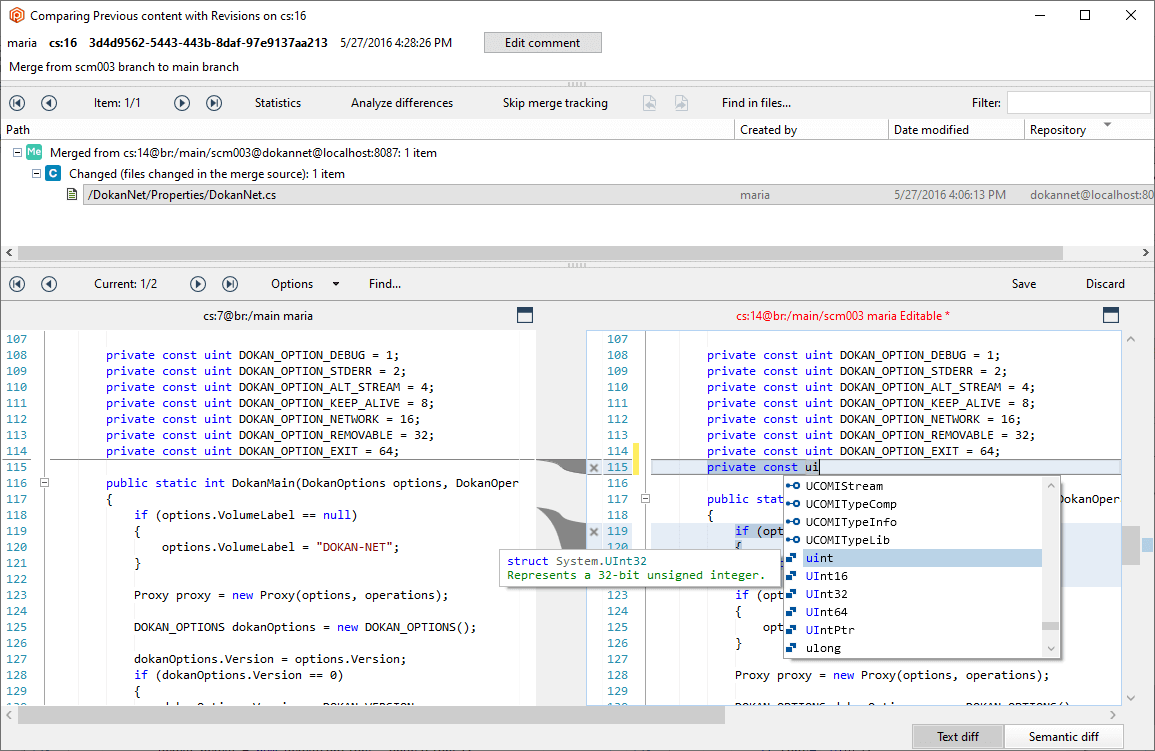
Plastic SCM GUI - Windows - Text diff is editable
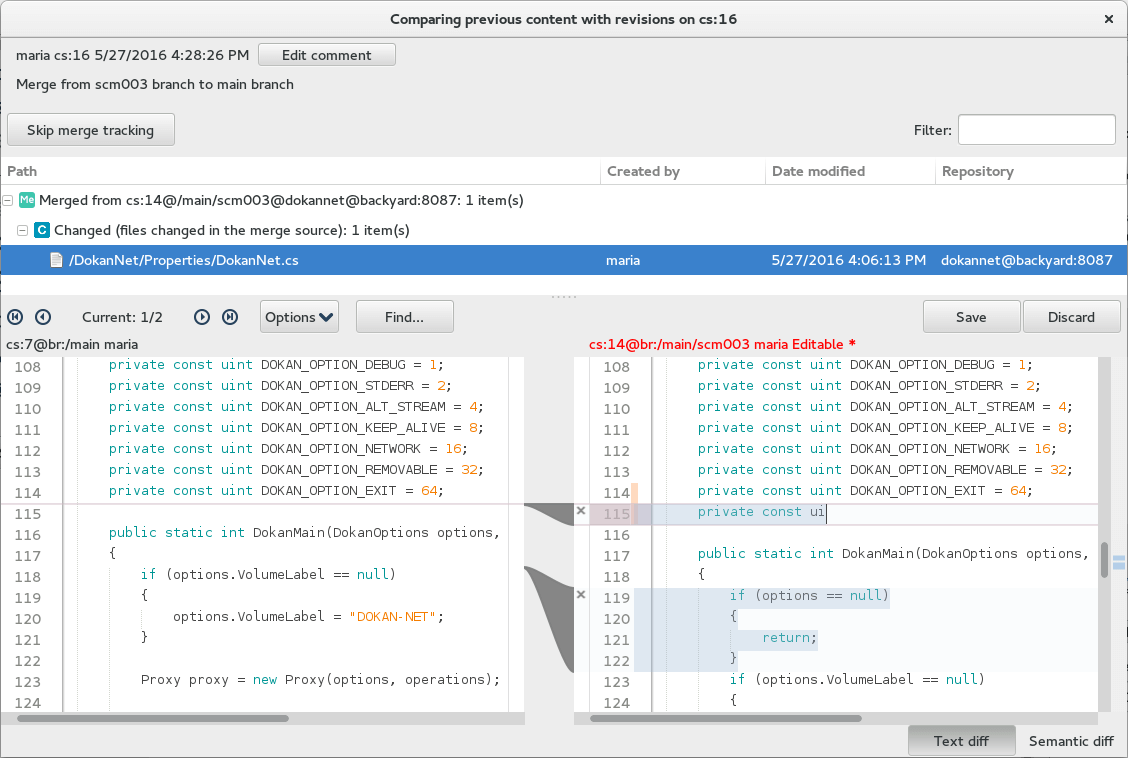
Plastic SCM GUI - Linux - Text diff is editable
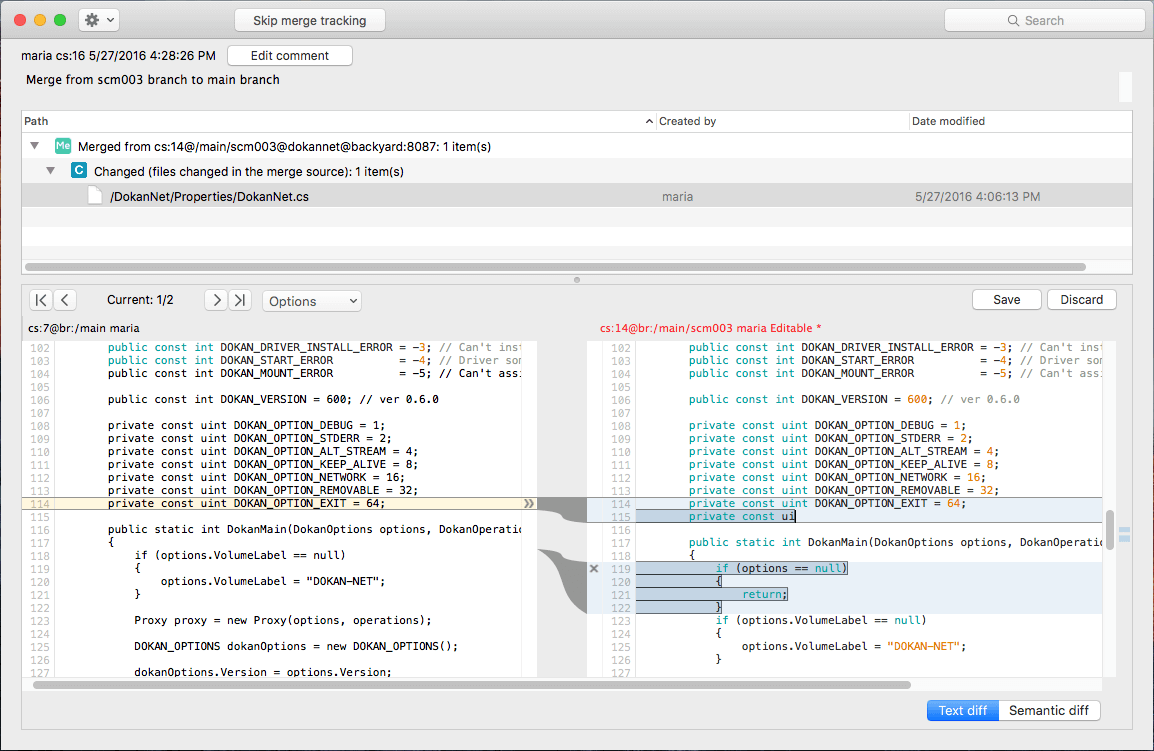
Plastic SCM GUI - macOS - Text diff is editable
After saving the changes done, then:
- The title of the revision comes back to black.
- The options Save and Discard disappear.
- The revision appears as viewed + edited.
- And a new changed item is in the Pending changes view:


So the change can be checked-in to get a new revision, or undone to keep the item as it was previously.
Diff branches and changesets with merges
It's possible to see what elements come from a merge when diffing a branch or a changeset. This means that it is possible to understand where each difference comes from.
These elements are showed inside a Merge group ( ![]() ):
):

The elements in this Merge group are those that were modified both in the source branch and in the destination of the merge, and hence they required a 3-way merge. Normally, these are the files worth reviewing when diffing a merged changeset.
The diff is helping you to understand the change because instead of a regular diff, it is grouping the files depending not only on the category (added, changed, deleted, moved) but also on whether they come from the branch being diffed itself, or from the merge.
Note in the picture above, that the ![]() group means "files in conflict". "CC" stands for changed-changed, which means it has been modified both on the branch and during the merge. This is the case of the ClientFileSystem.cs file.
group means "files in conflict". "CC" stands for changed-changed, which means it has been modified both on the branch and during the merge. This is the case of the ClientFileSystem.cs file.
If we select that file and take a deeper look at the lower part of the diff window, you'll see that it's possible to find out where each change is coming from:

Using different colors the diff highlights:
- The changes done on the branch (in blue).
- The changes coming from the merge (in green).
- The changes that were modified during the merge as part of a conflict resolution (in red).
This is useful when you're reviewing code from another developer and the branch you're reviewing contains merges. It's normally difficult to figure out what was really modified on the branch and what is just coming from another one. These highlights show what happened to the code, making code reviews much easier using Plastic.
The Merge group can show you too those elements that were added in the branch and modified during the merge. This is the case of the FsProxy.cs file in the picture below:

Instead of seeing the FsProxy.cs file as added as a regular diff would do, you can see that the file was added during the merge and the actual modification you did on the file. In any other version control system, you'd just see FsProxy.cs as new and you wouldn't be able to clearly distinguish what you changed on the file (unless you started to diff each single changeset on the branch).
Plastic doesn't only diffs the trees associated to each changeset, but also calculates the individual history of each file to be able to find out what was merged and when.
Multi-file semantic diff
Related to the built-in semantic diff feature, Plastic SCM is able too to track the refactor and diff it correctly because of the multi-file semantic diff or analyze refactors feature.
As you've seen at the beginning of this chapter, when a branch or changeset diff is launched and there are more than 50 files involved, then the Analyze Refactors button appears. This feature parsers the code to detect refactors.
The Analyze refactors button will parse the C#, Vb.net, C or Java code.
This way, you can easily diff a method that was moved between two files as a result of a class being split. Plastic will locate the two versions of the method, on different files, and the user will be able to easily diff it.
Let's see the following example:

If you click the Analyze refactors button, then the analyze refactors
feature starts processing the differences. After calculating the semantic differences and if it finds some
code moved between files, then you can click the
Show button to see an explanation (Visual Diff) of the refactor group
( ![]() ):
):

If you click in the items view a file involved in the refactor, then you'll see a new semantic category - the Multi-file Moved. This mark explains if the class, method and so on, has been moved to or moved from:

Two new options are available now:
- Diff moved code - Show up a diff taking the code from the two involved files (similar to the Diff changed code option).
- Go to moved code - Jump to the file where the code was moved to.
Columns in the Items Table
The items table is divided in categories for Changed, Added, Moved and Deleted items, much like The Pending Changes View. The columns found in this panel are:
- Path
- Contain the repository pathname of them item.
- Created by
- Show the user who created the item.
- Date modified
- It's the date on which the item was last modified.
- Repository
- Show the repository in which the revision is contained.
- Viewed
- Show if you have explored in the Side-by-side diff tool pane the content of the selected item in the Items pane.
- Status
- This column shows up after clicking the Analyze differences button. The Status column can have the following values: Identical, Changed, Added, Deleted, Only changes in comments or blank lines.
- LOC / SLOC
- This column shows up after clicking the Analyze differences button. If you have CLOC in your Plastic SCM client directory, the new column SLOC shows you the differences by counting the number of code lines. Otherwise, the column LOC shows you the differences by counting the number of physical lines.
In the picture below, check what both SLOC and LOC columns show regarding the following changed code:

Chapter 15: The Branch Changes Window
The Branch Changes window is opened by the Explore changesets on branch command. It enables you to get both high-level and detail-level perspectives on the changes that have been made on a selected branch:
- The left pane is a scrollable listing of all of the branch's changesets, with their timestamps and comment strings.
(The initial changeset and any others that establish or change the branch's branch base link are not included in this listing.)
- The right pane is an embedded Diff window , which "recalculates" automatically as you browse through the changesets.
Selecting a changeset in the left pane executes a Diff changeset contents command on that changeset, displaying the results in the right pane.

You can use both the mouse and the standard keyboard navigation keys to browse through the changesets in the left pane. See the Diff Window and Side-by-side Diff Tool descriptions for help using the right pane to "drill down" from the changeset level to individual line edits.
Chapter 16: The Merge Organizer Window
The Merge Organizer window is a dispatch center, in which you initiate the merging of branches and changesets. For more details about the merge operation, refer to the INTRODUCTION TO PLASTIC SCM guide.
In most cases, the revisions to be merged come from two specified sets - for example, the set of revisions (inside changesets) on one branch, and the set of revisions (inside changesets) on another branch. In all cases, merging two of an item's revisions is a directional operation:
- One revision is the source - It remains unchanged by the merge operation. This is the revision that comes from the branch or changeset that is being merged.
- The other revision is the destination - It is always the revision in your workspace - typically, the last revision on the workspace's active branch. The merge operation performs a Checkout on this revision (if necessary) and replaces its contents with the merge results.
When the view is loaded, it presents a summary of the operations that will happen during merge. This summary can be formed by three panes:
- Items to merge.
- Directory conflicts.
- Discarded conflicts.

Items to merge
The list of items that need to be merged, grouped in categories according to the type of merge conflicts between the source and the destination revisions.

This is a list of all the possible categories:
- Changed on both the source and destination, might require a manual merge - These items have been changed on both source and destination. Plastic SCM will try to merge them automatically, but if both revisions have changes on overlapping lines, the user needs to solve them manually. In this case, The 3-way Merge described in the next chapter is used.
- Changed only on source, automatic merge - The item only has changes in the source, so the changes will be merged automatically to the destination in the workspace.
- Added, automatic merge - The item has been added in the source branch or changeset; it will be added as well in the destination (the workspace).
- Moved, automatic merge - The item has been moved in the source branch or changeset; it will be moved as well in the destination (the workspace).
- Deleted, automatic merge - The item has been deleted in the source branch or changeset; it will be deleted as well in the destination (the workspace).
Columns in the Items to merge table
- Item name
- The item's full pathname in the active workspace.
- Remarks
- A short description of the conflict for each item.
- Contributor
- Prints the action that will be run when the Process all merges button is clicked. This can be set in The Merge Options , to force the merge to take all the changes from a specific contributor or try to merge them.
Context Menu Commands
A selected item's context menu includes these commands:
- Merge selected files
- Process the merge for the selected files.
- Merge selected files choosing method
-
- Merge with manual conflict resolution (review conflicts)
- Open a 3-way Merge window to review the conflicts.
- Merge with automatic conflict resolution, when possible
- Try to automatically solve the conflict without user intervention.
- Merge keeping source changes
- Do the merge operation by including the source changes.
- Merge keeping workspace changes
- Do the merge operation by including the workspace (destination contributor) changes.
- Diff destination contributor with source
- Diff destination contributor with ancestor
- Diff source contributor with ancestor
- These three options open a Side-by-side Diff tool, comparing any two of the three revisions involved in the merge.
- View history as 2D revision tree
- Open a Branch Explorer for the selected item showing the revisions and their types as described in the revision tree view.
- Change merge contributor
- Override the merge behaviour. Here you can get further information about these options:
- Merge changes from both contributors
- Preserve workspace changes
- Preserve source changes
- View merge contributors
- Open a pop-up window, showing the revision identifiers of the source, destination, and common ancestor revisions.
- Expand all
- Expand all merge categories.
- Collapse all
- Collapse all merge categories.
Directory conflicts
If directory merge conflicts are found, an additional panel is shown on the top of the Merge Organizer window. The directory conflicts need to be solved before the merge of files can continue.

You are able to apply filters to a tree using the Filter textbox at the top right-hand corner of the screen. If the text in a cell matches the text in the Filter textbox, that row is shown. All other rows are hidden.
With very large merges, such as those containing more than 100 directory conflicts, you can select all the conflicts on the list, right-click, and select the resolution method that you prefer to use for all selected conflicts. This is a huge time-saver, freeing you up to do the more labor-intensive resolutions.
These are the possible types of directory conflicts (Conflict column):
- Add / Move conflict
- An item has been added on the source and other item has been moved on the destination to the same location.
- Move / Add conflict
- An item has been moved on the source and a item with the same name has been added on the destination on the same location.
- Change / delete conflict
- An item has been added or modified on the source, and the destination has deleted the item or its parent.
- Cycle move conflict
- Two items have been moved on source and destination and collide because they create a cycle.
- Delete / Change conflict
- An item has been deleted on the source and the destination has changed it.
- Delete / Move conflict
- An item has been deleted on the source and it was moved on the destination.
- Move / Delete conflict
- An item has been moved on the source and the destination has deleted it or its parent.
- Divergent move conflict
- An item was moved on source and destination to two different locations.
- Evil twin conflict
- An item has been added on the source and on the destination with the same name, and they are different items.
- Loaded twice conflict
- Two items have been added on source and destination and collide because they are the same item.
- Moved evil twin conflict
- Two different items with the same name have been moved to the same location on source and destination.
- Xlink conflict
- An Xlink has been changed on source and destination.
- Writable Xlink conflict
- The Xlinked repository doesn't know the ancestor changeset to calculate merge. The user must specify the ancestor changeset manually.
To solve the directory conflicts, the user needs to click on the Choose... clickable link in the Resolution method column. This will pop up a new dialog with several choices for the specific type of conflict.

This dialog lets you review the involved changes before choosing one of the options presented by clicking the Actions button:
- View changes on source item - Open a Side-by-side Diff tool of the item.
- View content of item changed on source - Open a revision viewer with the source content.
- View content of item deleted on destination - Open a revision viewer with the destination content.
Once a directory conflict is resolved, the Status column will change from "Unresolved conflict" to "Solved conflict".
Context Menu Commands
A selected conflict's context menu includes the Choose... option and the same commands in the Action botton that you've seen before.

Discarded conflicts
The bottommost panel shows the discarded conflicts, or merge warnings. These warnings are largely informational - they'll tell you why a particular item has been discarded - but can also contain real warnings. You'll also note the presence of a Severity column, that gives you an idea of which discarded items are more important.
As far as housekeeping is concerned, you are allowed to sort the discarded conflicts pane. You can sort by item name, severity, or remark. You can also maximize this pane, close it, and restore it, if you need it back.

Commands in the Merge Organizer Window
The Merge Organizer has a set of buttons on the top of the view and a few more at the bottom.

- Process all merges
-
Run the merge operation.
-
By default, if you have pending changes to be checked in in your workspace, Plastic SCM will prevent you from performing a merge.
But if you are familiar with how merge works, it is safe to disable this extra check. To do so, you can do it from the Allow to merge with pending changes option in the Preferences window under the Diff and Merge tab, or manually editing yourclient.conffile adding the following key:<MergeWithPendingChanges>yes</MergeWithPendingChanges>
Before performing a merge, Plastic will look for the same kind of changes that you have checked to look for on your Pending changes view preferences, meaning that, if you have a locally changed file, but you have the Show changed items option disabled, Plastic will not prevent the merge even if the Allow to merge with pending changes option is disabled. - If Directory conflicts are still unresolved, a message will appear warning that the directory conflicts need to be resolved before continuing with the merge.
-
By default, if you have pending changes to be checked in in your workspace, Plastic SCM will prevent you from performing a merge.
- Explain merge
- Open a new Branch Explorer window with a filtered diagram that displays the base, source and destination changesets used in the merge calculation.
- View contributors
- Open a new window with a list that shows the changeset contributors in the merge.
- Merge options
- Open a new window with the options that govern the merge operation. This dialog is described in its own section below.
- Recalculate merge
- Refresh the Merge Organizer view to perform the merge calculation considering the latest changes of the workspace.


The Merge Options window
The Options panel (opened with the Merge options button) enables you to customize the merge operation.

- Select merge contributor - In this section it is possible to override the default merge behavior of combining changes from source and destination together and instead force the merge to take all the changes from one of the contributors. This option only affects items in the "Changed on both the source and destination, might require manual merge" category.
- Merge your changes with the source contributor's changes - The merge operation will try to merge the changes in content from both the source and destination. The 3-way Merge may appear to solve non-automatic content conflicts. This is the default option.
- Preserve changes in your workspace (discarding the source contributor's changes) - For items that have content conflicts, override the default merge behavior and take always the changes from the workspace (the destination).
- Preserve changes in the source contributor (discarding your changes) - For items that have content conflicts, override the default behavior and take always the changes from the source.
- Merge tracking - This section is only enabled when performing a cherry pick merge.
- Ignore merge tracking - This option covers the scenario where a changeset has been merged and then it has been de-integrated using a subtractive merge. If the change needs to be merged again, no candidate items will appear in the dialog, since they have been already merged before and the merge links were created.
Checking this option will ignore the previous merge links (i.e. the merge tracking) so that all the revisions in the changeset will be evaluated as merge candidates and can be merged again.
- Ignore merge tracking - This option covers the scenario where a changeset has been merged and then it has been de-integrated using a subtractive merge. If the change needs to be merged again, no candidate items will appear in the dialog, since they have been already merged before and the merge links were created.
- Choose a conflict resolution method
- Manual conflict resolution - This option always launches the 3-way Merge window to review conflicts whether or not they are automatic.
- Automatic conflict resolution, when possible - This option launches the 3-way Merge window only when there are manual conflicts to be resolved by the user.
- Advanced
- Automatic calculate the common ancestor changeset for merge - Lets Plastic SCM calculate the common ancestor changeset for all the involved changes in the merge process.
- Specify a common ancestor changeset manually - Lets the user enter the common ancestor changeset for all the involved changes in the merge process.
Chapter 17: The 3-way Merge
The 3-way Merge window is an interactive tool for performing a 3-way merge, involving three revisions of an item:
- the source contributor revision
- the destination contributor revision
- the closest common ancestor revision of the two contributors (also called the base revision)
The destination contributor is always the revision in your workspace - typically, the last revision on the workspace's active branch. During a merge operation, Plastic SCM performs a Checkout on this revision (if necessary) and replaces its contents with the merge results.
Plastic SCM takes into account previous merges of the same item when determining the closest common ancestor. This means that you don't need to merge the same section over and over again when you perform multiple merges on an item.
The 3-way Merge window doesn't appear immediately when you issue one of Plastic SCM's many "merge" commands. Instead, a Merge Organizer window appears. Invoking the Process all merges command in that window opens the Merge window as many times as necessary to perform a merge for each specified item, but only when user intervention is needed to solve a non-automatic conflict.
Initially, Plastic SCM is set to perform merges as automatically as possible: a 3-way Merge appears only when there are one or more conflicts between the contributors, requiring manual intervention to resolve. You can modify this setting for all ther merge operations in the Preferences window -- see section The Diff and Merge Tab, or in the Merge Options window into the Merge Organizer window for the current merge operation.
Organization of the Merge Window
The 3-way Merge has quite a few panes:
- Control pane - At the top, with buttons for controlling the merge process and for navigation.
- Contributor panes - A row of three read-only panes, side by side, displaying the contents of the source contributor, base (common ancestor), and destination contributor. Adjustable wide vertical separators define these panes.
- Merge results pane - An editable pane at the bottom. The contents of this pane changes according to choices you make in the control panel. You can also edit the contents of this pane directly. There's an adjustable, wide horizontal separator between this pane and the row of panes above it.
- Scroll bar - At the right side scrolls all the panes, and also provides a "map" of the changes found in the contributors. It works the same way as the Side-by-side Diff tool's scroll bar, described above.
- Merge information pane - By clicking the Info about this merge button, a new pane shows at the bottom. It explains the changesets involved in the merge.

Change Blocks and Conflict Blocks
Much like the Side-by-side Diff tool. The 3-way Merge window partitions the three revisions' text into color-coded sections, called change blocks. And as with Side-by-side Diff tool, there are options for controlling the way in which change blocks are identified and displayed -- see 3-way Merge Options.

For the following simple kinds of change blocks, 3-way Merge always merges the sections automatically:
- Blocks in which only the source contributor differs from the common ancestor.
- Blocks in which only the destination contributor differs from the common ancestor.

For more complex change blocks, in which both contributors differ from the common ancestor, 3-way Merge merges the sections automatically in some cases, but requires you to guide it ("manual intervention") in other cases:
- Conflict block - A change block in which one or more lines in the common ancestor have been modified by both contributors, in different ways. This is where manual intervention is required -- see Resolving a Conflict.
- Identical twins - A change block in which one or more lines in the common ancestor have been modified or deleted by both contributors, in exactly the same way. Since the contributors agree with each other, 3-way Merge accepts their decision, automatically placing the agreed-upon change in the merge results. For a modification, 3-way Merge indicates this case in the contributor panes by using the source contributor's color-coding for both identical sections.
- Parallel insertions - A new section has been inserted in both contributors at the same location in the common ancestor:
- If both insertions are the same, this is another "identical twins" case. 3-way Merge automatically places the inserted text in the merge results.
- If the insertions are sufficiently similar, 3-way Merge automatically combines the sections into a single insertion in the merge results. It indicates this case in the merge results pane by using a blending of the source and destination contributors' color-coding. See section Working with a Parallel Insertion.
- If the insertions are not sufficiently similar, 3-way Merge treats this as a conflict block, initially placing both contributors' sections in the merge results. See section Resolving a Conflict.
And there's more ... like Side-by-side, Merge can determine when sections of text have been moved within the file -- see section The Xmerge Capability.
In all cases - both automatic and non-automatic -- you can undo or modify 3-way Merge's work in a change/conflict block, using the techniques described in Resolving a Conflict.
The Merge Window Toolbar
The toolbar includes the following indicators and controls:

- Save & Exit
-
Save the current contents of the merge results (bottom) pane as a checked-out revision of the item, on the destination branch. Then, close the 3-way Merge window.
If any conflicts have not yet been resolved, you must specify how to proceed in a pop-up dialog:- Save & Exit - Continue with the save operation. The work you've done in this window is preserved, but Plastic SCM does not consider this item's revisions to have been merged. (It does not create a merge link for this item.)
- Exit without saving - Close the 3-way Merge window without saving the work you've done. Plastic SCM does not consider this item's revisions to have been merged.
- Cancel - Go back to working in the 3-way Merge window.
The same pop-up dialog appears if you try to close the 3-way Merge window with the x control in its window banner.
-
By opening the Save & Exit menu, it is possible to select one of the following options:
- Save as
- Save the content of the results pane as a file.
- Keep source contributor & exit
- Save the source contributor as a checked-out revision of the item on the destination branch. Then, close the 3-way Merge window.
- Keep base contributor & exit
- Save the base contributor as a checked-out revision of the item on the destination branch. Then, close the 3-way Merge window.
- Keep destination contributor & exit
- Save the destination contributor as a checked-out revision of the item on the destination branch. Then, close the 3-way Merge window.
- Pending non-automatic navigation controls
- Previous (Ctrl + PageUp) and Next (Ctrl + PageDown) buttons support browsing through all the non-automatic conflicts that are pending to be resolved by the user. The NN/TT indicator identifies the current and the total number of pending non-automatic conflicts.
- Change block navigation controls
- First (Ctrl + Shift + -), Previous (Ctrl + -), Next (Ctrl + +), and Last (Ctrl + Shift + +) buttons support browsing through all the change blocks, including the conflict blocks. The NN/TT indicator identifies the current change block and the total number of change blocks. See Navigating through the Change and Conflict Blocks.
- Options menu
-
- Find
- Open a text box to find in the Results pane.
- Options
- A menu of several options related to merging.
- Diff actions - Diff base with source, base with destination, or source with destination
- Diff the three revisions involved in the merge in a separate window launched directly from the mergetool.
- Info about this merge
- Open a new pane where you can see an explanation about the changesets involved in the merge.
- Conflict block select/deselect buttons
-
A toggle button is located above each contributor pane. The buttons include/exclude a revision's contribution to the merge results. When you restore a section that has been toggled off, it is placed at the end of the change block (not necessarily at its original position).
You can use the Ctrl + 1 , Ctrl + 2 , and Ctrl + 3 keyboard shortcuts to obtain the same outcome as clicking on the source, base and destination contributor buttons respectively.
You can use these buttons in any change block - not just conflict blocks. This provides a way to modify or undo the 3-way Merge tool's automated merge decisions.
A maximize button is available for every contributor pane.
Caution: Toggling a section off also obliterates manual changes that you've made to it. - Current conflict type
-
A status indicator for the current change block:
- Current conflict is automatic. No user intervention is required. - 3-way Merge has automatically merged the contributors.
- Current conflict is non-automatic. Resolve it by clicking the buttons above, editing the result file or marking it as resolved. - This is a conflict block. 3-way Merge has placed text sections from the source contributor, common ancestor, and destination contributor in the merge results pane.
- Current conflict is non-automatic, and it has been already resolved by the user. - This is a conflict block that you have already resolved.
In any kind of change block (conflict block or not), you can undo or modify 3-way Merge's work by using the techniques described in Resolving a Conflict.
- Mark as resolved / Mark as unresolved
- Manually toggle whether the 3-way Merge tool considers the current conflict to be resolved. Normally a non-automatic conflict is marked as resolved as soon as the user clicks on any of the buttons to select or deselect a contributor, but in some cases, the solution that the 3-way Merge suggests by default may be the right answer. In that case, click Mark as resolved and the non-automatic conflict is no longer pending.
Above the results pane, you can see a new toolbar with the following:

Navigating through the Change and Conflict Blocks
At any moment, one of the change blocks is the current change block:
- If it's a non-conflict change block (no user intervention required - for example, where only the source contributor differs from the common ancestor), the "tubes" in the separator bars are tinted gray.
- If it's a conflict block (user intervention required), the "tubes" are tinted red.

Use these facilities to navigate among the change blocks - and more generally, within the files/revisions involved in the merge:
- Scroll bar and mouse - These work in much the same way as in the Side-by-side Diff tool. In the 3-way Merge, the "map" in the scroll bar's background is color-coded: conflict block locations are red; non-conflict change block locations are gray.
- Navigation buttons - There's one set of navigation buttons in the control panel for browsing through all the change blocks (including the conflict blocks), and another set of buttons for browsing through the conflict blocks only. Clicking a button sets the current change block and scrolls the display to bring it into view.
Resolving a Conflict
In the upper part of the 3-way Merge window, a conflict block (with a red line around) appears as the contributing sections (source contributor, common ancestor, and destination contributor) displayed side by side and connected by "tubes".

Before you resolve the conflict, the merge results pane displays the three sections stacked vertically. Color-coding makes it easy to distinguish them.

Deleted lines are included in this display, indicated by strike-through, to help you fully understand the contents of all three sections. (Don't worry - those lines won't be included when you save the merge results!)
The 3-way Merge tool is satisfied that you've resolved the conflict in that particular block when you do any of the following:
- Click any of the Deselect buttons located above the contributor panes (see above). These buttons toggle the inclusion of that contributor's section in the merge results. You can toggle a section as many times as you like. In particular, a deselect/select sequence moves a section to the end of the conflict block. But be careful: toggling a section obliterates manual changes that you've made to it.
- Manually change the contents of any section within the conflict block, by typing or by using the Paste context-menu command.
- Click the Mark as resolved button in the toolbar.
Once the conflict is solved, the line around the conflict block turn to green:

Clicking Mark as unresolved tells the 3-way Merge tool that the conflict is not resolved, after all. But it doesn't change the contents of the merge results pane.
Working with a Parallel Insertion
3-way Merge sometimes treats a parallel insertion as a conflict block requiring manual intervention, and at other times processes it automatically. In particular, if you don't approve of how the 3-way Merge has combined the two contributors' sections into a single insertion, you can use any combination of these techniques:
- The Deselect source button in the separator bar above the merge results pane, toggles the inclusion of the combined text insertion.
- The Select base and Select destination buttons above the contributors' columns, work as described in the preceding section.
- And, manually, you can change the merge results pane, as described in the preceding section.

The Xmerge Capability
The Xmerge ("cross-merge") is Plastic SCM procedure for resolving a particular subset of conflicts:
- The Contributor A (either the source or the destination) has modified a section, but not deleted it.
- The Contributor B (the other one) has moved the same section to another location in the file - and perhaps modified it, also.
Detecting this situation is a heuristic procedure.
The merge automatically enables Xmerge for any conflict block in which it appears that the above conditions might hold true. That is, one contributor is modified from the common ancestor, and the other contributor is completely missing at that location. It also makes the Xmerge available through the Xmerge context-menu choice, which is enabled in all conflict blocks, because what appears to be a "normal" conflict block might actually be an Xmerge situation:

Exception: Xmerge is not modified for a parallel insertion in which the two contributors' sections are not combined as we've seen above.
The Xmerge Procedure
After clicking the Xmerge button, the Xmerge tries to locate the missing text section in "Contributor B". The search algorithm is configurable (see the moved detection option).
- If it finds a candidate section, the Xmerge highlights it in the merge results pane. At this point, the section will appear to be a separate "inserted text" change block, made by Contributor B. It displays a dialog asking for your approval. You can correct Xmerge's guess by highlighting another section in the merge results pane.
- If it does not find a candidate section, Xmerge invites you to identify the missing text section yourself, by highlighting it in the merge results pane.

When you click Xmerge with this selection in the dialog, the current 3-way Merge work is suspended. Then, a sub-merge window opens. It's another full-featured instance of the Merge window, but limited to the current conflict block:
- The contributor A modified section.
- The common ancestor original section.
- The contributor B moved (and, perhaps, modified) section. This is the one you just (highlighted and) confirmed.

Resolve the conflict(s) in the sub-merge window by using the techniques described in this section. You can finish your work in this window in either of these ways:
- Click Save & Exit - The current contents of the sub-diff window merge results pane are placed in the merge results pane of the original 3-way Merge. The Contributor B move of the text block to a new location is preserved. In addition, the conflict block is marked as resolved.
- Close the window with the X control in the window banner. No change is made to the original 3-way Merge. The conflict block remains as unresolved.
Text Operations
In the contributor panes (read-only) and the merge results pane (read-write), you can use context menus to operate on a selected text string:
- Cut
- (merge results only) Remove the text string from the merge results pane, and place it on the operating system clipboard.
- Copy
- Copy the selected text to the operating system clipboard.
- Paste
- (merge results only) Insert the contents of the operating system clipboard.
- Delete
- (merge results only) Remove the text string.
- Select All
- Select the entire contents of the current pane.
- Go to line
- Open a dialog where you can enter a number line to go to.
- Xmerge
- (enabled for conflict blocks only) Launch the Xmerge procedure for this conflict block, even though it does not meet 3-way Merge's criteria for a moved text section. See section The Xmerge Capability above.
- Find
- Same as the Side-by-side Diff tool's Find command.
- Find next
- If the search panel is already open, perform a search forward. If the search panel is not already open, simply open it.
3-way Merge Options
- Comparison method
- This option is the same as the Side-by-side Diff Tool comparison method option.
- Syntax highlight
- This option is the same as the Side-by-side Diff Tool syntax highlight option.
- Encoding (Base, Source, Destination and Result encoding)
- This option is the same as the Side-by-side Diff Tool encoding option.
- Editor options
-
- Convert tabs to spaces while editing
- View white spaces
- Tabs
- Column guides
- These options above are the same as those in the Side-by-side Diff Tool editor options.
- View border lines for unselected regions
- Allows the user to view border lines for unselected regions.
- Split conflict blocks
- Wherever possible, split a conflict block into a smaller contiguous change blocks. For example, if the source contributor and base share some code that does not occur in the destination contributor, a conflict block requiring manual intervention can be converted into two or more changes blocks that are merged automatically:

- Moved detection
-
Open a dialog in which you can adjust two parameters used by both the Xdiff ("cross-difference") and Xmerge ("cross-merge") capabilities, which detect moved text sections - see The XDiff Capability and The Xmerge Capability.
- Move detection ratio - the threshold at which two text sections are determined to be "the same section, but edited". Choose a higher value if you are getting "false positives"; at 100%, two sections must be truly identical to be judged the same section. Choose a lower value if Xdiff/Xmerge is failing to recognize an insertion/deletion pair as being the same section.
- Minimum lines in difference -- the minimum number of lines that each section must contain to trigger Xdiff/Xmerge processing. Below this threshold, the two sections are always treated as a separate insertion and deletion.
- Configure fonts and colors
- This option is the same as the Side-by-side Diff Tool configure fonts and colors option.
Chapter 18: The Workspaces View
The Workspaces view lists all your workspaces on the local machine. It provides a command button for creating a new workspace.
Columns in the Workspaces View
- Name
- The name of the workspace. Get a workspace as the GUI active workspace by double-clicking on it.
- Path
- The full pathname of the workspace's root directory.
- Repository
- The repository whose files are loaded into the workspace.
Commands in the Workspaces View
Toolbar Commands
The toolbar includes the following buttons and controls:
- Create new workspace
-
Open a dialog in which you create a new workspace. The dialog includes these fields:
- Default repository - Select the repository that should be loaded in the workspace. By default, the "/main" branch will be used. In case the /main branch has been renamed in that repository, the new name given to it will be used instead. It is also possible to create a new repository with the New button on the right of the default repository.
- Workspace name - The name for the new workspace. SPACE characters are allowed, but not at-sign (@), pound-sign (#), slash (/) or colon (:). This name identifies the workspace in the tab bar at the top of the GUI window, and in the banner at the top of the work context area.
- Path on disk - The full pathname of a disk location that will become the new workspace root directory. You can specify an existing location, in order to "convert" an ordinary directory into a Plastic SCM workspace. But you cannot specify a location within an existing Plastic SCM workspace. (That is, you cannot nest workspaces.)
The text fields (Workspace name and Path on disk) will be automatically filled if the user doesn't manually alter them. The default worspace root path will be set to the user directory (/homeon Linux,C:/Userson Windows, or/Userson Mac) and will be stored in theguiclient.conffile (<DefaultWorkspaceRoot>argument) so the user can customize it with any other default workspace root path.
- Export view data
- This button is used to export the current content of the table in the view to a text file, either CSV or XML. See Exporting the table contents to a text file section for more details.
- Filter
- You can use this field to reduce the Workspaces table to a subset of its rows. You can filter on one or all the columns in the view..
Context Menu Commands
- Make active workspace
- Set the selected workspace as the GUI's active workspace. The views that are currently open in the work context of the newly activated workspace appear, replacing the views belonging to the workspace that was previously active. This action is the same as clicking the workspace tab at the top of the GUI window.
- Rename
- Change the name of the selected workspace. This does not change the workspace's location in disk storage.
- Delete
- Permanently remove the selected workspace from Plastic SCM. (This does not remove the workspace's directory tree from disk storage.) You cannot remove the active workspace. To prevent data loss, you cannot remove a workspace that contains items with Checked out status (but you can remove a workspace with Changed items).
Chapter 19: The Repositories View
The Repositories view lists all the repositories managed by the repository servers that your client software is configured to use.
By default, your client software uses the Plastic SCM repository server on the local machine. But you can configure any number of repository servers by using one of the following ways:
-
Configuring your profile as "automatic" - In the Connection Profiles tab (in the Preferences window), when the connection type is set to Automatic on the connection profile, the repositories view will connect to this server and list its repositories together with other servers:

-
Using the
plastic.serversfile - You can create a fileplastic.serversin your Plastic configuration directory, with the names of the servers to contact:mbc@cloud ssl://codice@cloud.plasticscm.com:8086
Using one of these ways your Repositories view will look like this:

The Repositories view also provides a command button for creating a new repository on any server whose repositories are listed.
Columns in the Repositories View
- Name
- The name of the repository.
- Server
- The repository server (
hostname:portnumber) that manages this repository.
Commands in the Repositories View
Toolbar Commands
The toolbar includes the following buttons and controls:
- List view
- The Repositories view displays the repositories as a list.

- Tree view
- The repositories are displayed as a tree, grouping the submodules.

- New repository
-
Open a dialog in which you create a new repository. The dialog includes these fields:
- Name of new repository - a simple name for the new repository. SPACE characters are allowed, but not at-sign (@), pound-sign (#), slash (/) or colon (:). The slash (/) character is allowed only to create submodules. Submodules allows to store several repositories inside the same physical database. The submodule repository names look like code/cli and code/gui instead of just the single name given to a repo.
- Plastic SCM repository server - the name (in
hostname : portnumberformat) of the Plastic SCM repository server where new repository will be on.

- Server
- By entering or selecting the name of a Plastic SCM server (in
hostname : portnumberformat) and then clicking on the Refresh button, the repositories of that server will be displayed. - Export view data
- This button is used to export the current content of the table in the view to a text file, either CSV or XML. See Exporting the table contents to a text file section for more details.
- Filter
- You can use this field to reduce the Repositories table to a subset of its rows. You can filter on one or all the columns in the view..
Context Menu Commands
The context menu for a selection of one or more repositories includes these commands:
- Create new sync view (push/pull)
-
Create a sync view to synchronize a pair of repos (local and Cloud):

If no source or destination repository exists, then the dialog lets you create a new repository to use as source or destination.

- View branches
- Open a Branches view for each selected repository.
- View labels
- Open a Labels view for each selected repository.
- View changesets
- Open a Changesets view for each selected repository.
- View Branch Explorer
- Open a Branch Explorer view for each selected repository.
- View attributes
- Open an Attributes view for each selected repository.
- Create workspace for this repository
- Open a dialog in which you create a new workspace for the selected repository.
- Rename
- Change the name of the selected repository. This does not change the selector of the active workspace or any other workspace. If the renamed repository is used by any workspace(s), you must revise the workspace(s)' selector(s) manually.
- Delete
-
-
If you are
not using
Jet as your default repository storage
, then this option permanently removes the selected repository.
So be careful! Plastic does not check whether any workspace (even the active workspace) is using the repository.
-
If you are
using Jet as your default repository storage
, you can tell Plastic to mark the deleted repository as "deleted". You only have to add the
deletereposonschedulesetting to yourjet.conffile:deletereposonschedule=true
By default, these "deleted" repositories remain in your Jet storage during 14 days. Beyond these days, Plastic will permanently remove them.
You can configure this number of days by using the
deletereposonschedulegraceperioddayssetting in yourjet.conffile. For example:deletereposonschedulegraceperioddays=8
If you enter a value less or equal than 0, Plastic will get the default 14 days grace period.
If you are the owner of the repository, you'll have the chance to see the "deleted" repositories in your Repositories view and to recover (Undelete) them:

-
If you are
not using
Jet as your default repository storage
, then this option permanently removes the selected repository.
- Permissions
- Open a Permissions window for the selected object.
- Path permissions
- Open a Permissions window for the selected object.
- Repository server permissions
-
Open a Permissions window for the repository server, which is the top-level object in the ACL inheritance hierarchy. Any permission set at this level is inherited by all repositories that haven't explicitly broken the permission inheritance.
Moreover, the owner (user or group) of the repository server becomes the superuser of the system, having no security restrictions. It is a good practice to set this superuser when setting up Plastic SCM.
Note that by default this owner is set to ALL_USERS, so has no effect until a specific user or group is set.
Chapter 20: The Change Statistics View
The Change Statistics view displays two bar charts that provide a high-level perspective on how a repository's items have been changed by developers over a particular interval (default: one month):
- The Changed-items chart includes a bar for each item that has new revisions, showing the number of changesets that contain a new revision of that item.
- The Users chart includes a bar for each user, showing the number of changesets created by that user.

In both charts, selecting a bar provides more detailed information on the changes it represents. There are sorting and filtering controls, and you can customize the query that provides the raw data that goes into the charts.
Detailed Information on Changes
As you hover the mouse over an item's bar in the Changed-items chart, the status pane at the bottom of the view displays the item's pathname and its total number of changesets.
Similarly, as you hover the mouse over a user's bar in the Users chart, the status pane at the bottom of the view displays the user's name and the total number of changesets created by that user.
In either chart, selecting a bar partitions it into multiple alternating color bands, and also partitions the bars in the other chart. The color bands represent a "drill down" to provide more detail on the changes.
When you select an item's bar in the Changed-items chart:
- The item's pathname appears in the status pane at the bottom of the view.
- Alternating color bands in the selected item's bar indicate the number of changesets created by individual users. Hovering the mouse over a color band displays the user-specific details in the status pane.
- All bars in the Users chart are two-way partitioned: the lower band depicts the user's changesets that contain the selected item; the upper band depicts the user's other changesets. Hovering the mouse over the lower band displays its details in the status pane.

When you select a user's bar in the Users chart:
- The user name appears in the status pane at the bottom of the view.
- Alternating color bands in the selected user's bar indicate the individual items that the user has changed. Hovering the mouse over a color band displays the item-specific details in the status pane.
- All bars in the Changed-items chart are two-way partitioned: the left band depicts the changesets created by that user; the right band depicts the changesets created by all other users. Hovering the mouse over the left band displays its details in the status pane.

Modifying the Charts
These control enable you to modify the Changed-items chart:
- Minimum changes / item
- An integer value that defines a filter: an item will be included in the chart only if its number of changesets equals or exceeds this value.
- Sort order
- The order in which the bars are displayed:
- Order by name - sorts the bars by item pathname (ascending)
- Order by changes - sorts the bars by size (largest number of changes first)
This control enables you to modify the Users chart:
- Sort order
- The order in which the bars are displayed:
- Order by name - sorts the bars by user name (ascending)
- Order by changes - sorts the bars by size (largest number of changes first)
In the Change Statistics view's toolbar, you can revise the SCM-level query that yields a set of revisions, providing the raw data for the charts. Clicking the Execute button runs the revised query and regenerates both charts.

The query above yields all the revisions created from 6th June 2014 in the active workspace's repository:
If the active workspace combines items from multiple repositories, you are prompted to choose one of them.
Note: You can use both "revision" and "revisions". And the value strings must be placed in quotes (either single or double).
Following are typical revised queries:
-
All revisions created during the year 2010 in the active workspace's repository:
find revision where date between '1/1/2010' and '12/31/2010'
-
All revisions you created in repository fracrepo:
find revisions where owner = "ME" on repository "fracrepo"
-
All revisions made on branch /main/task398 before December 2010:
find revisions where branch = "/main" and date < "12/1/2010"
Chapter 21: The Code Reviews View
The Code Reviews view contains a table that lists some or all of the code reviews that users create by using the command New code review for this branch or New code review for this changeset from the branch and changeset context menus respectively.
Use the Previous (<) and Next (>) arrows to see the Code Review view in Windows and macOS.
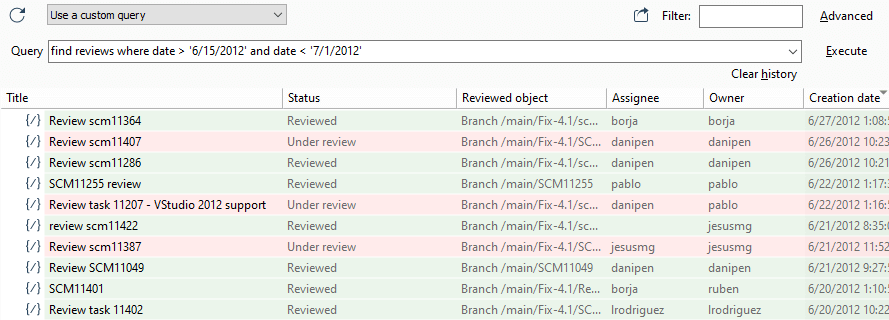
Plastic SCM GUI - Windows - Code Review view
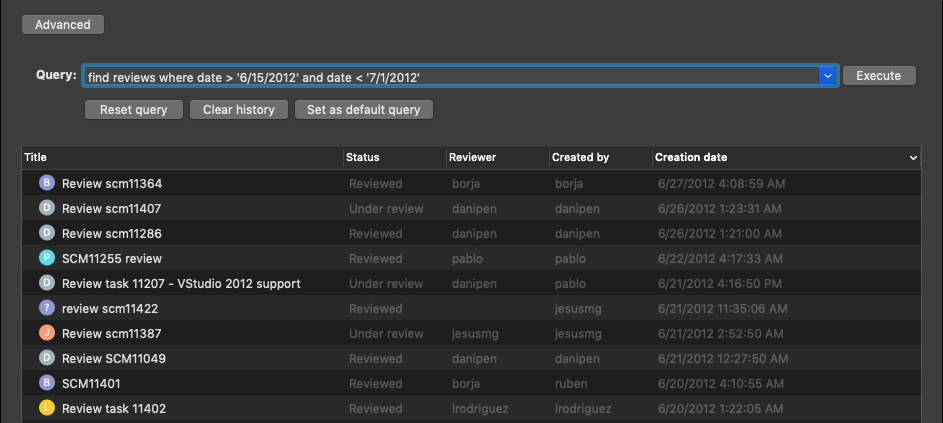
Plastic SCM GUI - macOS - Code Review view
You can use this table to locate a particular code review and open it. Plastic SCM uses a separate window, the Code Review window, to display the contents of a particular code review.
Columns in the Code Reviews View
- Title
- The name of the code review.
- Status
- One of these values: Under review, Reviewed, Rework required.
- Reviewed object
- The name of the branch, or the number of the changeset, for which the code review was created.
- Assignee
- The user or group to whom the code review is currently assigned. This field can be empty, indicating that the code review is not currently assigned to anyone.
- Owner
- The user who created the code review.
- Creation date
- A timestamp indicating when the code review was created.
Commands in the Code Reviews View
Toolbar Commands
- Standard filters list
-
This view provides the following standard filters that can be selected in the dropdown list:
- All code reviews - Display all code reviews
- Pending reviews - Display all code reviews that are under review.
- Created by me - Display all code reviews that you've created.
- Assigned to me - Display all code reviews that are currently assigned to you personally. (Do not include code reviews that are assigned to groups that you belong to.)
-
Use a custom query - Display a new box where you can enter a query to find reviews. You must
use the find command to filter by date, owner, assignee, status, and so on. These are some
examples:
find reviews where date > '6/15/2012' and date < '7/1/2012'
(Shows all code reviews between those dates.)

find reviews where status = 1
(Shows all the code reviews with status 'Reviewed'.)

find reviews where assignee = 'ruben'
(Shows all the dcode reviews assigned to Ruben.)
- Export view data
- This button is used to export the current content of the table in the view to a text file, either CSV or XML. See Exporting the table contents to a text file section for more details.
- Filter
- You can use this field to reduce the Code reviews table to a subset of its rows. You can filter on one or all the columns in the view..
Advanced
Toggles the toolbar's Advanced mode, in which you can view and customize the query that produced this view's table. See section Advanced Mode: Revising the Query that Produces a Table.
Context Menu Commands
- Open
- Open a Code Review window and showing the contents of the selected code review. You can use this window to browse existing review comments, add new reviews, change the status, edit the reviewer, and more.
- Delete
- Permanently remove the selected code review. Be careful! There is no way to recover the comments in a code review that has been removed.
Chapter 22: The Code Review Window
The Code Review window opens when running one of these actions:
- Open an existing code review, by double-clicking the code review or by right-clicking the Open context menu of the code review in the Code Review view.
- Create a new code review for a branch (New code review for this branch). This action creates a code review with all the revisions modified on the branch, even if they are contained on more than one changeset.
- Create a new code review for a changeset (New code review for this changeset). This action creates a code review with all the revisions checked in together as part of the selected changeset.
The Code Review window is a Diff window with some extra functionalities. The
developers can add  a review
to any line of any text-file revision that the window displays.
All the reviews appear in a separate, scrollable pane at the bottom of the window.
The indicators
a review
to any line of any text-file revision that the window displays.
All the reviews appear in a separate, scrollable pane at the bottom of the window.
The indicators  on the reviewed
lines make easy to see which ones have reviews. These indicators also help you to display a particular line's
comments.
on the reviewed
lines make easy to see which ones have reviews. These indicators also help you to display a particular line's
comments.
Use the Previous (<) and Next (>) arrows to see the Code Review window in Windows and macOS.
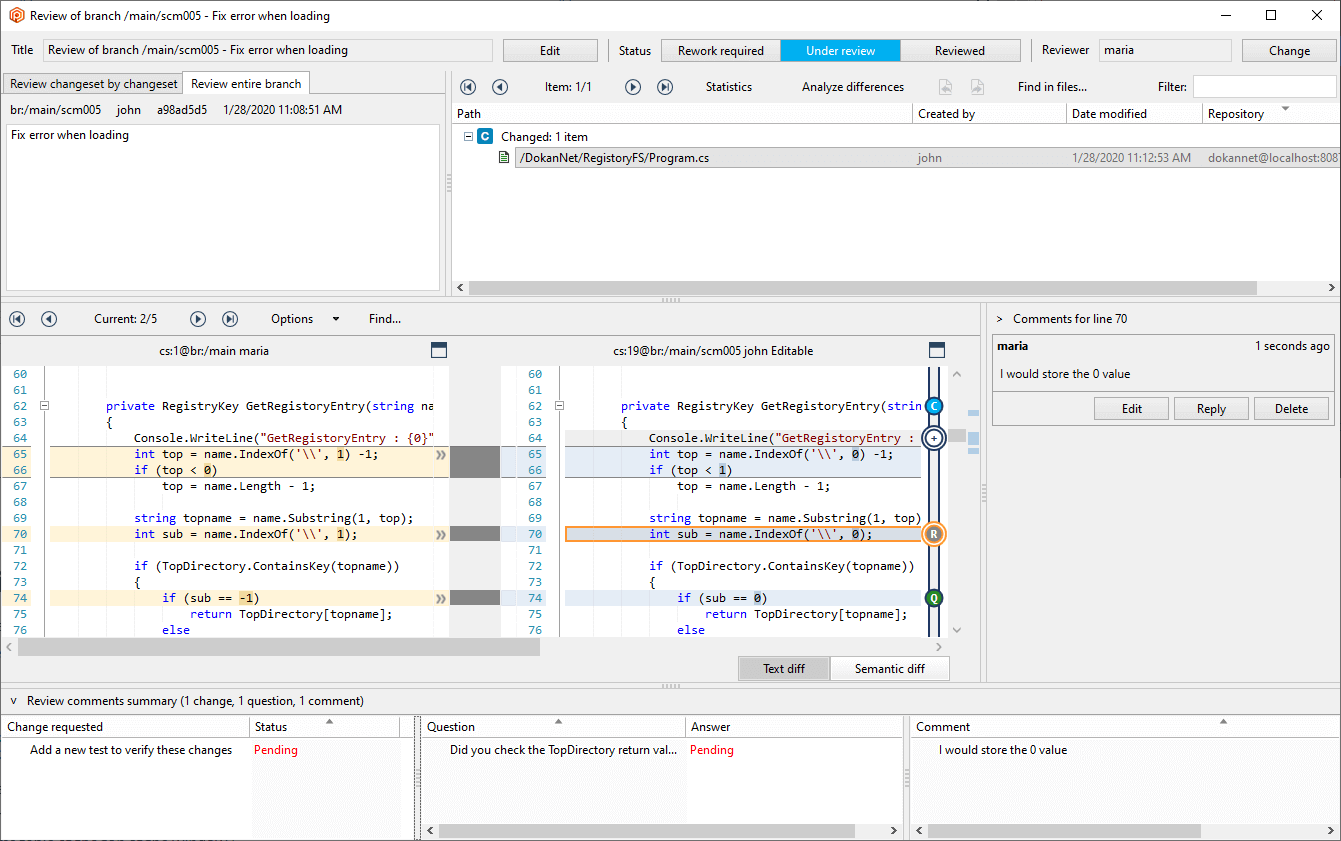
Plastic SCM GUI - Windows - Code Review window
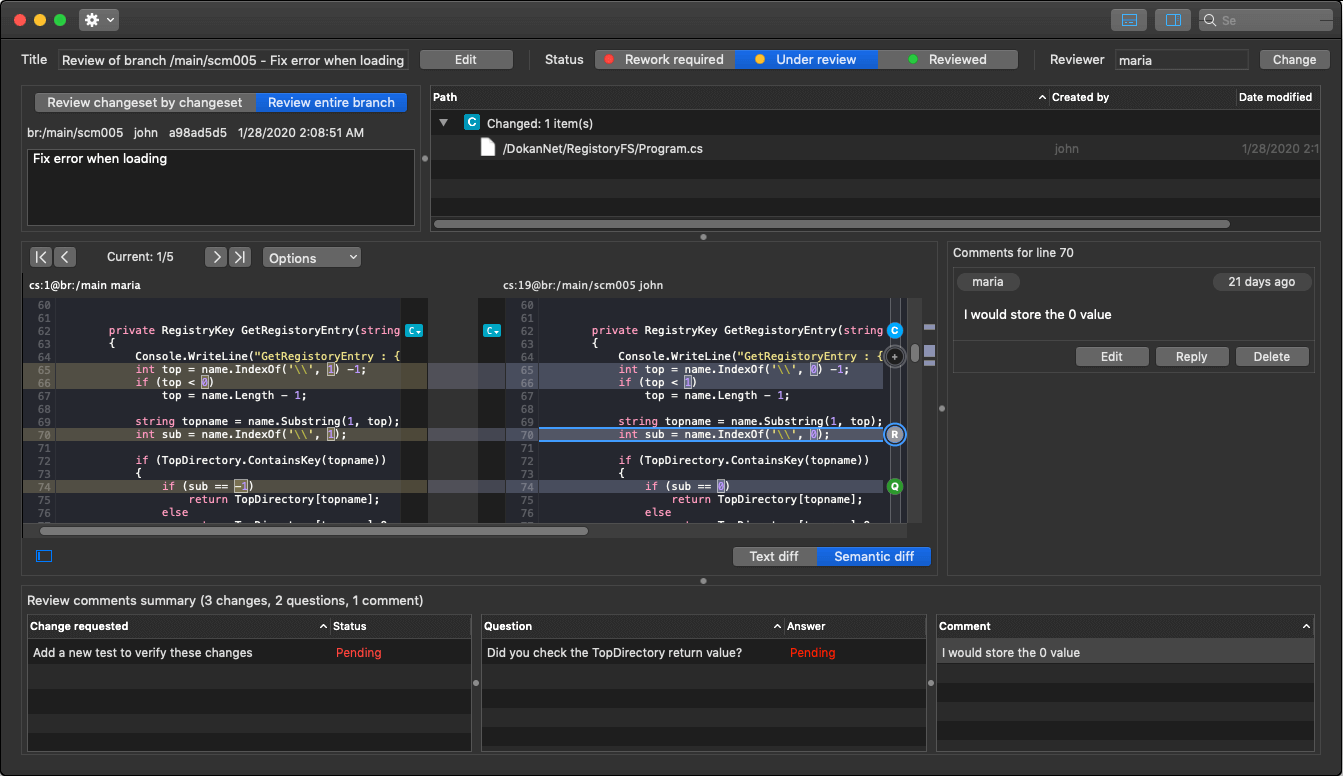
Plastic SCM GUI - macOS - Code Review window
Adding new comments to a line
As you hover the mouse over the right gray bar in the right-side revision, this button appears:
When the reviewer clicks this button, then they can enter a comment for this line:
Use the Previous (<) and Next (>) arrows to see how to add comments in Windows and macOS.
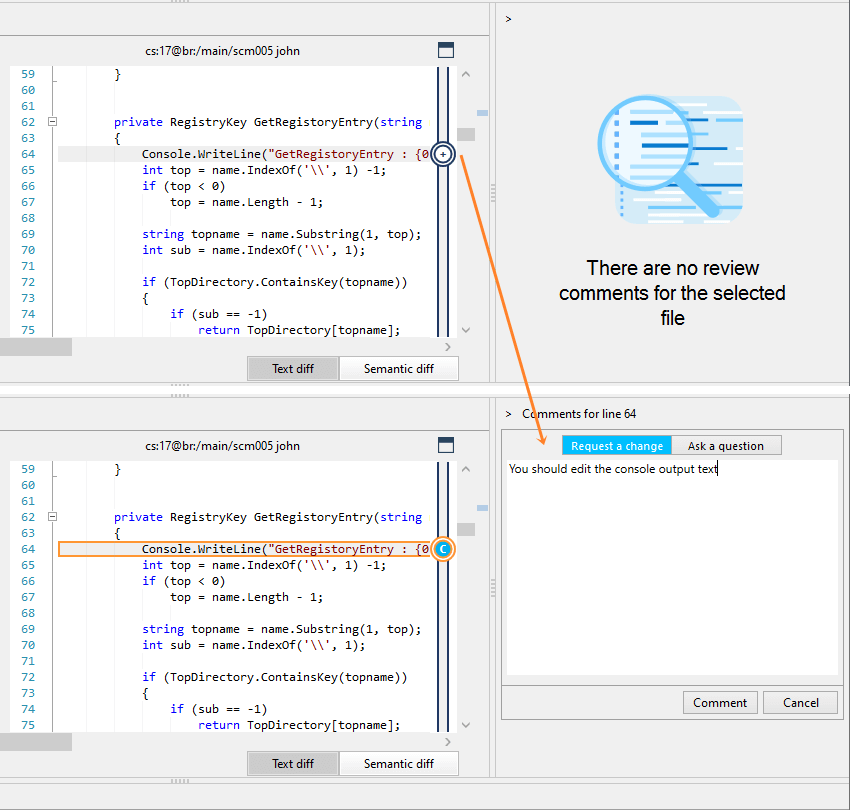
Plastic SCM GUI - Windows - Creating a comment for a line
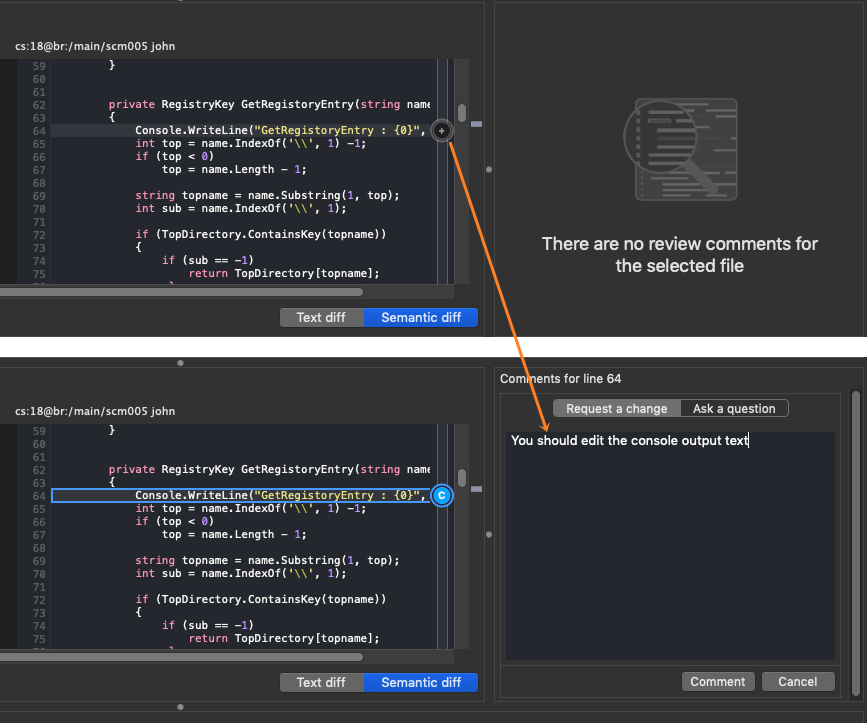
Plastic SCM GUI - macOS - Creating a comment for a line
The Code Review system allows the reviewer to choose the comment type when adding a new comment:
-
Request a change -
 This means that a change in the code is needed. This is the default option when adding a new comment.
-
Ask a question -
 This comment needs to be answered, but no change is required initially.
-
 Or simple write a regular comment.
You can also starts conversations by using the Reply functionality. You can choose the comment type in the replies too. This is an example of a conversation with several threads:
Use the Previous (<) and Next (>) arrows to see how see how the conversations look like in Windows and macOS.
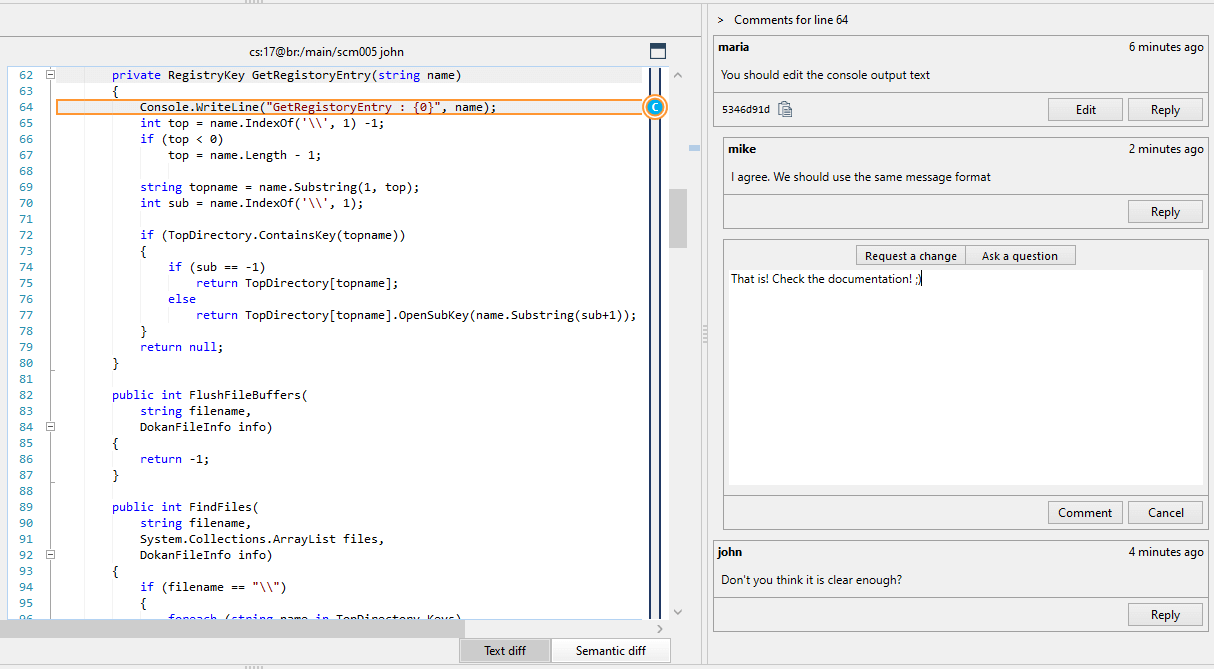
Plastic SCM GUI - Windows - Conversations in the code review
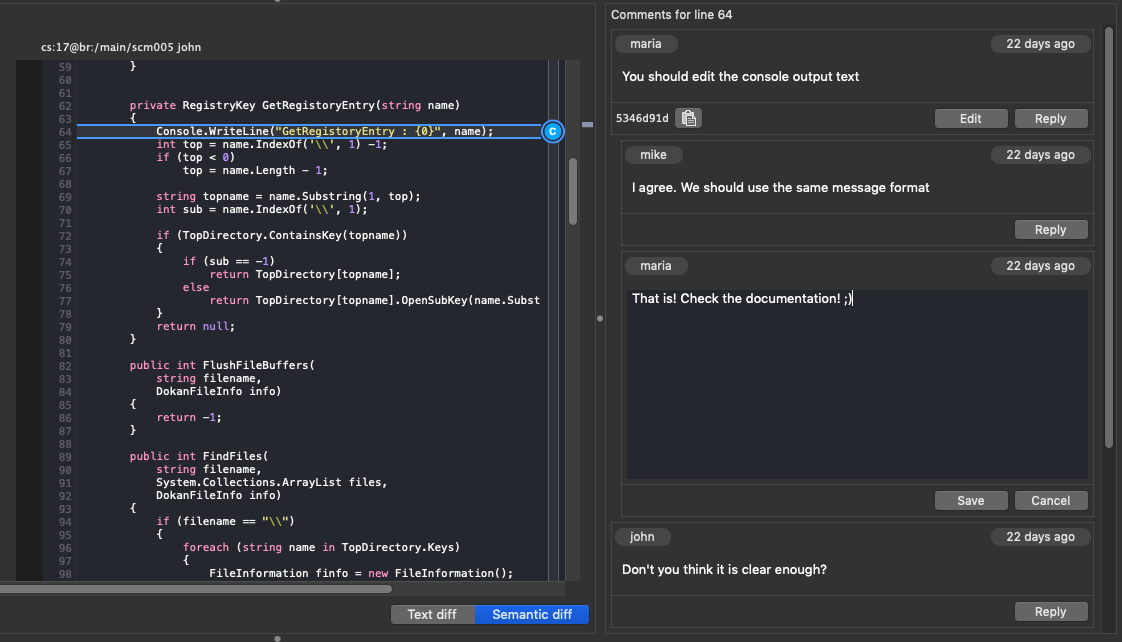
Plastic SCM GUI - macOS - Conversations in the code review
The Code Review system does not support adding comments in some scenarios:
- When the selected file belongs to a different repository.
- When the file is an Xlink.
- When the file is an unsupported file type (image diff, directory diff, ...).
In these cases, the Code Review system shows you the appropriate message for each scenario:

Viewing existing comments
The Review comments summary pane at the bottom of the Code Review window shows all the comments for the code review. This pane is divided in three lists, one for each comment type:
Use the Previous (<) and Next (>) arrows to see how see how the comments pane looks like in Windows and macOS.
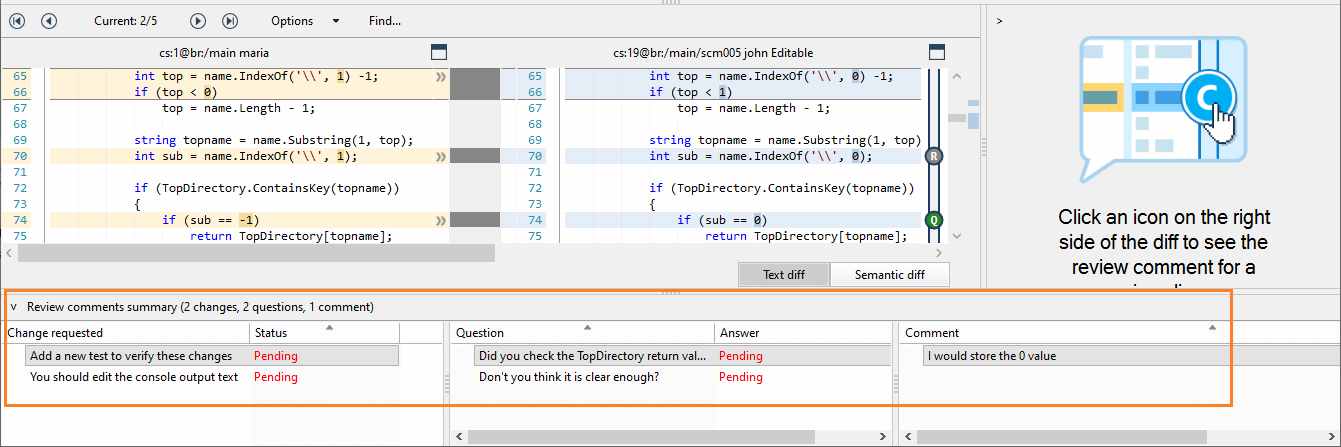
Plastic SCM GUI - Windows - Comments pane in the Code Review window

Plastic SCM GUI - macOS - Comments pane in the Code Review window
- Changes
-
List all the changes requested to indicate that a change in the code is needed.
You can navigate to the related comment by double-clicking the request in the list.
If the developer clicks Reply this comment, the status of the change request keeps as
Pending. If the developers clicks Discard this comment, the new status of the change request isDiscarded:
This list shows all change requests even if they are replies. For example, if the user replies to a change request with another request, then this reply appears in this 'Changes' list.
- Questions
-
List all the questions made when reviewing the code. The reviewer asks a question when they need an answer, but no change is required initially.
You can navigate to the related comment by double-clicking the question in the list.
This list shows all questions even if they are replies. For example, if the user replies to a question with another question, then this reply appears in this 'Questions' list.
- Comments
-
List all the regular comments.
You can navigate to the related comment by double-clicking the comment in the list.
This list shows only first level regular comments, not the replies.
Applying the requested changes
As you've seen before, the Code Review system allows you to request changes.
The change request is a special comment used to request the author to make a change. This comment is identified with a GUID.
And it is possible to track if this change request was applied.
Let's see how this tracking works with an example:
Use the Previous (<) and Next (>) arrows to see how to apply requested changes in Windows and macOS.
-
The reviewer requested the developer a change. And this comment identifies with a GUID:
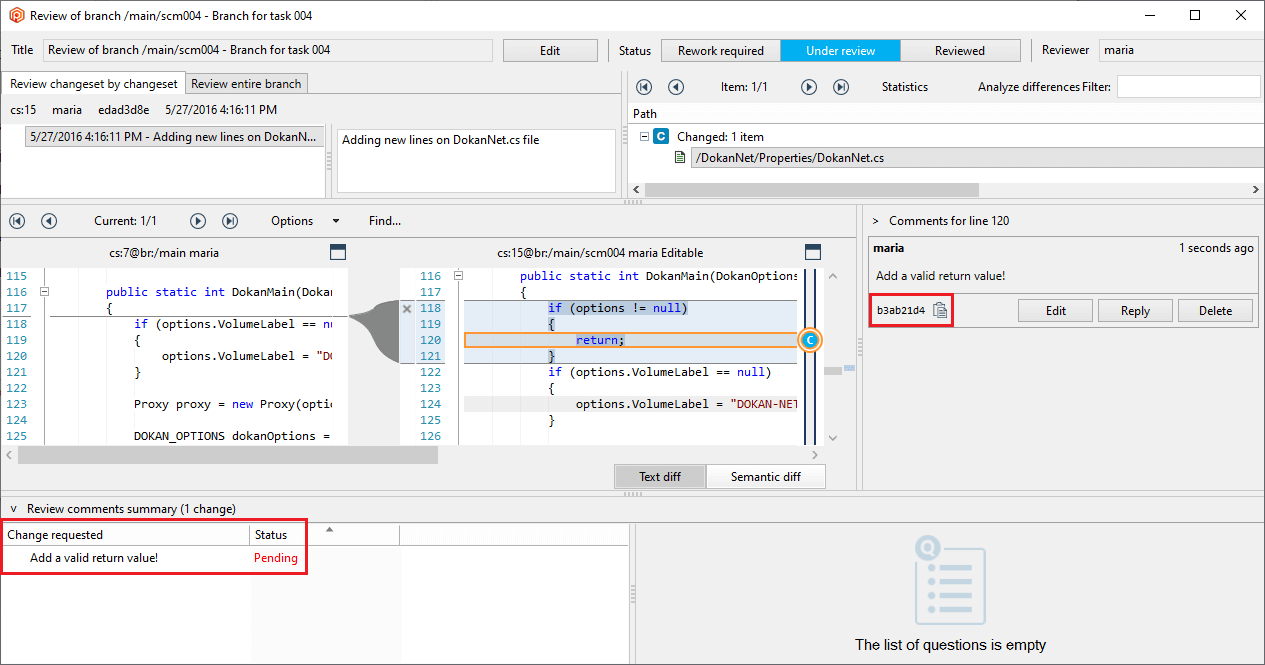
Plastic SCM GUI - Windows - Added change request
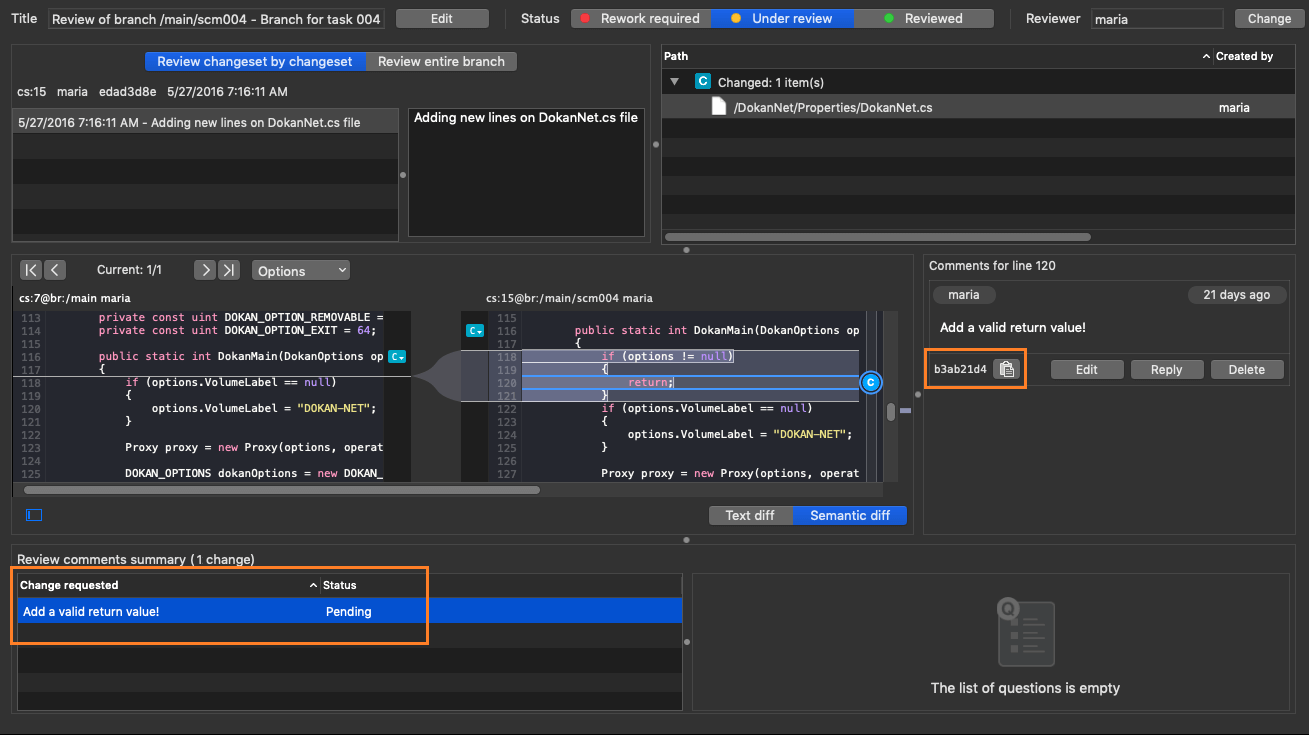
Plastic SCM GUI - macOS - Added change request
-
Once the developer applies the change requested by the reviewer, it's time to mark the comment as
Done. To do this, the developer only has to click the button Close change requested in review: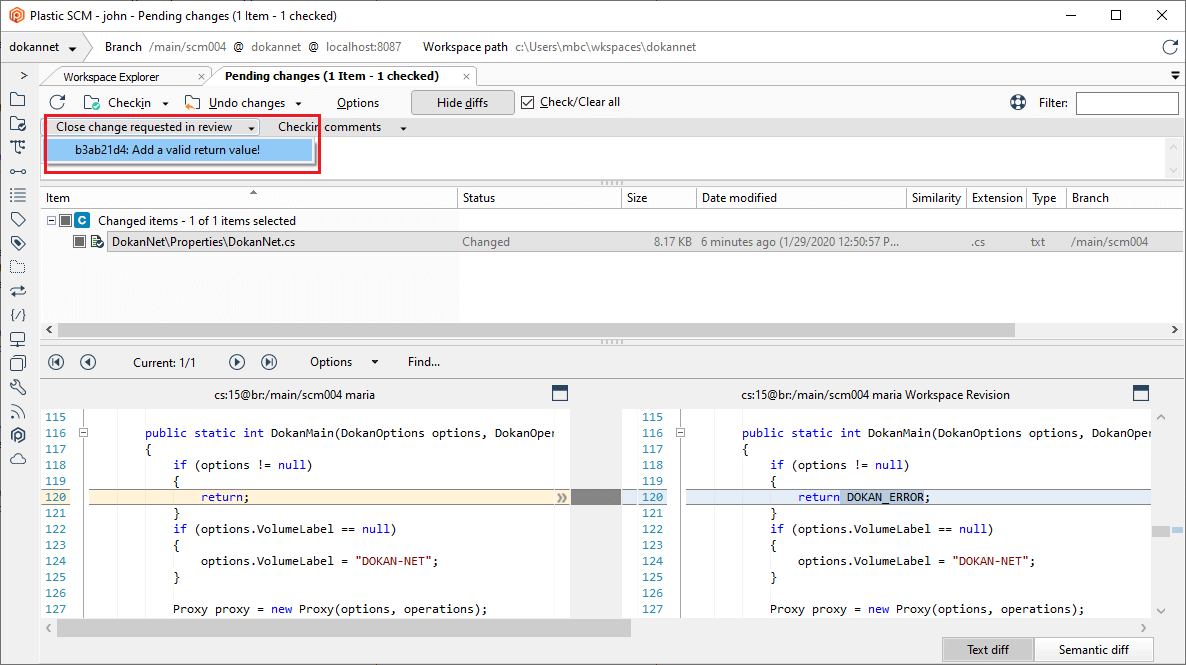
Plastic SCM GUI - Windows - Checkin and mark as Done the change request
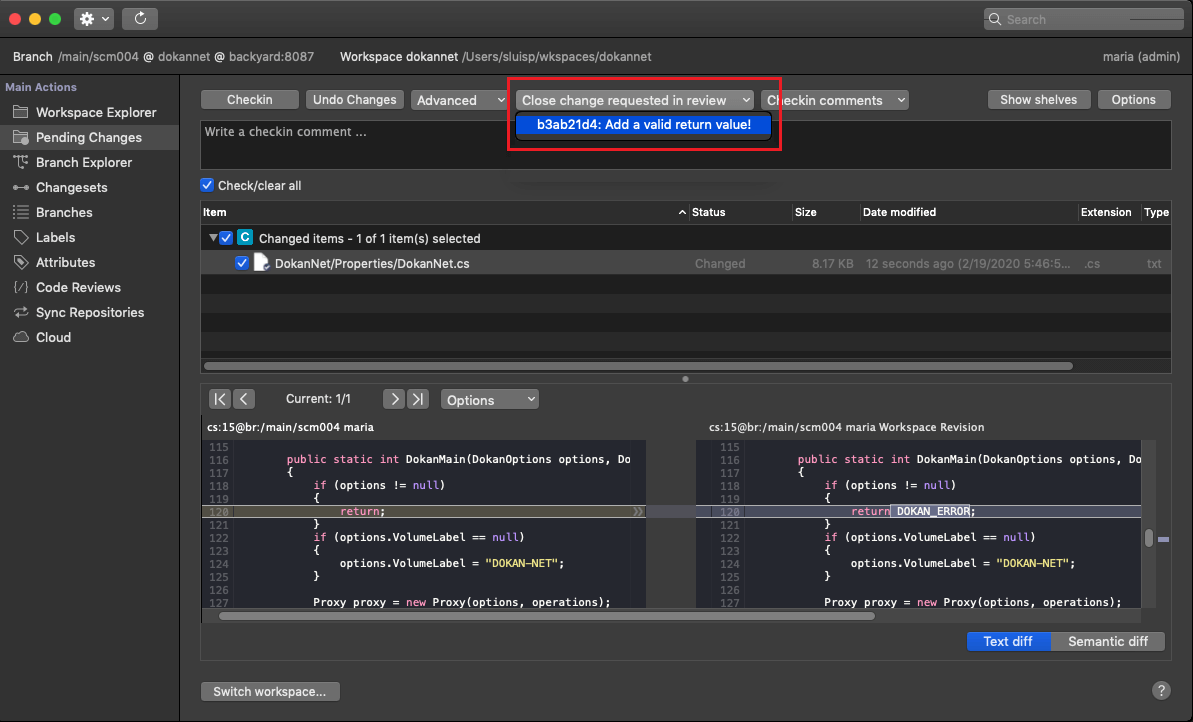
Plastic SCM GUI - macOS - Checkin and mark as Done the change request
This command automatically adds a special comment ([apply-change:change_GUID]). Then, the developer can also add more comments:
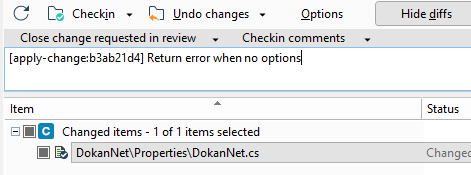
Plastic SCM GUI - Windows - Checkin and mark as Done the change request
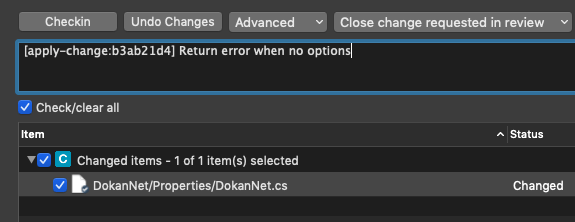
Plastic SCM GUI - macOS - Checkin and mark as Done the change request
Then, the developer must Checkin the change.
To apply the requested change by using the command line, you only have to run the checkin command and add the special comment [apply-change:change_GUID]. For example, to apply the requested change in the example above, you must run the following: cm checkin DokanNet.cs -c="[apply-change:b3ab21d4] Return error when no options" -
The reviewer now can track if the author applied the change or not by taking a look to the change request status
in the 'Changes' list:
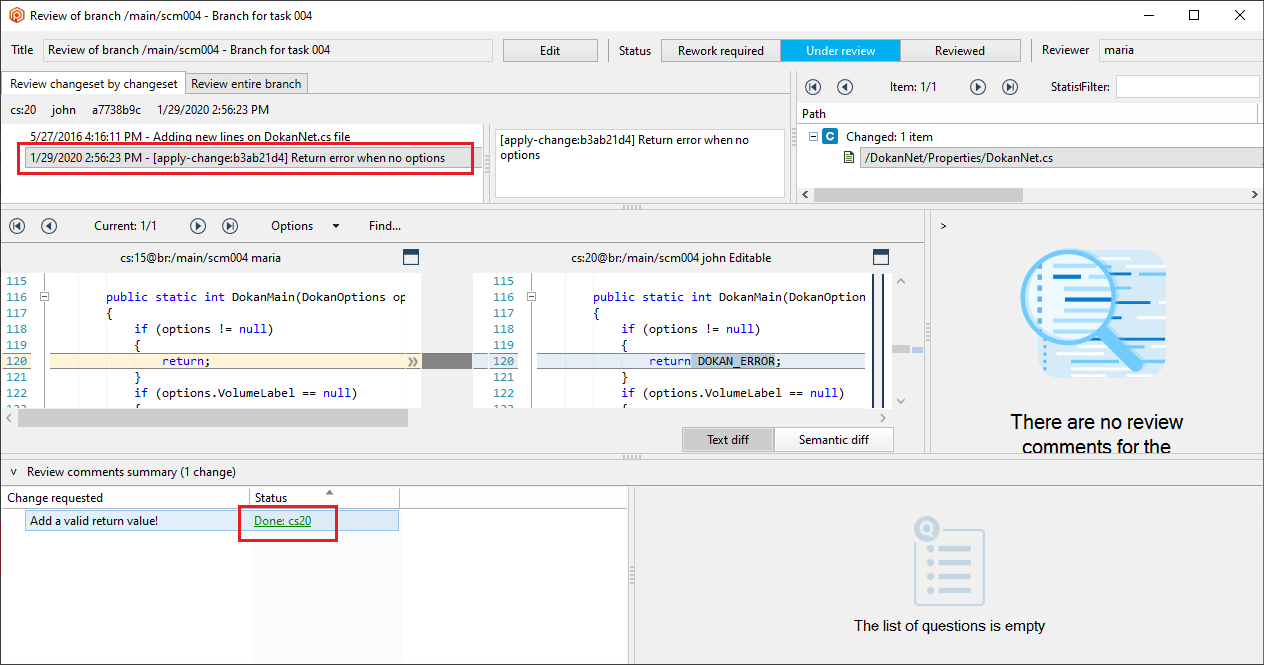
Plastic SCM GUI - Windows - Requested change done
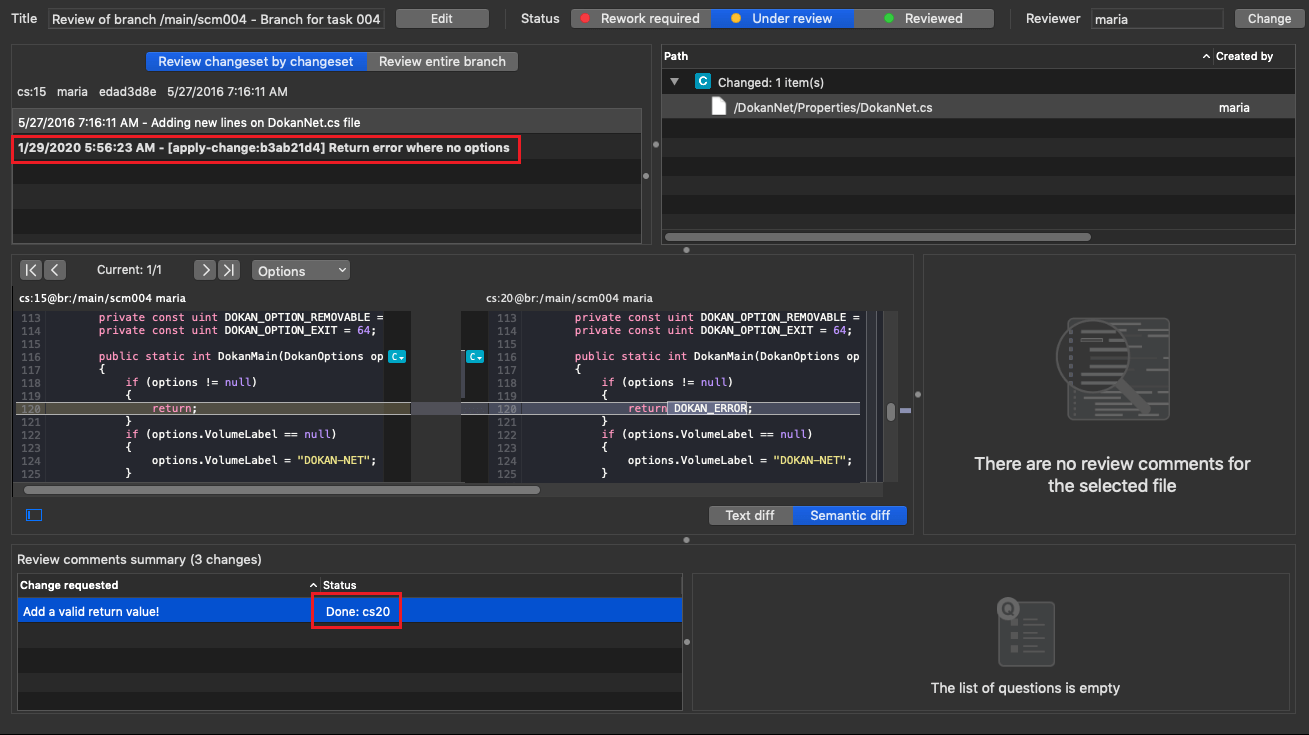
Plastic SCM GUI - macOS - Requested change done
As you can see in the figure above, the requested change is now
Doneinstead ofPending.If the reviewer double-clicks the comment in the 'Changes' list, then the Code Review system navigates to line of code where the reviewer entered the requested change.
If the reviewer clicks the
Donestatus in the 'Changes' list, then the Code Review system navigates to the applied change.
Visualizing comments existing in another revisions
The Code Review system allows you to visualize comments that are located in revisions that are not loaded by the diff window.
Let's see how this feature works with the following example:
Use the Previous (<) and Next (>) arrows to see how to visualize comments existing in another revisions
in Windows and macOS.
-
You applied changes in file AssemblyInfo.cs:

-
The reviewer creates a new code review to the branch and enters a comment:

-
Then, someone else (or just yourself), applies another change to the AssemblyInfo.cs file:

-
If you open the code review of the entire branch, you will see your changes and the reviewer's comment in the
list:
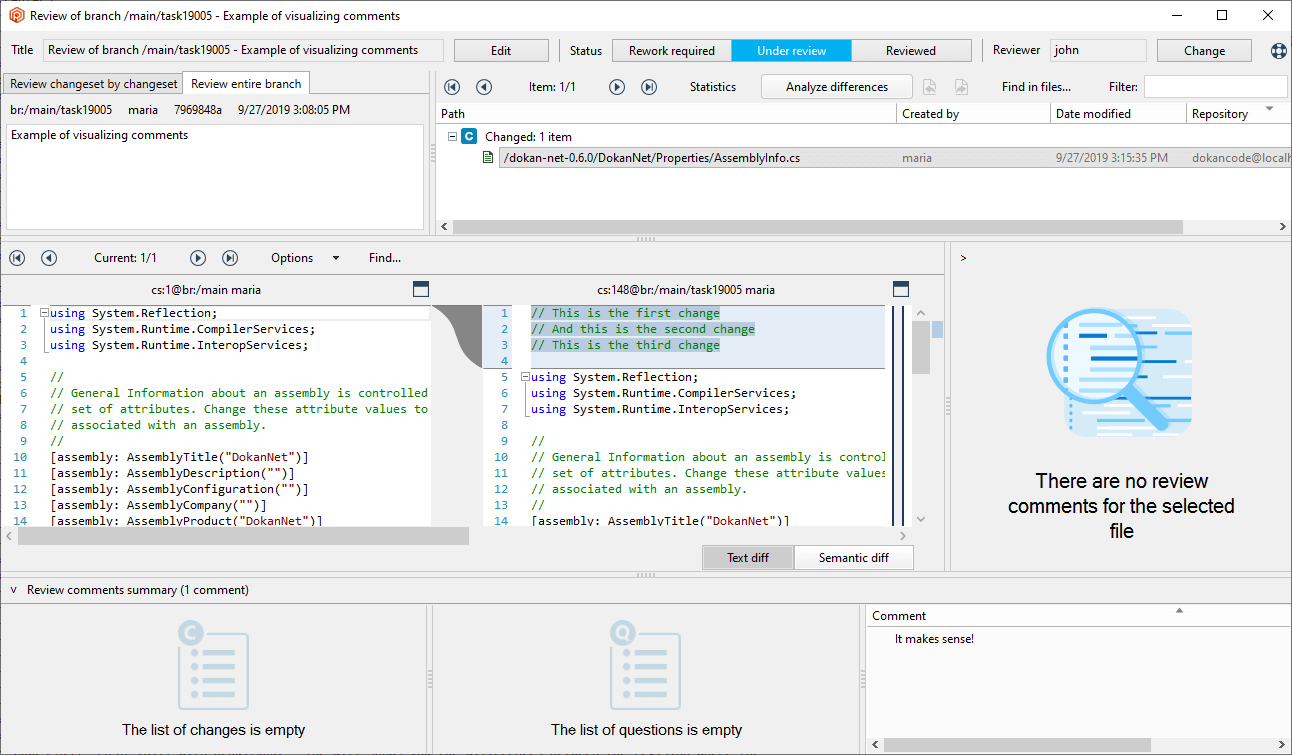
Plastic SCM GUI - Windows - Visualize comments
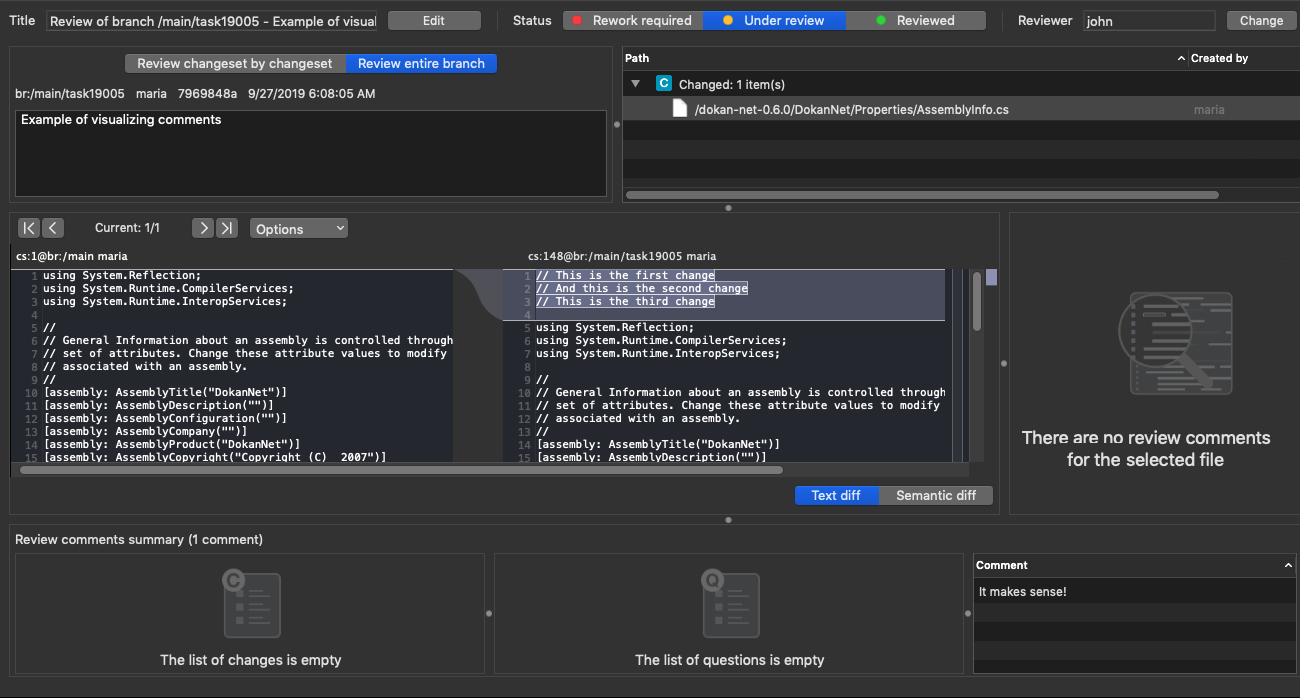
Plastic SCM GUI - macOS - Visualize comments
-
And if you double-click the comment to check the reviewed code, a new pane appears with three actions:
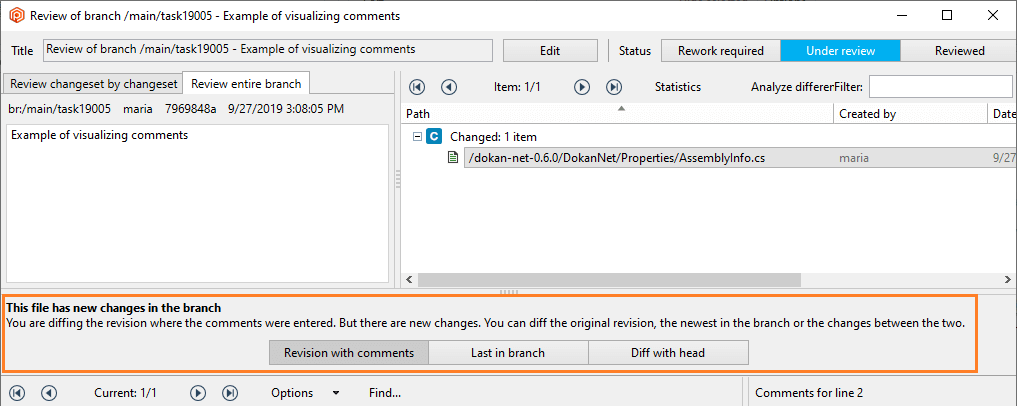
Plastic SCM GUI - Windows - Visualize comments - Diff options
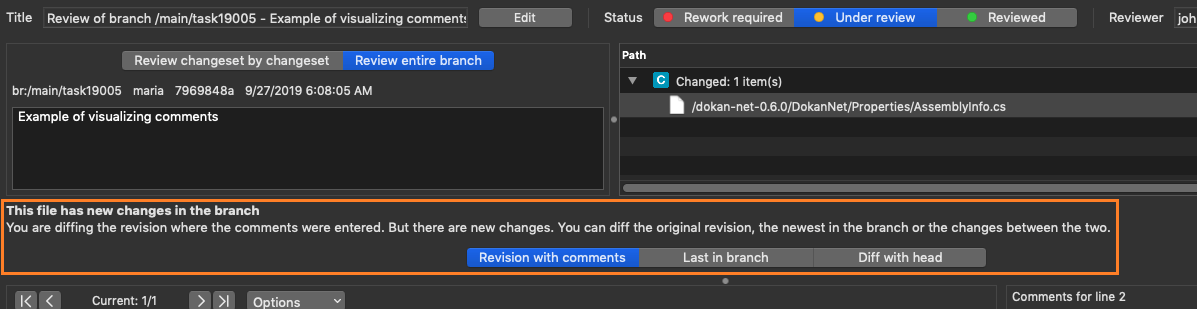
Plastic SCM GUI - macOS - Visualize comments - Diff options
-
Revision with comments - The diff shows you the differences between the base
revision and the revision where the reviewer entered the comment:
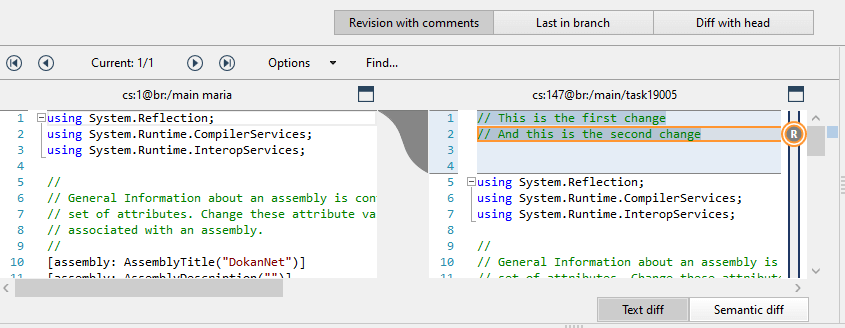
Plastic SCM GUI - Windows - Revision with comments
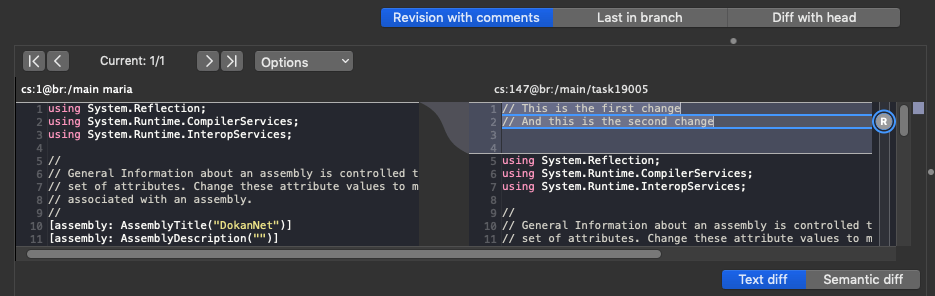
Plastic SCM GUI - macOS - Revision with comments
-
Last in branch - The diff displays the differences between the base revision and the
last revision in the branch:
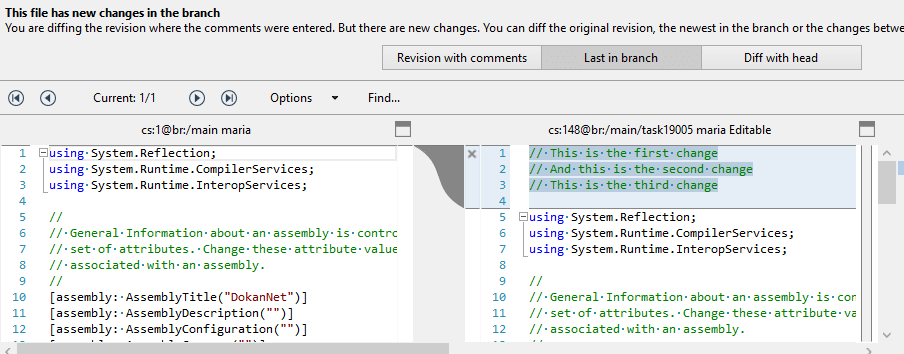
Plastic SCM GUI - Windows - Last in branch
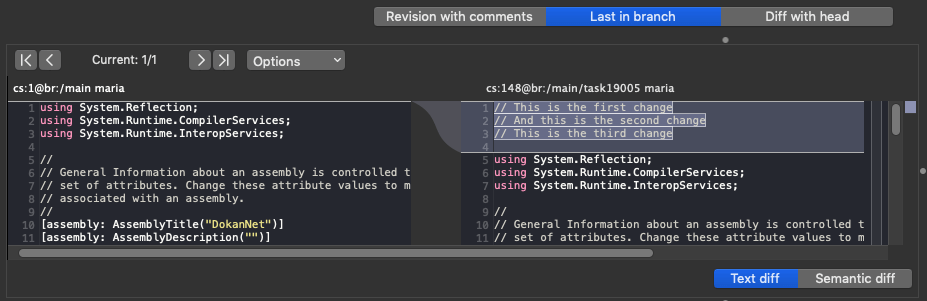
Plastic SCM GUI - macOS - Last in branch
-
Diff with head - The diff shows you the differences between the revision where the
reviewer entered the comment and the last revision in the branch:
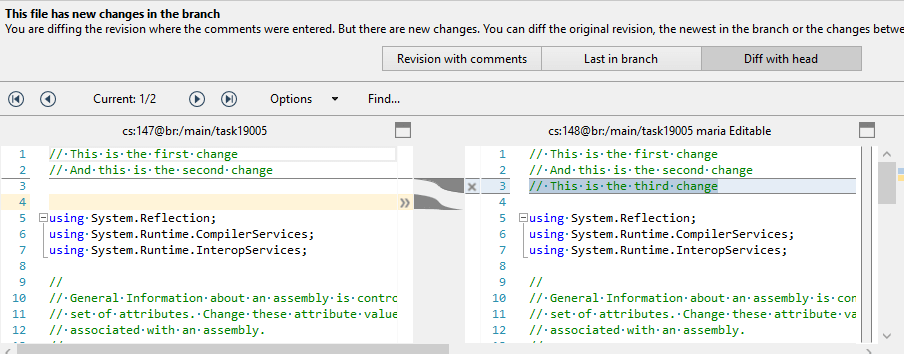
Plastic SCM GUI - Windows - Diff with head
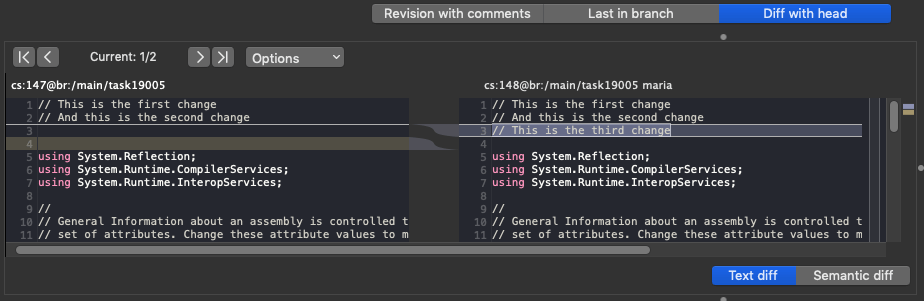
Plastic SCM GUI - macOS - Diff with head
-
Revision with comments - The diff shows you the differences between the base
revision and the revision where the reviewer entered the comment:
This functionality also works with added (single contributor) files.
Reviewing branches changeset by changeset
The Code Review system allows you to review a branch, changeset by changeset. When the developers checkin often, keeping reviewers in mind , it's helpful to review the branch walking through each changeset. When reviewing a branch by diffing changeset-by-changeset, the reviewer will follow the pre-recorded explanation that the author made to clarify each step of the task.
When the reviewer creates a New code review for this branch, it is possible to review a branch stepping through changeset-by-changeset. Just go to the Review changeset by changeset tab:
Use the Previous (<) and Next (>) arrows to see how to review a branch changeset by changeset in Windows and
macOS.

Plastic SCM GUI - Windows - Review changeset by changeset
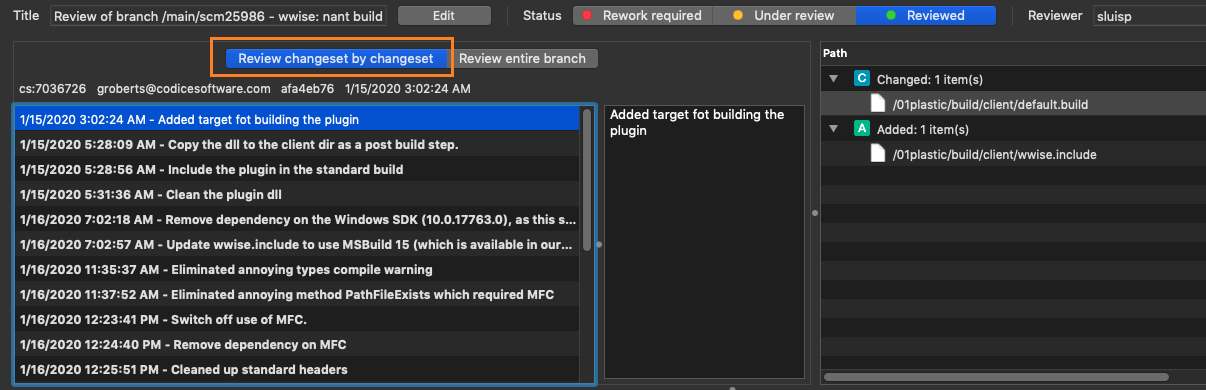
Plastic SCM GUI - macOS - Review changeset by changeset
While reviewing a branch, you can switch between the modes Review changeset by changeset and Review entire branch at any time, adding comments in either of them. Each comment will be displayed in the mode it was added.
Why is so important reviewing changeset by changeset? When a developer follows the rule of running checkins with the reviewer in mind, then every single checkin helps the reviewer following the developer's thoughts and steps to really understand what happened.
Change the reviewer
You can change the reviewer directly in the Code Review window:
Use the Previous (<) and Next (>) arrows to see how to change the reviewer in Windows and macOS.
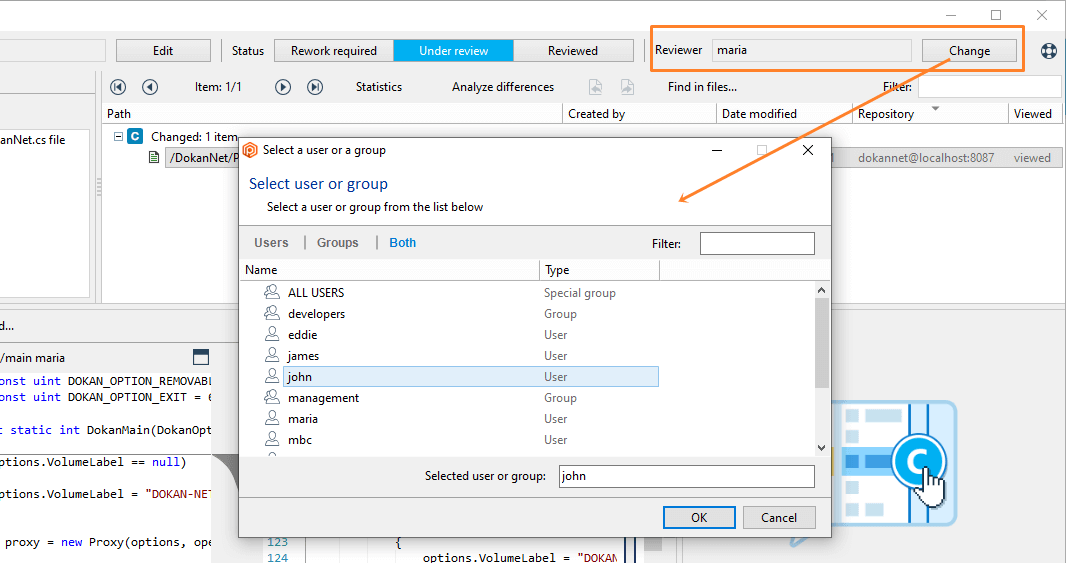
Plastic SCM GUI - Windows - Change the reviewer
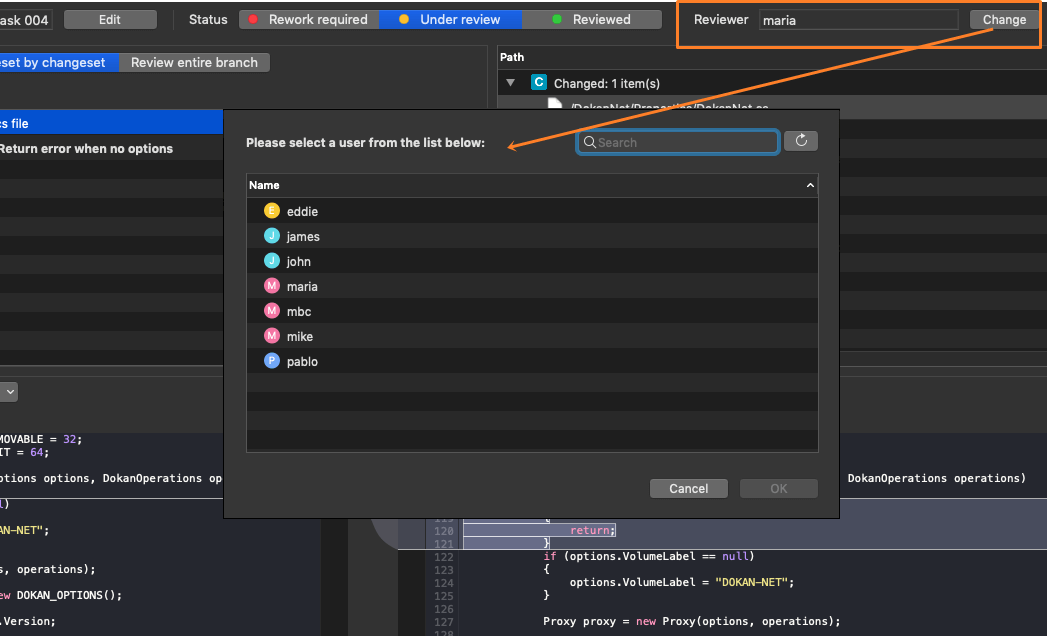
Plastic SCM GUI - macOS - Change the reviewer
Change the code review status
- Under review
- When the reviewer creates a new code review, the code review status is Under review.
- Rework required
- If the reviewer wants to highlight that the developer has to do some work, the reviewer must change the status of the code review to Rework required.
- Reviewed
-
When the reviewer finishes the review, the reviewer must change the status of the code review to Reviewed.
The Code Review system warns you when you try to change the status to Reviewed, but there are pending comments to solve. This happens, for example, when there are required changes to apply or questions to answer:
Use the Previous (<) and Next (>) arrows to see how to this warning in Windows and macOS.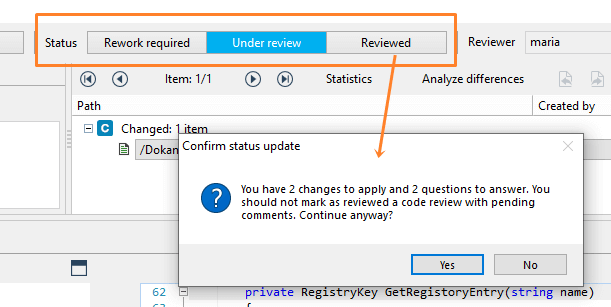
Plastic SCM GUI - Windows - Confirm status update
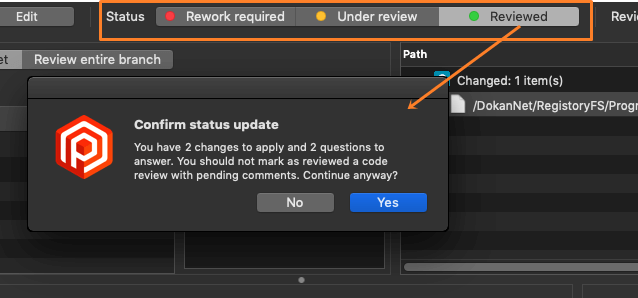
Plastic SCM GUI - macOS - Confirm status update
Code reviews in the age of pull requests
If you previously worked with the old Plastic Code Review system, then you've seen that this new Code Review system includes a lot of improvements making code reviews much better.
Most of the ideas behind our new Code Review come from our users.
These are the key principles for the this new Code Review system:
-
For the reviewer:
- Writing comments must be comfortable, easy, useful.
- Easy to differentiate between questions and changes.
- Very easy to check if the actions were applied and questions were answered.
-
For the author:
- It must be very easy to list the comments, to see all of them.
- It must be very easy to see all the actions — the real things to change.
- It must be very easy to say that an issue or remark was fixed.
We invite you to read the Upcoming: code reviews in the age of pull requests blog post where you'll see how this Code Review system started!
Chapter 23: The Synchronization view
The Sync Replication view lets the user configure replication relationships between repositories so they can be easily synchronized with one click. Replication relationships automate branch replication operations so that entire repositories can be kept in sync with little effort.
This view is divided in two main areas, as depicted on the next figure.

The top pane, called User defined sync views contains the list of defined relationships, or Sync views. This is a table that will list the list of relations created. Relations are just containers that assign a name to a set of repositories configured to synchronize with each other. Each relation, later, will have a number of source repositories each configured to synchronize with one or more destination repositories.
Note: Source and destination is just a naming convention, actually the synchronization can happen in both directions.
Once a Sync view is created and selected in the top pane, the bottom pane lets the user configure the repositories to synchronize.

Replications relationships are configured defining one or more source repositories and, for each of them, one or more destination repositories. When the relations are expanded, the source repository server connects to the destination repository server to get a list of the changesets that need to be synchronized.
Creating a new Sync View
In order to take advantage of the new Sync View it is necessary to configure one.
A synchronization configuration is about selecting a source repository and a destination repository and then running them to find the outgoing and incoming changesets.
The next steps guides you through the process of setting up a sync view.
- Click the Add sync view button to create a new "sync configuration".
- A dialog box will pop up to let you enter a name to the configuration.
- An empty configuration has been created. Click the Add source repository button.
- A dialog box will let you choose a server and browse and select the available repositories.
- Once you have a source server, your sync view will look like this.
- Click the Add destination repository button and select a destination repository.
- Once configured, you'll be able to see the outgoing and incoming changesets, and run replicas and diffs from there.


Source and destination explained
Whenever you define a new sync view configuration, you'll have to define a repository source and a destination.
- You can set up a sync view with your code repo at your laptop as source and your project repo at the central server as destination to use it to push and pull changesets from your central server to your laptop and vice versa.
- You can set up a sync view between your main server and a mirror, to use it to keep the mirror in sync.
- You can set up a sync view to keep two servers, at two distant locations, in sync.
Several sources and destinations on a single view
As the next figure shows, it is possible to define more than one source-destination pair on a single view. This is useful when you need to replicate more than one repository between the same two servers.

Commands on the Sync replication view
Commands in the "User defined sync views" pane (top)
Use the buttons in the toolbar to add a new relationship (or Sync view) or delete the selected one in the table, as shown in the figure below. When a new Sync view is created, a dialog appears to prompt for the new name.

Commands in the "Sync View details" pane (bottom)
Configuring a relation involves adding first one or more source repositories. Each of these repositories will be synchronized on demand with one or more destination repositories. These actions are depicted in the next figure.

- Refresh
- Refresh the content of the view to show any changes that may have been made.
- Add source repository
- Add a new repository to the relationship definition. A dialog appears to choose the server repository and the repository itself. The list of servers in the dropdown list is the made of the default server plus any servers defined in the Connection Profiles tab in the Preferences dialog.
- Delete source repository
- Remove the selected source repository from the selected Sync view. Note that this does not affect the repository itself in any way.
- Add destination repository
- Let the user select a destination repository. The selection mechanism is the same the one used for the source repository described above.
- Delete destination repository
- Delete the selected destination repository from the source repository in the relation. Note that this doesn't affect the repository itself in any way.
- Push visible - Pull visible
- These two commands are very useful if using Xlinks to use the filter to push or pull all the branches with a given name, in different repositories. They are used to launch the pull or push of all the branches selected by the filter.
- Show excluded branches
- Include the excluded branches selected under the Exclude branches branches menu option.
Context menu commands in the "Sync View details" pane (bottom)
Each type of object in the Sync view details table has a different set of available actions.
"Sync view details" menu
If you right-click on a blank zone in the Sync view details pane you will see:

- Add source repository
- Same as the Add source repository command described above.
- Refresh
- Same as the Refresh command described above.
Source repository menu

- Add destination repository
- Same as the Add destination repository command described above.
- Delete selected repository source
- Same as the Delete source repository described above.
- Refresh
- Reloads the list of pending changes of the repositories underneath.
Destination repository menu

- Synchronize all
-
Initiates a synchronization of all the pending changes, replicating all the branches listed in the outgoing and incoming sections for the selected repository. A summary window appears so the user can review the actions that will be done and confirm that the operation can proceed as depicted in the next figure.

- Push all outgoing changes
- Instead of performing a full replication, only the outgoing changes (from source to destination) are replicated. A summary window appears so the user can review the actions that will be done and confirm that the operation can proceed as depicted in the figure above.
- Pull all incoming changes
- Same as the previous option, but the other way around: only pull from the destination to the source.
- Delete selected repository target
- Same as the Delete destination repository command described above.
- Refresh
- Reload the list of pending changes for the selected relationship.
Outgoing / incoming changes menu

- Push / Pull all changes
- Initiates a replication operation that includes all the outgoing or incoming changes.
Branch menu

- Push / Pull branch
- Depending if the branch is listed under outgoing or incoming changes, this action is "Push" or "Pull" respectively. The command initiates a replication operation on the selected branch.
- Exclude branches
- The excluded branches are those that you don't want to sync between the source repository and the remote (destination) one. Since the SyncView calculates all the changesets that need to be pushed or pulled in order to let the user preview them, it started to get slow with thousands of branches. With the Excluded branches feature the Plastic user can select the branches he won't be syncing and just exclude them. The result is that the sync view will be much faster. At any time these excluded branches can be included again by clicking on the Show excluded branches option.
Changeset menu

- Diff changeset
- The content of the selected changeset can be reviewed before replicating it as part of the synchronization process. A Diff window appears with the content of the changeset.
Chapter 24: The Permissions Window
The Permissions window is the control panel for an object's access control list (ACL). Whenever a user invokes a Plastic SCM command through the client software, the repository server first consults the ACL of one or more objects to determine whether that user has permission to execute the command.
An object's ACL consists of permissions, each of which states that a particular user or group (possibly the special user OWNER or the special group ALL USERS) either is Allowed or Denied the right to perform a particular Plastic SCM operation on this object.
Each object has an owner - initially, the user who created it. The ownership of some objects can be changed, using the Change owner command in this window.
The Permissions window's Advanced tab displays an individual permission like this:

This permission says that group "All users" is allowed (not denied) the right to apply labels to revisions, and that this is a direct permission (an explicit setting on this particular object), not an inherited permission (from a higher-level object).
The inheritance scheme means that an object can be affected by a large number of individual permissions:
- Some objects (for example, items) inherit from the file system hierarchy.
- Others (for example, branches) inherit from the repository object hierarchy.
- Still others (for example, revisions) inherit from both hierarchies.
For each operation, the Assigned Permissions tab shows the result of combining the object's direct permissions with its inherited permissions to answer the question, "does this user have the right to perform this operation on this object?". (The PLASTIC SCM SECURITY manual details the algorithm that combines the permissions.) But note that this answer might not be the "final answer". Many operations involve multiple repository objects - for example, applying a label to a revision involves both a label object and a revision object. Thus, the Permissions window for each individual object sometimes tells just a part of the story for a given operation.
The Permissions Window Display
An object's Permissions window has two tabs, described in the following sections.
The Assigned Permissions Tab
This tab displays the "net effect" of the object's individual permissions. The upper pane lists all the users and groups for which permissions on this object (both direct and inherited) have been defined. Selecting a particular user or group in this pane causes the lower pane to display that user/group's "effective permissions" for the object.

Each row indicates the "effective permission" for one Plastic SCM operation as two checkboxes - one for Allowed and one for Denied. Each checkbox can have one of these states:
 empty
empty- For this user/group and this Plastic SCM operation, the object has no direct or inherited permission of this kind (Allowed or Denied).
 black checkmark
- For this user/group and this Plastic SCM operation, the object has a direct permission of this kind (Allowed or Denied), but no inherited permissions. You can clear this setting with a mouse click.
 gray checkmark
-
For this user/group and this Plastic SCM operation, the object has one or more inherited permissions of this kind (Allowed or Denied). It is also possible that the object has a direct permission of the same kind. You can determine the details on the Advanced tab - for example, which higher-level object the permission is inherited from.
You cannot clear this setting with a simple mouse click, but see section Clearing an Inherited Permission below.
These checkbox settings determine the effective permission as follows:
- If the Allowed checkbox is checked (black or gray) and the Denied checkbox is cleared, then the user/group has the right to perform the operation on this object.
- Otherwise, the user/group cannot perform the operation on this object.
Clearing an Inherited Permission
You cannot clear an inherited permission, indicated by a gray checkmark, with a simple mouse click. Instead, open a Permissions window on the higher-level object from which the setting is inherited, and clear the direct setting there. (If the lower-level object has multiple inherited permissions for this user/group for the same operation of this kind (Allowed or Denied), clear the setting on each of the higher-level objects.)
When you reopen a Permissions window on this lower-level object, you'll see:
- An empty checkbox, if there was no corresponding direct permission -- for this user/group, for the same operation, and of the same kind (Allowed or Denied).
- A black checkmark, if there was a corresponding direct permission. In this case, the direct permission has now "emerged from the shadow" of the inherited permission(s) that you just removed from the higher-level object.
The Advanced Tab
The upper pane displays a table of all the object's individual permissions - both direct and inherited -- for all users and groups.

The columns of this table are:
- User/Group
- The name of the user or group (possibly the special user OWNER or the special group ALL USERS) to which this permission applies.
- Permission
- The Plastic SCM operation that is affected by this permission.
- Allowed
- Yes or No, indicating whether this permission grants the right to perform this operation.
- Denied
- Yes or No, indicating whether this permission denies the right to perform this operation.
- Inherited
- The identifier of the object from which the permission is inherited. Dashes (--) indicate a direct permission (not inherited).
Commands in the Permissions Window
There are command buttons and checkboxes on both tabs in this window. No change that you make takes effect immediately - instead, the following buttons operate on the changes you've made on either tab:
- Apply
- Save any new permissions, changes to existing permissions, and ownership changes that you've made on the Assigned Permissions tab; save any inheritance changes that you've indicated by the checkboxes on the Advanced tab.
- Ok
- Perform the Apply command, then close the Permissions window.
- Cancel
- Close the Permissions window without saving any of the changes that you've made since the most recent Apply command.
Commands on the Assigned Permissions Tab
- Add
- Create a set of direct permissions for a user or group. You select the user or group from a pop-up dialog.
- Remove
- Delete all the direct permissions for the selected user or group.
- Change owner
- Change the object's owner to another user or group. You select the user or group from a pop-up dialog.
Commands on the Advanced Tab
By default, an object inherits permissions from its parent (which may, in turn, inherit permissions from its parent, and so on). On this tab, you can invoke one or both of these kinds of commands:
- A command that changes how this object inherits permissions from higher-level objects.
- A command that changes how this object's permissions are inherited by lower-level objects.
The following four commands are mutually exclusive - you can check only one checkbox at a time:
- Break inheritance, copying inherited permissions
-
Convert all of the object's inherited permissions to direct permissions. You can think of this command in either of these ways:
- On the Assigned Permissions tab, for all users/groups: change all the gray checkmarks to black checkmarks.
- On the Advanced tab, change each object identifier in the Inherited column to "--".
- Break inheritance, without copying inherited permissions
-
Remove all of the object's inherited permissions, leaving the direct permissions unchanged.
WARNING! This command can render the object completely inaccessible. Before invoking this command, make sure that the object has some direct permissions -- for example, chgperm, view, and read --that will provide at least minimal access after the inherited permissions are removed.
- Add inheritance from parent directory item
- (items only) Undo a previous Break inheritance command, by reestablishing permission inheritance from the item's parent directory. This command removes the object's direct permissions, if any.
- Add inheritance from a specified object
- Have this object inherit the direct permissions that are defined for a specified other object. This adds to the existing settings - it does not change or delete any existing direct or inherited permission.
You can invoke the following command by itself, or in combination with one of the above:
- Extend inheritance
- (directory items only) This command does not affect this directory object; instead, it affects all the file system objects in the subtree below this directory. In effect, an Add inheritance from parent directory item command is performed on each file and directory in the subtree. This removes direct permissions throughout the entire subtree.
Chapter 25: The Preferences Window
The Preferences window manages your user profile, which controls many aspects of your day-to-day usage of the Plastic SCM client software. Your user profile is stored in an XML-format file, client.conf, located in a subdirectory (subfolder) under your home directory.
The General Preferences
This dialog lets you configure the connection information to connect to your Plastic SCM server.

You can launch this wizard from a command processor without having to start the Plastic SCM GUI. Read how to do it .
The Diff and Merge Tab
The settings on this tab configure the defaults to be used by the Side-by-side Diff and Merge tools. You can override the defaults in instances of these tools.
- Comparison method and encoding
-
- Comparison method
-
Controls handling of non-visible characters like spaces, tabs and ends of line when calculating the differences.
These are the settings options:
- Ignore EOLs - Ignore ends of line in the comparison.
- Ignore whitespaces - Ignore spaces and tab characters in the comparison.
- Ignore EOLs and whitespaces - Ignore both.
- Recognize all - Do not ignore any characters, use all of them when computing differences. This is the default setting.
Learn how to configure the EOL conversion mechanism . - Default / Result encoding
- The encoding used to convert text files' contents to screen characters in the merge and diff tools. For more details, refer to sections File-Comparison Options in the Side-by-side Diff tool and The 3-way Merge Options.
- Merge conflict resolution
-
The default way in which the two contributors to a text-file merge operation are to be handled. For more
details, refer to section The Merge Options window.
- Manual conflict resolution - Always launch merge tool to review conflicts even if all of them are automatic conflicts.
- Automatic conflict resolution, when possible - Launch merge tool only when the user interaction is required to resolve a manual conflict.
- Merge view behavior
-
- Close Merge view and open Pending changes - Configure whether or not to close the Merge view and open the Pending changes one when a merge is completed.
- Allow to merge with pending changes - By default, if you have pending changes to be checked in in your workspace, Plastic will prevent you from performing a merge. Read more about this option.
The Diff tools Tab
This tab enables you to configure and customize the behavior of the Diff tool when it compares revisions of items. It contains a sequence of patterns (in the Type/Suffix column), which Plastic SCM matches, one after another, with an item's file type or its filename. When it finds a match, the Plastic SCM invokes the corresponding command in the Diff tool command line column.

This tab is initialized with several special patterns that are matched against an item's type, as reported in the Type column of the Worspace Explorer:
- .doc;.docx
- .xls;.xlsx
- .ppt;.pptx - With these three patterns you can see the differences for MS Word, MS Excel and MS PowerPoint, respectively. Here you can see how it works.
- $text - Matches all items whose type is Text.
- $binary - Matches all items whose type is Binary.
By clicking the Add button, you can create additional entries for filename extensions, such as .docx, .cs, and so on:

In each entry, the command corresponding to the pattern is one of the following:
- Embedded diff viewer
- (indicated by the keyword $internal_tool) The GUI's built-in file-comparison routine will be invoked, creating a view in the active workspace's work context area.
- Plastic SCM diff tool
- A standard mergetool command line will be invoked for files of type Text and for files with a matched filename extension. A standard binmergetool command line will be invoked for files of type Binary. This creates a separate top-level window on your desktop.
- External diff tool
-
A command line to invoke any file-comparison program. You use the following keywords to incorporate information
about the revisions being compared into the command line (click the
 help button):

Once you've choose the diff tool, you have to select the file types that this program will use:
- Text files
- Binary files
- Files with a certain pattern:
-
For example, you can use the following patterns:
.cs: Any file with the "cs" extension*.cs: Any file with the "cs" extensionREADME: Any file named "README"Diff*: Any file that starts with "Diff"^Diff.*(\.es)|(\.nl)\.resx$: Any "es" or "nl" resource file that starts with Diff (Diff*.es.resx & Diff*.nl.resx)
The Merge tools Tab
This tab enables you to configure and customize the behavior of the Merge tool when it performs a 3-way merge of two contributor revisions and a common ancestor (base) revision. It contains a sequence of patterns (in the Extension column), which Plastic SCM matches, one after another, with an item's file type or its filename. When it finds a match, Plastic SCM invokes the corresponding command in the Tool column.

This tab is initialized with several special patterns that are matched against an item's type, as reported in the Type column of the Workspace Explorer
- .doc;.docx - Enables to use the MS Word Merge. Here you can see how it works.
- $text - Matches all items whose type is Text.
- $binary - Matches all items whose type is Binary.
By clicking on the Add button, you can create additional entries for filename extensions, such as .docx, .cs, and so on.

In each entry, the command corresponding to the pattern is one of the following:
- Plastic SCM merge tool
- A standard mergetool command line will be invoked for files of type Text and for files with a matched filename extension. A standard binmergetool command line will be invoked for files of type Binary. This creates a separate top-level window on your desktop.
- External merge tool
-
A command line to invoke any file-merge program. You use the following keywords to incorporate information about
the revisions being merged into the command line (click the
help button):

Once you've choose the merge tool, you have to select the file types that this program will use:
- Text files
- Binary files
- Files with a certain pattern:
-
For example, you can use the following patterns:
.cs: Any file with the "cs" extension*.cs: Any file with the "cs" extensionREADME: Any file named "README"Merge*: Any file that starts with "Merge"-
^Merge.*(\.es)|(\.nl)\.resx$: Any "es" or "nl" resource file that starts with Merge (Merge*.es.resx & Merge*.nl.resx)
The Comments Tab
This tab provides some control of when and how Plastic SCM displays the Comments dialog. You use this dialog to associate a comment string with one or more new revisions.
- Maximum number of recent comments
- The maximum capacity of the list of your previously specified comment strings. This list of comments appears when you click the Recent comments button in a Comments dialog or in a Pending Changes view or when creating a child branch. When the capacity is reached, new comments are pushed onto the top of the list, and old comments fall off the bottom.
- Show comments dialog in Add command
- If this option is set, a dialog box appears when adding items to the repository in order to enter the comments associated to the operation. This is normally useful since the added items are by default checked in directly. So if this option is not set, that changeset will have an empty comment. (Note that the changeset comment can be edited later in the extended options panel, in the changesets view).
- Show comments dialog in Merge-to command
- If this option is set, a dialog box appears when processing a merge-to action in order to enter the comments associated to the operation. As in the option above, this is normally useful since the processed items in the merge-to operation are by default checked in directly. So if this option is not set, that changeset will have an empty comment. (Note that the changeset comment can be edited later in the extended options panel, in the changesets view).
- Warn about empty comment in Pending Changes view
- Display a warning message when checking in from the Pending Changes view if the comment is empty.
- Comments auto-text
- Specifies the text, if any, which is automatically entered into each instance of the Comments dialog. Plastic SCM can automatically fill in the user name that performed the operation and the date they were performed. Keep in mind, however, that this information is also recorded in the Plastic SCM repository even if not detailed in the comment.
The Other Options Tab
- Behavior when trying to switch/update the workspace with changed items
-
Control the action to be executed when there are changed items and the user is trying to perform a
switch-to-branch or any other operation that involves an update workspace. These are the possible values:
- Allow
- Allow, showing a warning
- Do not allow, show an error
- Update and Checkin operations set files as read-only
-
Check this checkbox to use the checkout-modify-checkin methodology to work with
source-controlled files. Files remain read-only until they are checked-out. (Some IDEs require this methodology.)
Clear this checkbox to use the modify-commit methodology to work with source-controlled files. Files are writable at all times.
And, also, you can customize this read-only attribute of your workspace files when performing update and checkin operations, and define exceptions to the main rule:
-
If you enable the Update and Checkin operations set files as read-only preference,
you can create a file named
writable.confand define file extensions that won't be affected by the preference, so the update and checkin won't set the readonly attribute on matching files. -
If you disable the Update and Checkin operations set files as read-only preference,
you can create a file named
readonly.confand define file extensions that will override the preference, so the update and checkin operations will set the readonly attribute on matching files.
Thewritable.confandreadonly.conffiles can be located:- In the root directory of the workspace.
- In the Plastic SCM client folder.
-
In the
plastic4directory (under$HOME/.plastic4on Linux/macOS systems orC:\Users\user\AppData\Local\plastic4on Windows).
Read in the Platic book the details of how to setupwritable.confandreadonly.conf.This is an example of these files:
*.pdb
*.dll
*/obj/*
*/.metadata
-
If you enable the Update and Checkin operations set files as read-only preference,
you can create a file named
- Check content (hash) when the file timestamp is modified to set it as "Changed"
- Controls how Plastic SCM determines whether a source-controlled file has Changed status. When this option is not set, Plastic SCM uses the timestamps of the files. When the option is set, the content of the files that have a changed timestamp is hashed to see if has really changed. The latter option is slower but completely accurate, while the first is faster but may mark a file as changed when it actually is not.
- Update operation sets repository timestamps on files
-
When Update creates a file in the workspace by copying a revision from the repository:
- If this option is set, the file's timestamp is set to the revision's creation time.
- If this option is not set, the file's timestamp is set to the current time.
- Enable shared workspaces support (Samba/WinShare)
- Adjust the file's timestamp values during the update operation in order to take into account potential time variations while writing the file content, typically present if your Plastic SCM workspace has been created inside a Samba/WinShare drive.
- Display error for same file with different case (from Unix filesystems) on Windows
- If this option is set, an error is displayed in the Update report when two files with the same name but different case are present on the same directory. This is supported in case-sensitive file systems, commonly found on Unix platforms, but it is not supported in Windows file systems. It is possible to add items with same name and different case in Linux and Update a workspace in Windows to download those files. However, in Windows only one of the files will be downloaded. When this option is set, the Update operation will warn about this. If it is not set, the case is ignored, but only one file is downloaded anyway.
- Checkin files and directories when adding them to source control
- When this option is set the Add to source control commands also checkin the items. When it is not set, the added items are left in Added state and have to be checked in using the Checkin command on the Pending Changes view or the Item's view context menu.
- Show current Plastic SCM user in the window title
- This preference is unchecked by default, but can easily be changed to show the current Plastic SCM user in the window title. This will also tell you if the current user is the administrator of the repository server.
- Hide ignored items in the Workspace Explorer
- If this option is checked then it hides all the ignored items that have been added to the ignored list in the Workspace Explorer.
- Find changed files in workspace before merge
- If this preference is enabled and the Allow to merge with pending changes preference in the Diff and Merge tab is disabled and there are changed files in the workspace, then Plastic shows a Pending changes dialog where the user is able to undo the changes.
The Issue Tracking Tab
This tab configures an integration between Plastic SCM and an issue tracking system (ITS).

For details on individual ITS integrations, see the TASK AND ISSUE TRACKING SYSTEMS guide.
The Connection Profiles Tab
This tab manages any number of named connection profiles, which can be used in replication operations instead of your day-to-day user profile:

Click the Add button to create a new connection profile. Each replication profile specifies:

- A remote repository server
- The user credentials
- A profile name
-
The connection type:
- On demand - The server is not always reachable from this client and Plastic SCM will not try to connect to it unless explicitly told so. (For instance: from the Branch Explorer replication sources Show remote data checkbox, or from the list repositories button on the replication dialog.) If you are configuring Plastic SCM on a laptop and when you leave the office this server is not reachable, but you still want to connect to it when you get back.
-
Automatic - The server is always online (maybe on the same local network, when connecting from a desktop machine). For instance, the repositories view will try to connect to this server when displaying the list of repositories if the connection type is set to "Automatic".
If a server is set as "Automatic" and for some reason it is not reachable, Plastic SCM may show a delay in some operations. This is because it has to wait until the network timeout is reached (normally between 20 seconds and several minutes).
The Preview tools Tab
This tab lets you configure external tools to calculate file previews. The Workspace Explorer, for example, will use these configured tools to preview the files.

Click the Add button to configure an external preview tool.
You can use one of the existing templates (ImageMagick or IrfanView) to configure the new preview provider. Or you can configure your own-defined tool.
The tool to calculate the preview is chosing according to the order you specify in this tab. So place the more specific rules first.
Custom Open with...
It's possible to customize the tools that will be displayed in the Open with... menu that appears in some windows in the Plastic SCM GUI (Workspace Explorer, Pending changes view...).
In the picture below, you can see an example:

You can also define the shortcuts on the
openwith.conf file using the following format on each line:
[Name|Shortcut] "Path" @arguments
For example:
[Notepad|CtrlI] "C:\Program Files (x86)\Notepad++\notepad++.exe" @file
where a valid shortcut value is one of the values you can find here.
The
openwith.conf file is located in the plastic4 directory
(under $HOME/.plastic4 on Linux/Mac systems or
C:\Users\user\AppData\Local\plastic4 on Windows).
Take into account that you can define some values that can override the existing
predefined shortcuts.
The Theme Tab
You can change the GUI theme of Plastic SCM for Windows:

The User Profile Tab
This tab lets you configure your user profile to receive notifications via email or Slack. This way, the DevOps plugs can notify you:

Chapter 26: The Cloud View
The Cloud window is just a "repositories view" connected to Plastic Cloud.
- For Cloud Edition users - It will simply list the repos on their cloud organization.
- For Enteprise Edition users - It will show them that Cloud is there to help, and of course will show the repos in their Cloud organization as soon as they get one.

The operations here were all previously doable from the regular Repositories view.
Columns in the Cloud View
The columns in this view are the same as the Repositories view.
Commands in the Cloud View
Toolbar Commands
The toolbar includes the same buttons and controls as the Repositories view.
Important: The server field in the Cloud view must follow this format: 
organization-name@cloud
Context Menu Commands
The commands available when a cloud repository is right-clicked are the same described in the Repositories view.
Keyboard shortcuts for Plastic SCM
This chapter collects the keyboard shortcuts that can be used to run the main actions in Plastic SCM.
| Shortcut | Main actions |
|---|---|
| Ctrl + F | Open a search dialog or set the focus to the search text box. |
| Ctrl + P | Open the main Permissions window related to the selected object. |
| F2 | Rename a selected object (repository, workspace, item, branch, label, attribute, sync view). |
| F5 | Refresh a view. |
| Del | Delete the selected object. |
| Shortcut | Main actions - Items |
|---|---|
| Ctrl + H |
|
| Ctrl + T |
|
| Ctrl + O | Run a checkout. |
| Ctrl + I | Execute a checkin. |
| [customizable] | The user can specify custom shortcuts for the defined Open with action. |
| Ctrl + X | Cut the selected item from the Workspace Explorer. |
| Ctrl + V |
|
| Shortcut | Main actions - Branches |
|---|---|
| Ctrl + N |
|
| Shortcut | Main actions - Differences |
|---|---|
| Ctrl + D |
|
| Ctrl + Shift + D |
|
| Shortcut | Main actions - 3-way merge |
|---|---|
| Ctrl + 1 | Select/deselect the source contributor. |
| Ctrl + 2 | Select/deselect the base contributor. |
| Ctrl + 3 | Select/deselect the destination contributor. |
| Ctrl + Shift + - | Go to the first change or conflict block. |
| Ctrl + - | Go to the previous change or conflict block. |
| Ctrl + + | Go to the next change or conflict block. |
| Ctrl + Shift + + | Go to the last change or conflict block. |
| Ctrl + PageUp | Go to the previous non-automatic conflict. |
| Ctrl + PageDown | Go to the next non-automatic conflict. |
| Shortcut | Main actions - Diff window |
|---|---|
| Ctrl + Shift + F | Open the find in files dialog. |
| Ctrl + Shift + - | Go to the first file. |
| Ctrl + - | Go to the previous file. |
| Ctrl + + | Go to the next file. |
| Ctrl + Shift + + | Go to the last file. |
| Ctrl + Shift + N | Go to the first difference. |
| Ctrl + N | Go to the previous difference. |
| Ctrl + M | Go to the next difference. |
| Ctrl + Shift + M | Go to the last difference. |
| Shortcut | Main actions - Text diff panel in the Diff window |
|---|---|
| Ctrl + S | Save changes in the editable diff view. |
| Ctrl + Click | Run a Diff changed code action. |
| Clipboard/Undo Edit Actions | |
| Ctrl + C | Copy to clipboard |
| Ctrl + Insert | Copy to clipboard |
| Ctrl + X | Cut to clipboard |
| Shift + Del | Cut to clipboard |
| Ctrl + L | Cut line to clipboard |
| Ctrl + V | Paste from clipboard |
| Shift + Insert | Paste from clipboard |
| Ctrl + Y | Redo |
| Ctrl + Shift + Z | Redo |
| Ctrl + Z | Undo |
| Delete Edit Actions | |
| Backspace | Backspace |
| Shift + Backspace | Backspace |
| Ctrl + Backspace | Backspace to previous word |
| Del | Delete |
| Ctrl + Shift + L | Delete line |
| Ctrl + Del | Delete to next word |
| Insertion Edit Actions | |
| Enter | Insert line break |
| Shift + Enter | Insert line break |
| Ctrl + Enter | Open line above |
| Ctrl + Shift + Enter | Open line below |
| IntelliPrompt Edit Actions | |
| Ctrl + Space | Request intelli prompt auto complete |
| Ctrl + Shift + Space | Request intelli prompt parameter info session |
| Miscellaneous Edit Actions | |
| Ctrl + I | Incremental search |
| Tab | Insert tab stop or indent |
| Ctrl + U | Make lowercase |
| Ctrl + Shift + U | Make uppercase |
| Shift + Tab | Remove tab stop or outdent |
| Ctrl + Shift + I | Reverse incremental search |
| Insert | Toggle overwrite mode |
| Ctrl + T | Transpose characters |
| Ctrl + Shift + T | Transpose words |
| Shift + Alt + T | Transpose lines |
| Alt + ArrowUp | Move selected lines up |
| Alt + ArrowDown | Move selected lines down |
| Movement Edit Actions | |
| ArrowDown | Move down |
| ArrowUp | Move up |
| ArrowLeft | Move left |
| ArrowRight | Move right |
| Ctrl + ArrowLeft | Move to previous word |
| Ctrl + ArrowRight | Move to next word |
| Home | Move to line start |
| End | Move to line end |
| Ctrl + Home | Move to document start |
| Ctrl + End | Move to document end |
| PageUp | Move page up |
| PageDown | Move page down |
| Ctrl + PageUp | Move to visible top |
| Ctrl + PageDown | Move to visible bottom |
| Ctrl + ] | Move to matching bracket |
| Scroll Edit Actions | |
| Ctrl + ArrowDown | Scroll down |
| Ctrl + ArrowUp | Scroll up |
| Selection Edit Actions | |
| Ctrl + Num- | Code block selection contract |
| Ctrl + Num+ | Code block selection expand |
| Escape | Collapse selection |
| Shift + ArrowDown | Select down |
| Shift + ArrowUp | Select up |
| Shift + ArrowLeft | Select left |
| Shift + ArrowRight | Select right |
| Ctrl + Shift + ArrowLeft | Select to previous word |
| Ctrl + Shift + ArrowRight | Select block to next word |
| Shift + Home | Select to line start |
| Shift + End | Select to line end |
| Ctrl + Shift + Home | Select to document start |
| Ctrl + Shift + End | Select to document end |
| Shift + PageUp | Select page up |
| Shift + PageDown | Select page down |
| Ctrl + Shift + PageUp | Select to visible top |
| Ctrl + Shift + PageDown | Select to visible bottom |
| Ctrl + A | Select all |
| Ctrl + Shift + W | Select word |
| Ctrl + Shift + ] | Select to matching bracket |
| Shift + Alt + ArrowDown | Select block down |
| Shift + Alt + ArrowUp | Select block up |
| Shift + Alt + ArrowLeft | Select block left |
| Shift + Alt + ArrowRight | Select block right |
| Ctrl + Shift + Alt + ArrowLeft | Select block to previous word |
| Ctrl + Shift + Alt + ArrowRight | Select block to next word |
How to run external tools on Plastic SCM objects
The
externaltools.conf file allows the users to run actions on the selected objects.
The
externaltools.conf file can be included:
- In your Plastic SCM client installation directory.
-
In the
plastic4directory (under$HOME/.plastic4on Linux/Mac systems orC:\Users\user\AppData\Local\plastic4on Windows). -
In the plastic-global-config repository at
/externaltools/externaltools.confso that all clients have the same settings by default .
This is the syntax:
<objectType>[:<objectType>[...]] | <toolName> | <actionToRun> | <args>
Where:
-
objectType- The name of the targeted object. It can be either item, label, changeset or branch. They can be combined using ':' to separate them. -
toolName- The name of the tool to be displayed in the context menu. -
actionToRun- This can be a path or an environment variable:-
pathToExecutable- Absolute path to the targeted application. Spaces don't need to be escaped or protected. -
%PATH_TO_TOOL_EXE%- Name of the environment variable that contains the path to the targeted application. Spaces don't need to be escaped or protected.
-
-
args- The arguments line to be passed to the targeted application. There are three currently supported placeholders:@object- replaced with the object name,@repository- replaced with the repository of the object,@wkpath- replaced with the current workspace path.
Please note that the replaced values might contain blank spaces, so they'll probably need to be surrounded with quotes.
These custom actions will appear appended to the Open menu item submenu in:
- Workspace Explorer - controlled and private items.
- Pending changes view.
- History view (only Windows).
And these actions will appear as a new menu item called External tools in:
- Branches view context menu.
- Changesets view context menu.
- Labels view context menu.
- History side panel context menu (only GTK & Mac).
This is an example of a valid externaltools.conf file:
item | Open with sublime | C:\Program Files\Sublime Text 3\subl.exe | "@object"
label:changeset:branch | Create new code review... | /usr/bin/createcodereview | "@object@@repository" @wkpath
item | Preview with PhotoScape | %PHOTOSCAPE_PATH% | "@object"
Last updated
February 4, 2022
October 4, 2021
September 21, 2020
September 14, 2020
June 08, 2020
May 25, 2020
March 16, 2020
February 25, 2020
February 24, 2020
- We edited the merge from this branch to and merge from this changeset commands to highlight that the merge-to command supports full conflict resolution.
- We remaned the Replication submenu item in the Branches and Branch Explorer context menu to Push/Pull so it's a bit easier to find when you're looking for the various Push and Pull options.
February 20, 2020
January 31, 2020
- Now, you can filter on one column besides filtering on all the columns in the view.
-
The Code Review system documentation is now completely updated!
- We edited the Code Review view chapter to update the statuses of the code reviews. We also included some examples of custom queries to filter code reviews.
-
We completely have redone the Code Review window chapter.
Here you will learn:
- How to add comments, ask questions or request changes.
- How to visualize comments.
- How to apply the changes requested by the reviewer.
- How to review branches changeset by changeset.
January 27, 2020
- Plastic tries to find code moved between files automatically in the Diff Window. If there are, a notification message Code moved between files detected! shows.
- Plastic only finds refactors automatically for less than 50 files. Up to that, the button Analyze refactors appears to launch the refactors. Note that analyzing refactors can be a time/resource consuming operation.
January 23, 2020
- We edited the explanation of the Create new attribute command to show you how to specify a list of values for an attribute. You can also specify this list when editing an existing attribute.
- You can now see Linux and macOS screenshots related to the text diff editable feature .
January 22, 2020
- The Preferences window documentation is now completely updated.
- We also updated the Commands for Source-Controlled Items in the Workspace Explorer. We documented two context menu options:
January 21, 2020
- We renamed the Apply local change context menu option in the Pending Changes view to Checkout.
- Updated the screenshots of the Create new attribute dialog. Check how it looks like now for Windows, Linux, and macOS.
November 13, 2019
February 27, 2019
November 30, 2018
May 18, 2018
May 16, 2018
- The option Compare files contents instead of timestamps when determining "Changed" status is now Check content (hash) when the file timestamp is modified to set it as "Changed". This is a better name for what this option does.
- The option Find changed files in workspace before merge takes into account the Allow to merge with pending changes preference.
May 8, 2018
- The new Branch Explorer design.
- A Branch Explorer view cleaner: added a date picker for quick filter; added a push button to quick show/hide relevant changests; navigator and statistics buttons moved to the "Display options" panel; and more.
- How to create new attributes and apply them directly from the Linux (GTK) and Mac OS GUIs.
February 12, 2018
January 29, 2018
November 21, 2017
-
This actions will appear appended to the Open menu item submenu in:
- Workspace Explorer - controlled and private items.
- Pending changes view.
- History view (only Windows).
- This actions will apear as a new menu item called External tools in:
September 28, 2017
July 18, 2017
June 16, 2017
June 02, 2017
- Now, the Display branch task info option will show the task info linked to the issue tracker or the branch comment.
- You can now multi-select and search changesets and branches on the Branch Explorer.
- The Diff selected changesets command is now explained.
June 01, 2017
May 12, 2017
For example, you can see this new combo in:
- Repositories view
- Create new repository dialog
- The repository selection dialog and the server selection in the Replication dialog
April 26, 2017
April 20, 2017
April 5, 2017
March 16, 2017
January 24, 2017
June 22, 2016
June 7, 2016
writable.conf y readonly.conf files work when customizing the read-only attribute of your workspace files when performing update and checkin operations.- The deleted regions are now represented in the editors.
- In the Merge tool, when the conflict is pending to solve, a red line around the conflict is displayed. Once the conflict is solved, the line turned to green.
- In the Merge tool, a new option has been added in the editor options menu to allow the user to view border lines for unselected regions.
- The Merge window toolbar has been updated by adding new options.
- All the screenshots in the 3-way merge chapter have been updated to show you the new look of this tool.
June 2, 2016
November 23, 2015
October 15, 2015
- Learn how the Semantic mode works and what is the Visual diff feature.
- The built-in semantic diff shows how Plastic SCM understands the code.
- The edition is enabled in the Diff Window.
- The analyze refactors feature has been added to let you track the refactor and diff it correctly.
August 26, 2015
July 9, 2015
- Create submodule repositories and list them as a tree view.
- List the repositories of any Plastic SCM server.